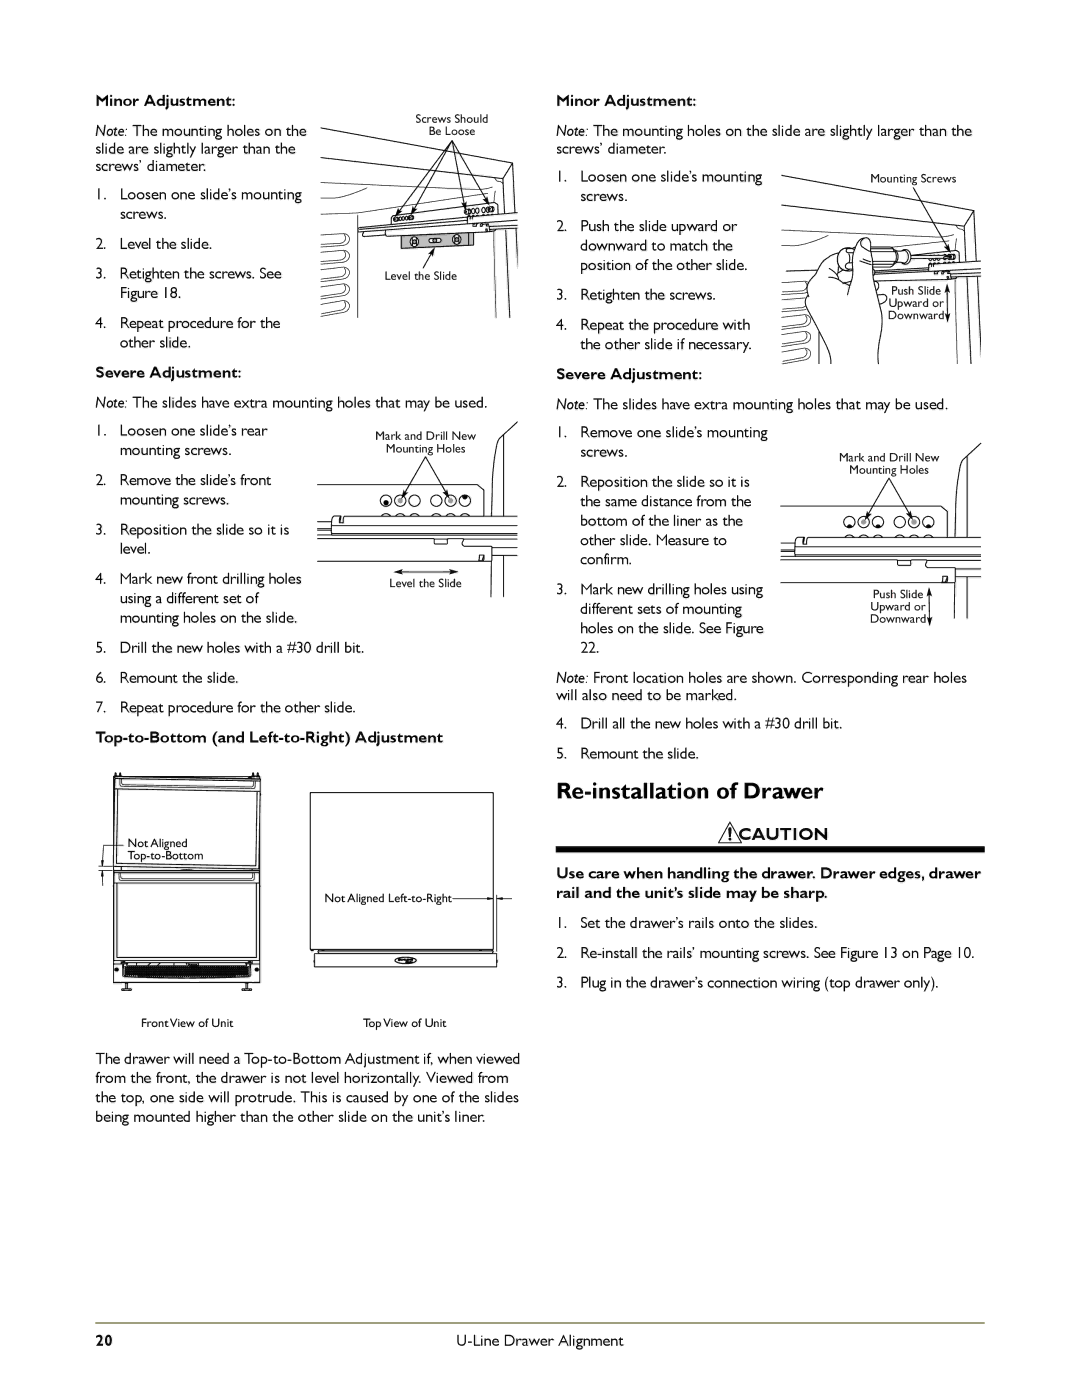
Minor Adjustment:

Note: The mounting holes on the slide are slightly larger than the screws’ diameter.

Screws Should

Be Loose

Minor Adjustment:

Note: The mounting holes on the slide are slightly larger than the screws’ diameter.

1.Loosen one slide’s mounting screws.

2.Level the slide.

3.Retighten the screws. See Figure 18.

4.Repeat procedure for the other slide.

Severe Adjustment:

Level the Slide

1.Loosen one slide’s mounting screws.

2.Push the slide upward or downward to match the position of the other slide.

3.Retighten the screws.

4.Repeat the procedure with the other slide if necessary.

Severe Adjustment:

Mounting Screws

Push Slide

Upward or

Downward

Note: The slides have extra mounting holes that may be used.

Note: The slides have extra mounting holes that may be used.

1.

Loosen one slide’s rear

Mark and Drill New


mounting screws.

Mounting Holes

2.

Remove the slide’s front


mounting screws.


3.

Reposition the slide so it is


level.


4.

Mark new front drilling holes

Level the Slide


using a different set of


mounting holes on the slide.

5. Drill the new holes with a #30 drill bit.

1.Remove one slide’s mounting screws.

2.Reposition the slide so it is the same distance from the bottom of the liner as the other slide. Measure to confirm.

3.Mark new drilling holes using different sets of mounting holes on the slide. See Figure 22.

Mark and Drill New

Mounting Holes

Push Slide

Upward or

Downward

6.

Remount the slide.

7.

Repeat procedure for the other slide.

Top-to-Bottom (and Left-to-Right) Adjustment

Not Aligned

Top-to-Bottom

Not Aligned Left-to-Right

FrontView of Unit

TopView of Unit

The drawer will need a Top-to-Bottom Adjustment if, when viewed from the front, the drawer is not level horizontally. Viewed from the top, one side will protrude. This is caused by one of the slides being mounted higher than the other slide on the unit’s liner.

Note: Front location holes are shown. Corresponding rear holes will also need to be marked.

4.Drill all the new holes with a #30 drill bit.

5.Remount the slide.

Re-installation of Drawer

CAUTION

Use care when handling the drawer. Drawer edges, drawer rail and the unit’s slide may be sharp.

1.Set the drawer’s rails onto the slides.

2.Re-install the rails’ mounting screws. See Figure 13 on Page 10.

3.Plug in the drawer’s connection wiring (top drawer only).

20

U-Line Drawer Alignment

Page 22
Image 22
U-Line C2275DWR, CO2175FF, 2175RF manual Re-installation of Drawer, Top-to-Bottom and Left-to-Right Adjustment

C2275DWR, 2175RF, CO2175FF specifications

The U-Line CO2175FF and 2175RF are two of the standout offerings in U-Line’s expansive portfolio of beverage centers, designed to provide both functionality and elegance in residential and commercial settings. Known for their commitment to quality and innovation, U-Line has crafted these models to meet the diverse needs of modern consumers.

The CO2175FF features a dual zone temperature management system, allowing users to store wine and beverages at optimal temperatures. With a precise range from 34°F to 60°F, it ensures that your collections will be preserved perfectly, making it ideal for wine enthusiasts and casual drinkers alike. The refrigerator is equipped with a stainless steel exterior, which not only provides a sleek and sophisticated look but also ensures durability. The glass door is UV-resistant, protecting your beverages from harmful light exposure.

On the other hand, the U-Line 2175RF model focuses on a robust refrigeration system designed for maximum storage capacity. This model features adjustable shelving that provides flexibility to accommodate bottles of various sizes, from standard wine bottles to larger formats. With a total capacity of approximately 24 wine bottles, it gives ample space for your collection while maintaining easy access to all your favorites.

Both models boast a quiet operation and are designed to be energy-efficient, making them ideal for those looking to minimize their environmental impact without sacrificing performance. With state-of-the-art technology such as the touch control panel, users can easily adjust settings and monitor temperature conditions, ensuring peace of mind when it comes to beverage storage.

The U-Line CO2175FF and 2175RF also feature built-in LED lighting, which not only enhances visibility but also adds a touch of ambiance to any room. Users can enjoy their favorite drinks in style, thanks to the elegant interior design.

In summary, the U-Line CO2175FF and 2175RF models represent the perfect blend of style and functionality. With features like dual temperature zones, adjustable shelving, and energy-efficient technology, they cater to the needs of modern beverage storage, making them an excellent choice for any home or business. Whether entertaining guests or simply enjoying a quiet evening, these beverage centers offer a sophisticated solution for all your storage needs.