OWNER’S MANUAL
OPERATING
FIREPLACE
FOR YOUR SAFETY
READ BEFORE
LIGHTING
![]() WARNING: If you do not fol- low these instructions exactly, a fire or explosion may result caus- ing property damage, personal injury or loss of life.
WARNING: If you do not fol- low these instructions exactly, a fire or explosion may result caus- ing property damage, personal injury or loss of life.
A.This appliance has a pilot which must be lighted by hand. When lighting the pilot, follow these instructions exactly.
B.BEFORE LIGHTING smell all around the appliance area for gas. Be sure to smell next to the floor because some gas is heavier than air and will settle on the floor.
WHAT TO DO IF YOU SMELL GAS
•Do not try to light any appliance.
•Do not touch any electric switch; do not use any phone in your building.
•Immediately call your gas supplier from a neighbor's phone. Follow the gas supplier's instructions.
C.Use only your hand to push in or turn the gas control knob. Never use tools. If the knob will not push in or turn by hand, don't try to repair it, call a quali- fied service technician. Force or at- tempted repair may result in a fire or explosion.
D.Do not use this appliance if any part has been under water. Immediately call a qualified service technician to inspect the appliance and to replace any part of the control system and any gas con- trol which has been under water.
LIGHTING
INSTRUCTIONS
1. | STOP! Read the safety information in |
| column one. |
2. | Open lower louver panel. |
3. | Disconnect the wire that runs from TH |
| to TPTH from the valve. |
4. | Turn off all electric power to the |
| fireplace. |
5. | Push in gas control knob slightly and |
6.Wait five (5) minutes to clear out any gas. Then smell for gas, including near the floor. If you smell gas, STOP! Fol- low “B” in the safety information in column one. If you don't smell gas, go to the next step.
7.The pilot is located by the main burner and should not require accessing for lighting.
8.Turn gas control knob counterclock-
wise ![]() to “PILOT”.
to “PILOT”.
9.Push in gas control knob all the way and hold. Immediately light the pilot by re- peatedly depressing the piezo spark ig- nitor until a flame appears. Continue to hold for about one (1) minute after the pilot is lit. Release gas control knob and it will pop back. Pilot should remain lit. If it goes out, repeat steps 5 through 8.
•If gas control knob does not pop up when released, stop and immediately call your service technician or gas supplier.
•If the pilot will not stay lit after sev- eral tries, turn the gas control knob to “OFF” and call your service tech- nician or gas supplier.
10.Reconnect the wire that runs from TH to TPTH from the valve.
11.Turn on all electric power to the fireplace.
12.Turn gas control knob counterclock-
wise ![]() to “ON”.
to “ON”.
13.This valve is equipped with a HI/LO feature. Set fireplace input as desired.
14.Close lower louver panel.
TO TURN OFF GAS
TO APPLIANCE
1.Open lower louver panel.
2a. If Using Optional ON/OFF Switch:
Turn ON/OFF switch to “OFF”.
2b. If Using Optional
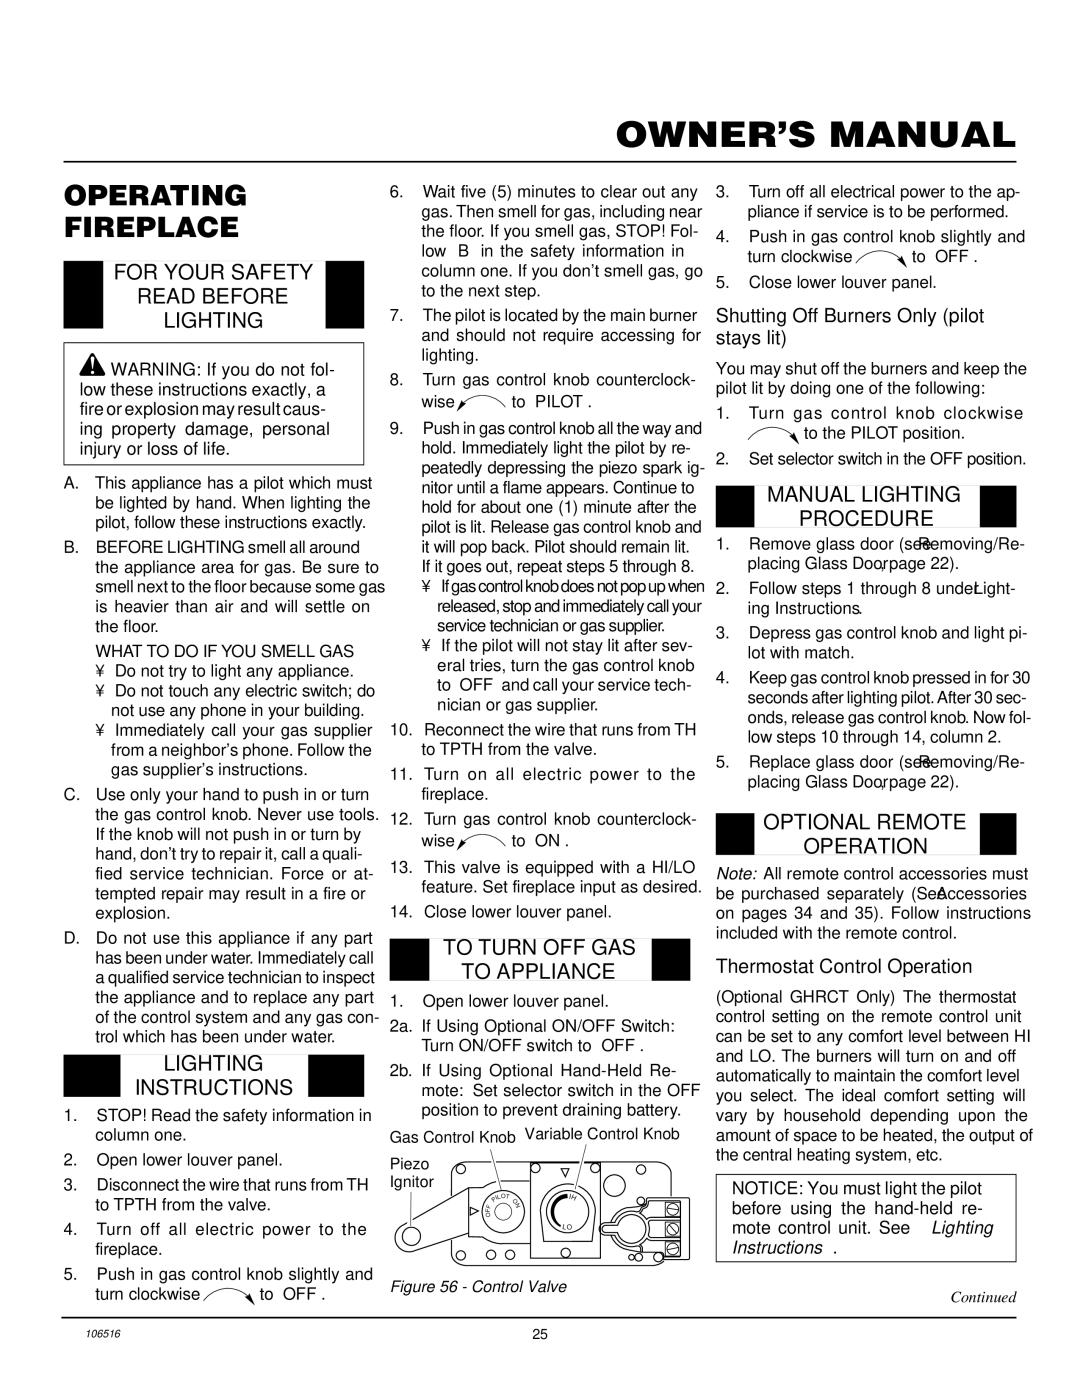
Gas Control Knob Variable Control Knob
Piezo
Ignitor
IL T | IH |
O |
|
P | O |
F | N |
F |
|
O |
|
| LO |
3.Turn off all electrical power to the ap- pliance if service is to be performed.
4.Push in gas control knob slightly and
turn clockwise ![]() to “OFF”.
to “OFF”.
5.Close lower louver panel.
Shutting Off Burners Only (pilot stays lit)
You may shut off the burners and keep the pilot lit by doing one of the following:
1.Turn gas control knob clockwise ![]() to the PILOT position.
to the PILOT position.
2.Set selector switch in the OFF position.
MANUAL LIGHTING
PROCEDURE
1.Remove glass door (see Removing/Re- placing Glass Door, page 22).
2.Follow steps 1 through 8 under Light- ing Instructions.
3.Depress gas control knob and light pi- lot with match.
4.Keep gas control knob pressed in for 30 seconds after lighting pilot. After 30 sec- onds, release gas control knob. Now fol- low steps 10 through 14, column 2.
5.Replace glass door (see Removing/Re- placing Glass Door, page 22).
OPTIONAL REMOTE
OPERATION
Note: All remote control accessories must be purchased separately (See Accessories on pages 34 and 35). Follow instructions included with the remote control.
Thermostat Control Operation
(Optional GHRCT Only) The thermostat control setting on the remote control unit can be set to any comfort level between HI and LO. The burners will turn on and off automatically to maintain the comfort level you select. The ideal comfort setting will vary by household depending upon the amount of space to be heated, the output of the central heating system, etc.
NOTICE: You must light the pilot before using the
turn clockwise | to “OFF”. |
Figure 56 - Control Valve
Continued
106516 | 25 |