®
UNVENTED 32" LogMate® FIREBOX
INSTALLATION
2. Place the blower against lower rear wall |
of firebox wrapper with the exhaust |
Continued
Note:
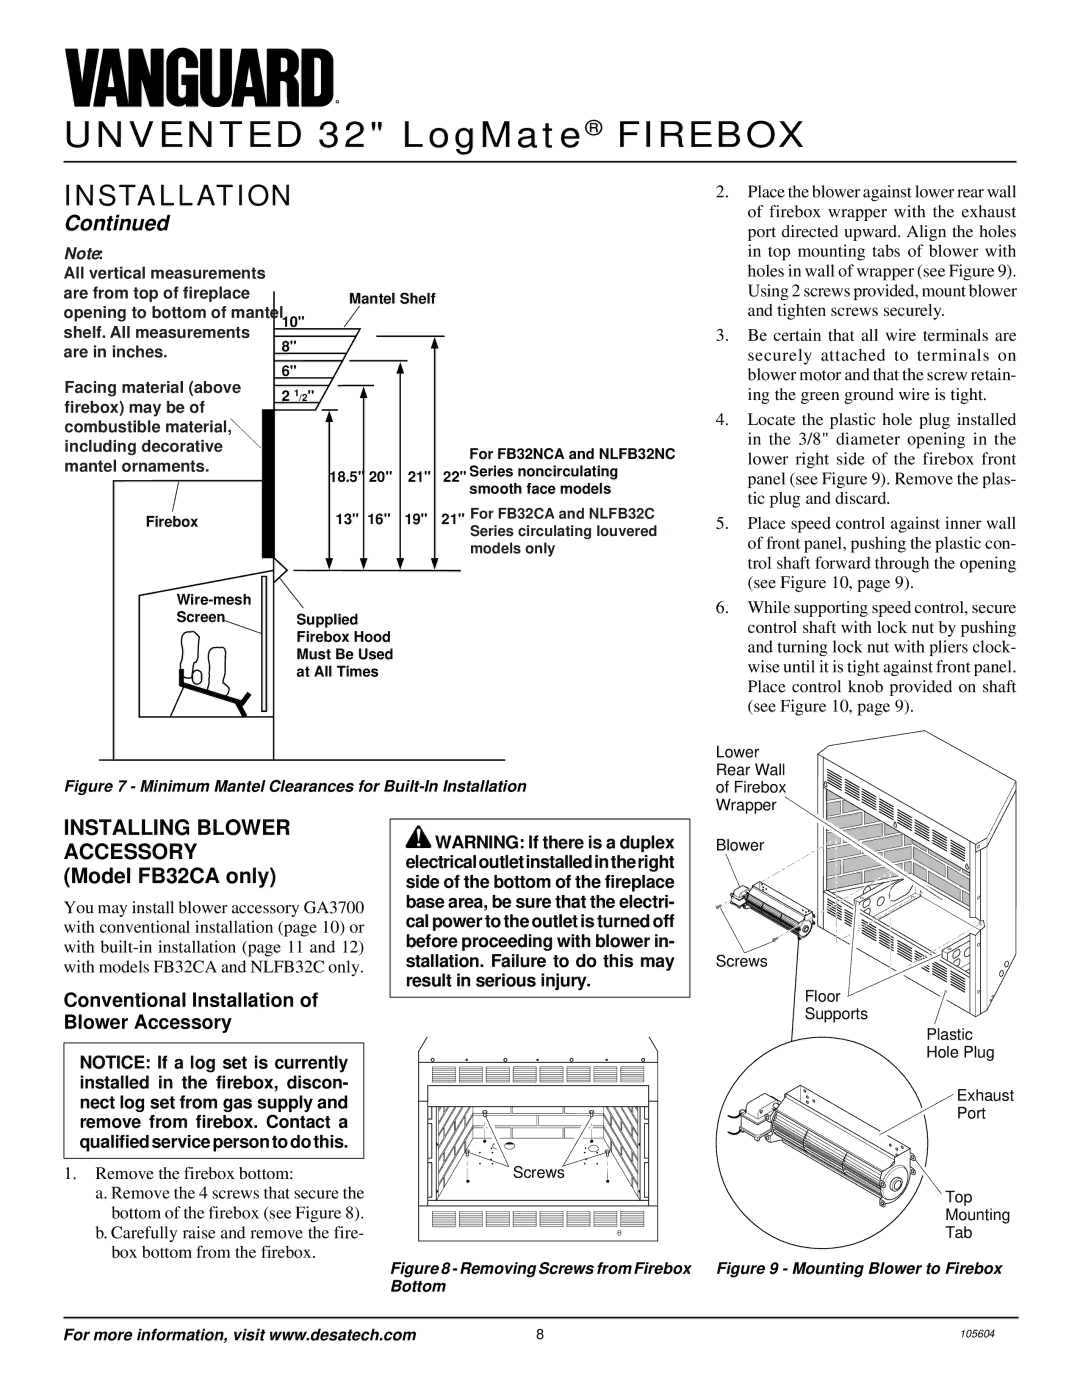
All vertical measurements are from top of fireplace opening to bottom of mantel shelf. All measurements are in inches.
Facing material (above firebox) may be of combustible material, including decorative mantel ornaments.
Firebox
Screen
Mantel Shelf
10"
8"
6"
2 1/2"
For FB32NCA and NLFB32NC
18.5" 20" 21" 22" Series noncirculating smooth face models
13" 16" 19" 21" For FB32CA and NLFB32C Series circulating louvered
models only
Supplied
Firebox Hood
Must Be Used
at All Times
port directed upward. Align the holes |
in top mounting tabs of blower with |
holes in wall of wrapper (see Figure 9). |
Using 2 screws provided, mount blower |
and tighten screws securely. |
3. Be certain that all wire terminals are |
securely attached to terminals on |
blower motor and that the screw retain- |
ing the green ground wire is tight. |
4. Locate the plastic hole plug installed |
in the 3/8" diameter opening in the |
lower right side of the firebox front |
panel (see Figure 9). Remove the plas- |
tic plug and discard. |
5. Place speed control against inner wall |
of front panel, pushing the plastic con- |
trol shaft forward through the opening |
(see Figure 10, page 9). |
6. While supporting speed control, secure |
control shaft with lock nut by pushing |
and turning lock nut with pliers clock- |
wise until it is tight against front panel. |
Place control knob provided on shaft |
(see Figure 10, page 9). |
Figure 7 - Minimum Mantel Clearances for Built-In Installation
Lower
Rear Wall
of Firebox
Wrapper
INSTALLING BLOWER ACCESSORY (Model FB32CA only)
You may install blower accessory GA3700 with conventional installation (page 10) or with
Conventional Installation of Blower Accessory
NOTICE: If a log set is currently installed in the firebox, discon- nect log set from gas supply and remove from firebox. Contact a qualified service person to do this.
1.Remove the firebox bottom:
a.Remove the 4 screws that secure the bottom of the firebox (see Figure 8).
b.Carefully raise and remove the fire- box bottom from the firebox.
![]() WARNING: If there is a duplex electricaloutletinstalledintheright side of the bottom of the fireplace base area, be sure that the electri- cal power to the outlet is turned off before proceeding with blower in- stallation. Failure to do this may result in serious injury.
WARNING: If there is a duplex electricaloutletinstalledintheright side of the bottom of the fireplace base area, be sure that the electri- cal power to the outlet is turned off before proceeding with blower in- stallation. Failure to do this may result in serious injury.
Screws |
Blower
Screws
Floor
Supports
Plastic
Hole Plug
Exhaust
Port
Top
Mounting
Tab
Figure 8 - Removing Screws from Firebox Figure 9 - Mounting Blower to Firebox Bottom
For more information, visit www.desatech.com | 8 | 105604 |
