VEC157CFL_Manual_013205 5/2/05 6:50 PM Page 6
WARNING
•NEVER SIMULTANEOUSLY CONNECT AC/DC AND DC/DC CHARGERS TO SPOTLIGHT.
Operation of the LED Area Lights
The ON/OFF switch for the LED Area lights is located on the top of the spotlight.
ON/OFF
SWITCH
To use the lights, simply push the button.
Using the Built-In Carry Lanyard
The lanyard may be used to store or carry the spotlight. Adjust the slide on the cords to keep the lanyard secure around the supporting object.
CARRY
![]() LANYARD
LANYARD
Using the Built-In Stand
Turn the spotlight
WORKSTAND/
CARRY HANDLE
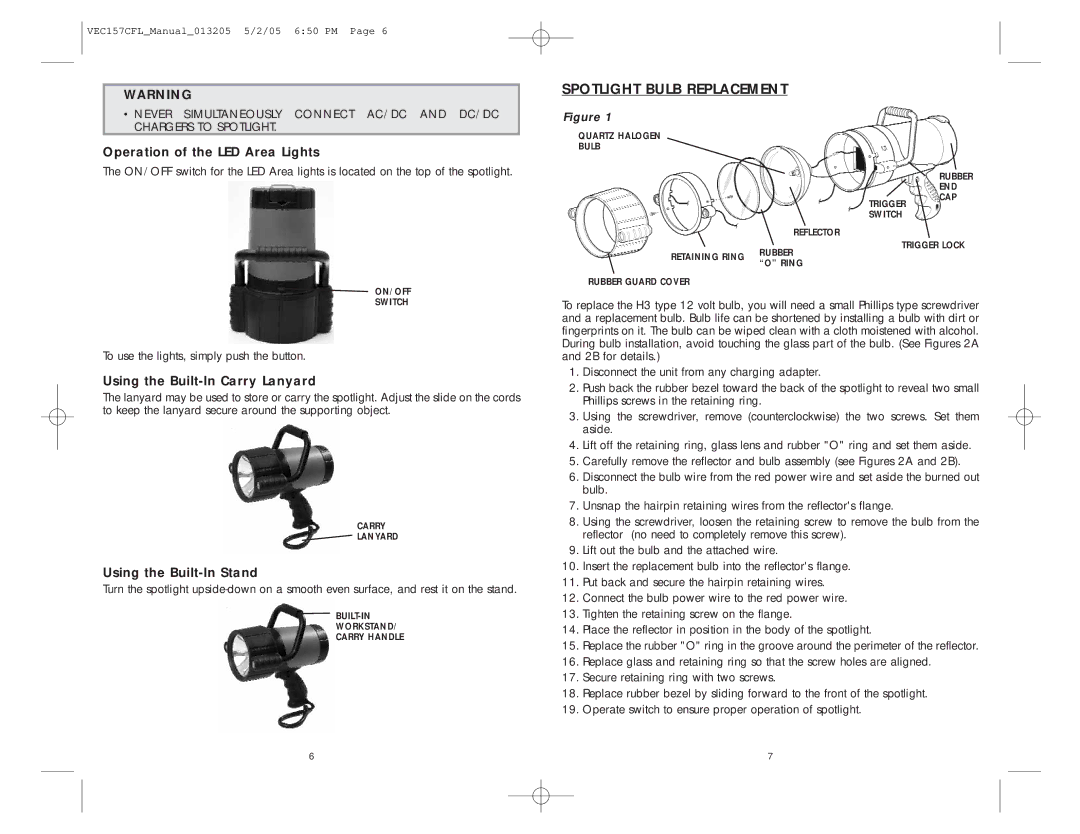
SPOTLIGHT BULB REPLACEMENT
Figure 1
QUARTZ HALOGEN
BULB
|
| RUBBER |
|
| END |
| TRIGGER | CAP |
|
| |
| SWITCH |
|
| REFLECTOR |
|
| TRIGGER LOCK | |
RETAINING RING | RUBBER |
|
“O” RING |
| |
|
| |
RUBBER GUARD COVER
To replace the H3 type 12 volt bulb, you will need a small Phillips type screwdriver and a replacement bulb. Bulb life can be shortened by installing a bulb with dirt or fingerprints on it. The bulb can be wiped clean with a cloth moistened with alcohol. During bulb installation, avoid touching the glass part of the bulb. (See Figures 2A and 2B for details.)
1.Disconnect the unit from any charging adapter.
2.Push back the rubber bezel toward the back of the spotlight to reveal two small Phillips screws in the retaining ring.
3.Using the screwdriver, remove (counterclockwise) the two screws. Set them aside.
4.Lift off the retaining ring, glass lens and rubber "O" ring and set them aside.
5.Carefully remove the reflector and bulb assembly (see Figures 2A and 2B).
6.Disconnect the bulb wire from the red power wire and set aside the burned out bulb.
7.Unsnap the hairpin retaining wires from the reflector's flange.
8.Using the screwdriver, loosen the retaining screw to remove the bulb from the reflector (no need to completely remove this screw).
9.Lift out the bulb and the attached wire.
10.Insert the replacement bulb into the reflector's flange.
11.Put back and secure the hairpin retaining wires.
12.Connect the bulb power wire to the red power wire.
13.Tighten the retaining screw on the flange.
14.Place the reflector in position in the body of the spotlight.
15.Replace the rubber "O" ring in the groove around the perimeter of the reflector.
16.Replace glass and retaining ring so that the screw holes are aligned.
17.Secure retaining ring with two screws.
18.Replace rubber bezel by sliding forward to the front of the spotlight.
19.Operate switch to ensure proper operation of spotlight.
6 | 7 |
