1.
2.

Control remote

Control remote

Colocación de pilas

Antes de utilizar el control remoto, colóquele las pilas. Si el control remoto comienza a funcionar mal, pruebe reemplazando las pilas. Cuando no vaya a utilizar el control remoto

durante mucho tiempo, extráigale las pilas y guárdelas en un lugar seguro.

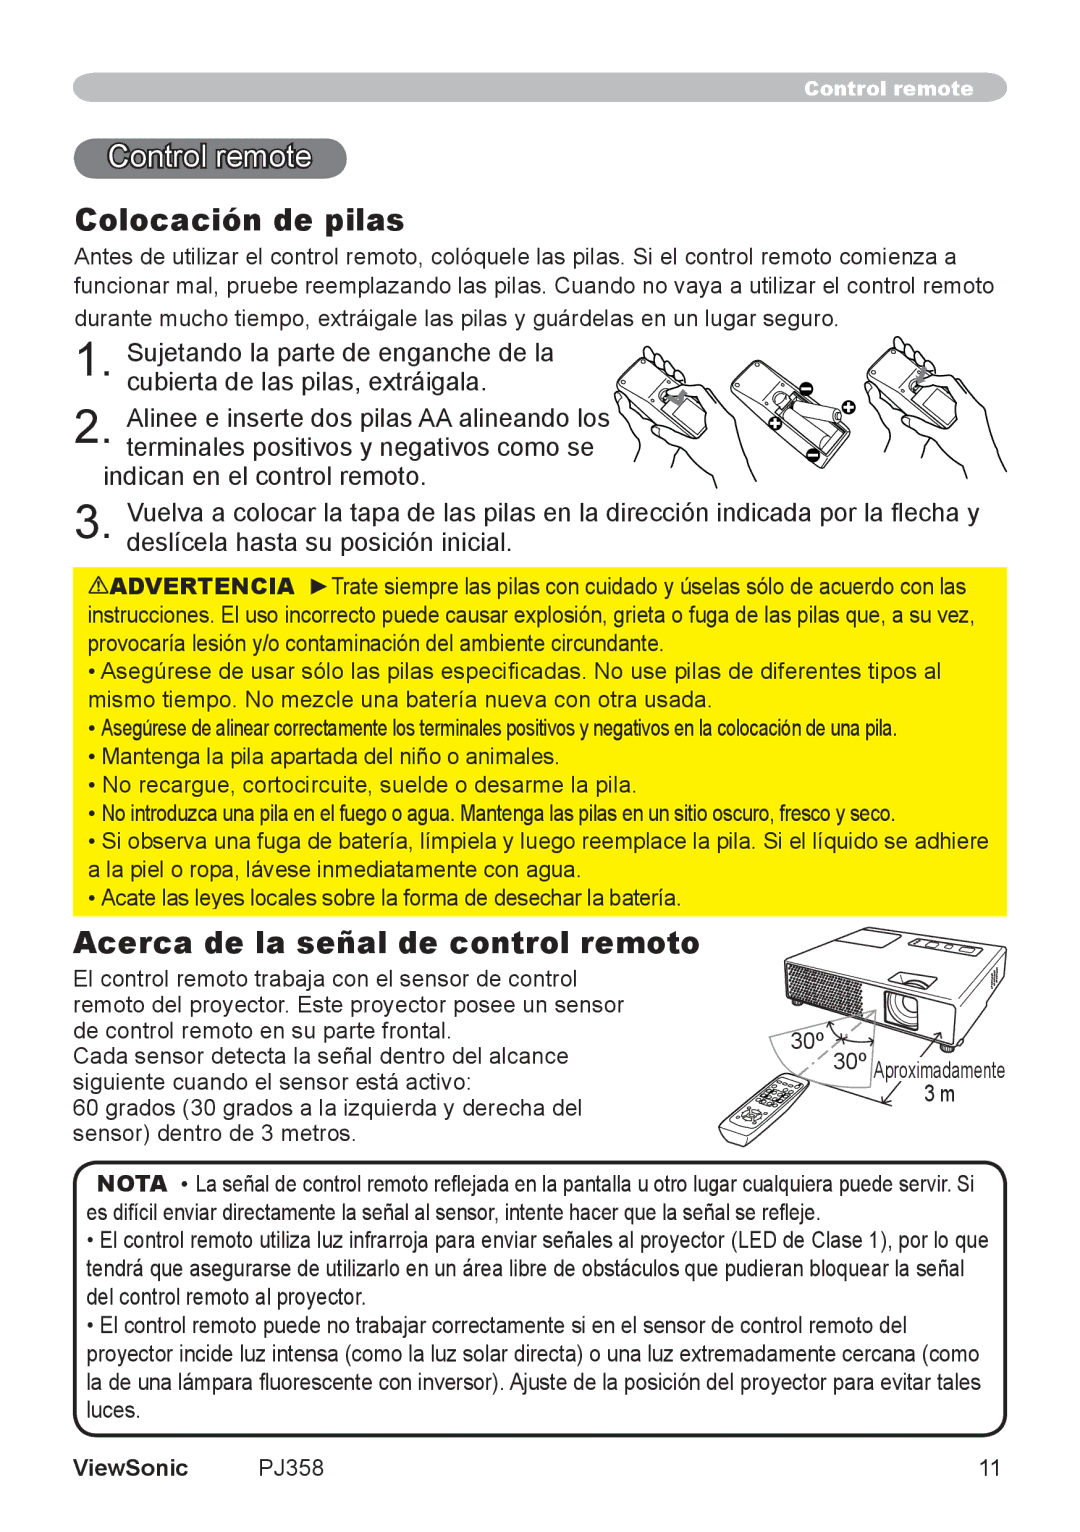
Sujetando la parte de enganche de la cubierta de las pilas, extráigala.

Alinee e inserte dos pilas AA alineando los terminales positivos y negativos como se

indican en el control remoto.

3. Vuelva a colocar la tapa de las pilas en la dirección indicada por la flecha y deslícela hasta su posición inicial.

ADVERTENCIA ►Trate siempre las pilas con cuidado y úselas sólo de acuerdo con las instrucciones. El uso incorrecto puede causar explosión, grieta o fuga de las pilas que, a su vez, provocaría lesión y/o contaminación del ambiente circundante.

Asegúrese de usar sólo las pilas especificadas. No use pilas de diferentes tipos al mismo tiempo. No mezcle una batería nueva con otra usada.

Asegúrese de alinear correctamente los terminales positivos y negativos en la colocación de una pila.

Mantenga la pila apartada del niño o animales.

No recargue, cortocircuite, suelde o desarme la pila.

No introduzca una pila en el fuego o agua. Mantenga las pilas en un sitio oscuro, fresco y seco.

Si observa una fuga de batería, límpiela y luego reemplace la pila. Si el líquido se adhiere a la piel o ropa, lávese inmediatamente con agua.

Acate las leyes locales sobre la forma de desechar la batería.

Acerca de la señal de control remoto

El control remoto trabaja con el sensor de control remoto del proyector. Este proyector posee un sensor de control remoto en su parte frontal.

Cada sensor detecta la señal dentro del alcance siguiente cuando el sensor está activo:

60 grados (30 grados a la izquierda y derecha del sensor) dentro de 3 metros.

30º 30º Aproximadamente 3 m

NOTA • La señal de control remoto reflejada en la pantalla u otro lugar cualquiera puede servir. Si es difícil enviar directamente la señal al sensor, intente hacer que la señal se refleje.

El control remoto utiliza luz infrarroja para enviar señales al proyector (LED de Clase 1), por lo que tendrá que asegurarse de utilizarlo en un área libre de obstáculos que pudieran bloquear la señal del control remoto al proyector.

El control remoto puede no trabajar correctamente si en el sensor de control remoto del proyector incide luz intensa (como la luz solar directa) o una luz extremadamente cercana (como la de una lámpara fluorescente con inversor). Ajuste de la posición del proyector para evitar tales luces.

ViewSonic

PJ358

11

Page 16
Image 16
ViewSonic VS11611, PJ358 manual Control remote, Colocación de pilas, Acerca de la señal de control remoto

PJ358, VS11611 specifications

ViewSonic is well-known for its innovative display technologies, and the VS11611, PJ358 model is no exception. This projector is designed with a variety of advanced features aimed at enhancing the viewing experience, making it suitable for both professional and personal use.

One of the standout features of the ViewSonic VS11611, PJ358 is its impressive brightness level. With a robust lumens rating, this projector ensures that images remain vivid and clear even in well-lit environments. This capability is particularly beneficial for presentations in conference rooms or educational settings where ambient light is prevalent.

The PJ358 incorporates DLP (Digital Light Processing) technology, which ensures high-quality image projection with sharp colors and deep contrasts. This technology minimizes the rainbow effect that some projectors exhibit, providing a smooth and crisp image that is pleasing to the eye. Additionally, the projector supports a full HD resolution, allowing users to enjoy clear visuals that enhance the overall viewing experience.

Another significant characteristic of the ViewSonic VS11611, PJ358 is its lightweight and portable design. Weighing only a few kilograms, this projector is easy to transport, making it a suitable choice for mobile presentations. The compact profile means that it can easily fit into a bag or case, making it ideal for professionals who need to set up in different locations.

Connectivity options are also a highlight of this model. The PJ358 is equipped with multiple input options, including HDMI and VGA ports, allowing it to connect seamlessly with a range of devices such as laptops, tablets, and media players. This versatility ensures that users can quickly switch between different source devices with ease.

In terms of user-friendly features, the ViewSonic VS11611, PJ358 includes an intuitive interface and simple remote control. This makes it easy for anyone to operate the projector, regardless of their technical expertise. The projector also comes with built-in speakers, enhancing convenience for those who wish to present without external audio equipment.

Overall, the ViewSonic VS11611, PJ358 projector stands out due to its combination of advanced technology, portability, and user-centric features. Its outstanding performance in various settings makes it a reliable choice for anyone looking to enhance their presentation capabilities or enjoy high-quality media viewing at home. Whether for business meetings, classrooms, or personal entertainment, the PJ358 is a versatile tool that delivers exceptional results.