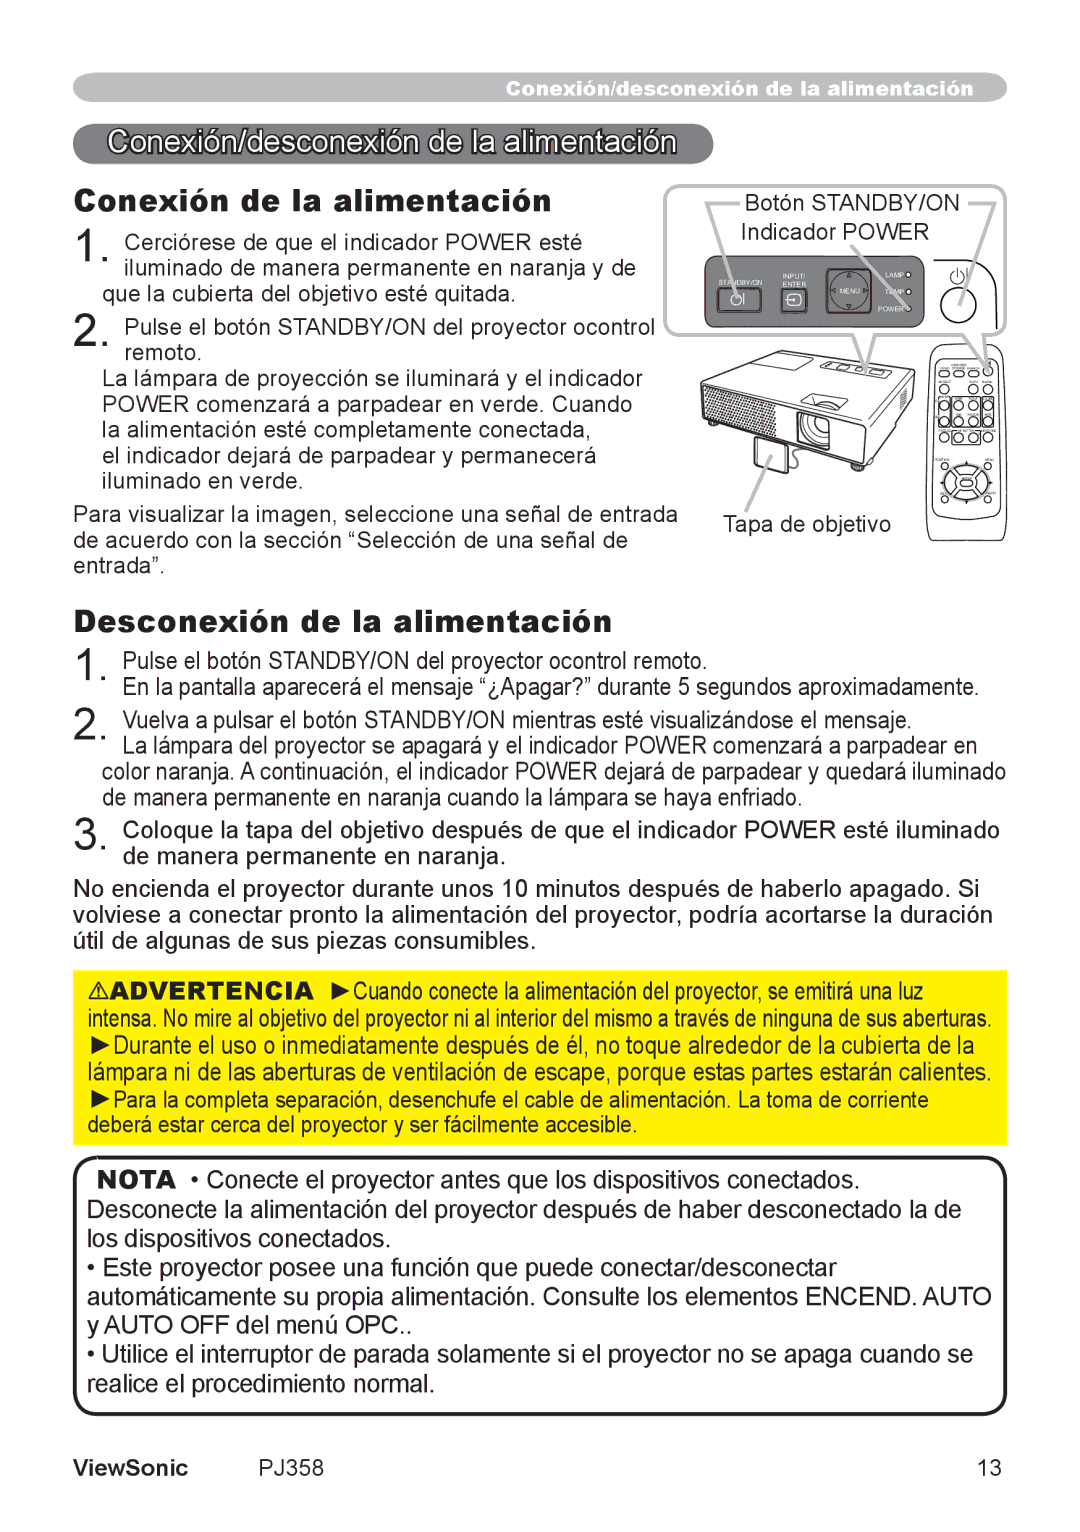
Coloque la tapa del objetivo después de que el indicador POWER esté iluminado de manera permanente en naranja.

Conexión/desconexión de la alimentación

Conexión/desconexión de la alimentación

Conexión de la alimentación

1. Cerciórese de que el indicador POWER esté iluminado de manera permanente en naranja y de

que la cubierta del objetivo esté quitada.

2. Pulse el botón STANDBY/ON del proyector ocontrol remoto.

La lámpara de proyección se iluminará y el indicador POWER comenzará a parpadear en verde. Cuando la alimentación esté completamente conectada,

el indicador dejará de parpadear y permanecerá iluminado en verde.

Botón STANDBY/ON Indicador POWER

INPUT/LAMP

STANDBY/ON ENTER

MENU TEMP

POWER


COMPUTER/


VIDEO

STORAGE

SEARCH


ASPECT


AUTO

BLANK

MAGNIFY

HOME

PAGE UP

VOLUME

ON

OFF

END

PAGE DOWN

MUTE

FREEZE

MY BUTTON

KEYSTONE


1

2


POSITION


MENU


ENTER


ESC


RESET

Para visualizar la imagen, seleccione una señal de entrada

Tapa de objetivo

de acuerdo con la sección “Selección de una señal de


entrada”.


Desconexión de la alimentación

1. Pulse el botón STANDBY/ON del proyector ocontrol remoto.

En la pantalla aparecerá el mensaje “¿Apagar?” durante 5 segundos aproximadamente.

2. Vuelva a pulsar el botón STANDBY/ON mientras esté visualizándose el mensaje.

La lámpara del proyector se apagará y el indicador POWER comenzará a parpadear en color naranja. A continuación, el indicador POWER dejará de parpadear y quedará iluminado

3.de manera permanente en naranja cuando la lámpara se haya enfriado.

No encienda el proyector durante unos 10 minutos después de haberlo apagado. Si volviese a conectar pronto la alimentación del proyector, podría acortarse la duración útil de algunas de sus piezas consumibles.

ADVERTENCIA ►Cuando conecte la alimentación del proyector, se emitirá una luz intensa. No mire al objetivo del proyector ni al interior del mismo a través de ninguna de sus aberturas. ►Durante el uso o inmediatamente después de él, no toque alrededor de la cubierta de la lámpara ni de las aberturas de ventilación de escape, porque estas partes estarán calientes. ►Para la completa separación, desenchufe el cable de alimentación. La toma de corriente deberá estar cerca del proyector y ser fácilmente accesible.

NOTA • Conecte el proyector antes que los dispositivos conectados. Desconecte la alimentación del proyector después de haber desconectado la de los dispositivos conectados.

Este proyector posee una función que puede conectar/desconectar automáticamente su propia alimentación. Consulte los elementos ENCEND. AUTO y AUTO OFF del menú OPC..

Utilice el interruptor de parada solamente si el proyector no se apaga cuando se realice el procedimiento normal.

ViewSonic

PJ358

13

Page 18
Image 18
ViewSonic VS11611, PJ358 manual Conexión/desconexión de la alimentación, Desconexión de la alimentación, Entrada

PJ358, VS11611 specifications

ViewSonic is well-known for its innovative display technologies, and the VS11611, PJ358 model is no exception. This projector is designed with a variety of advanced features aimed at enhancing the viewing experience, making it suitable for both professional and personal use.

One of the standout features of the ViewSonic VS11611, PJ358 is its impressive brightness level. With a robust lumens rating, this projector ensures that images remain vivid and clear even in well-lit environments. This capability is particularly beneficial for presentations in conference rooms or educational settings where ambient light is prevalent.

The PJ358 incorporates DLP (Digital Light Processing) technology, which ensures high-quality image projection with sharp colors and deep contrasts. This technology minimizes the rainbow effect that some projectors exhibit, providing a smooth and crisp image that is pleasing to the eye. Additionally, the projector supports a full HD resolution, allowing users to enjoy clear visuals that enhance the overall viewing experience.

Another significant characteristic of the ViewSonic VS11611, PJ358 is its lightweight and portable design. Weighing only a few kilograms, this projector is easy to transport, making it a suitable choice for mobile presentations. The compact profile means that it can easily fit into a bag or case, making it ideal for professionals who need to set up in different locations.

Connectivity options are also a highlight of this model. The PJ358 is equipped with multiple input options, including HDMI and VGA ports, allowing it to connect seamlessly with a range of devices such as laptops, tablets, and media players. This versatility ensures that users can quickly switch between different source devices with ease.

In terms of user-friendly features, the ViewSonic VS11611, PJ358 includes an intuitive interface and simple remote control. This makes it easy for anyone to operate the projector, regardless of their technical expertise. The projector also comes with built-in speakers, enhancing convenience for those who wish to present without external audio equipment.

Overall, the ViewSonic VS11611, PJ358 projector stands out due to its combination of advanced technology, portability, and user-centric features. Its outstanding performance in various settings makes it a reliable choice for anyone looking to enhance their presentation capabilities or enjoy high-quality media viewing at home. Whether for business meetings, classrooms, or personal entertainment, the PJ358 is a versatile tool that delivers exceptional results.