VIKING COMPONENTS
MEMORY INSTALLATION GUIDE
Rambus®
RIMMsm Memory & RIMMsm Continuity Modules
Manual No. 1005299 • Release 06.2000, Rev. A
Due to the number of systems that use Rambus RIMM modules, please refer to your sys- tem’s “Owner’s Manual”or your Viking Components Authorized Dealer for its proper con- figuration.
 Caution:
Electro Static Discharge (ESD) can damage electronic components. Before touching the memory module, ensure that you are discharged of static electricity by touch- ing a grounded metal object.
INSTALLATION INSTRUCTIONS:
NOTE: All pictures regarding location are for example only and may not reflect your system.
1.Shut down your system and all other connected peripherals. Remove the power cable and all other cables from the rear of the computer.
2.Remove your computer’s cover from its chassis and perform the necessary procedures to gain access to the memory expansion slots. If you are not familiar with these procedures, please refer to your system’s “Owner’s Manual.”
3.Locate the RIMM expansion slots on the system board. Please refer to your system’s “Owner’s Manual” for the proper location of the slots. The number of expansion slots vary from machine to machine. Generally, systems that use Rambus RIMM modules have two, three or four (two channels of two) RIMM expansion slots. For machines that have two or three expansion slots, at least one expansion slot will need to be occupied with a RIMM module and the other slot or slots may be occupied with another RIMM module or continuity module. These machines can have any combi- nation of size, density, type or speed. For systems that have four RIMM expansion slots, the modules need to be installed symmetrically into both channels and in pairs. For example,channel A contains slots #1 and #2. Channel B, contains slots #3 and #4. If a RIMM module is installed into slot #1 in channel A, the same size, density, type and speed RIMM must be installed into slot #3 in Bank B. The same goes for slot #2 and #4. All slots must be occupied with a continuity module if a RIMM mod- ule is not being used.
Note: To optimize memory performance on systems that have four expansion slots, slots #1 and #3 must be populated first.
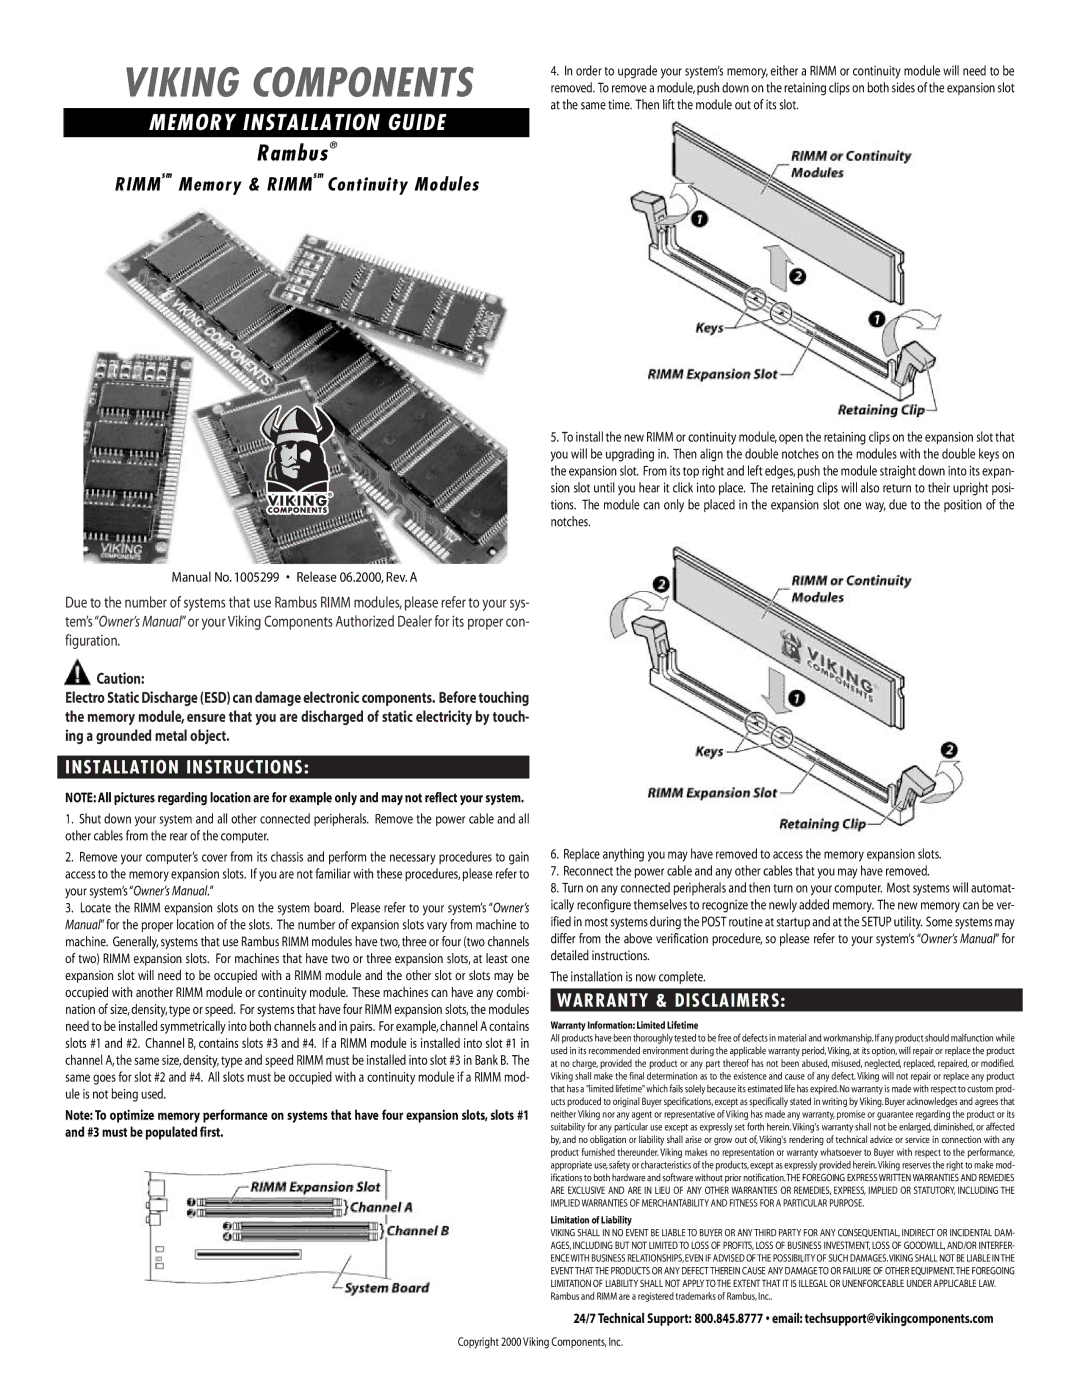
4.In order to upgrade your system’s memory, either a RIMM or continuity module will need to be removed. To remove a module,push down on the retaining clips on both sides of the expansion slot at the same time. Then lift the module out of its slot.
5.To install the new RIMM or continuity module, open the retaining clips on the expansion slot that you will be upgrading in. Then align the double notches on the modules with the double keys on the expansion slot. From its top right and left edges, push the module straight down into its expan- sion slot until you hear it click into place. The retaining clips will also return to their upright posi- tions. The module can only be placed in the expansion slot one way, due to the position of the notches.
6.Replace anything you may have removed to access the memory expansion slots.
7.Reconnect the power cable and any other cables that you may have removed.
8.Turn on any connected peripherals and then turn on your computer. Most systems will automat- ically reconfigure themselves to recognize the newly added memory. The new memory can be ver- ified in most systems during the POST routine at startup and at the SETUP utility. Some systems may differ from the above verification procedure, so please refer to your system’s “Owner’s Manual” for detailed instructions.
The installation is now complete.
WARRANTY & DISCLAIMERS:
Warranty Information: Limited Lifetime
All products have been thoroughly tested to be free of defects in material and workmanship. If any product should malfunction while used in its recommended environment during the applicable warranty period,Viking, at its option, will repair or replace the product at no charge, provided the product or any part thereof has not been abused, misused, neglected, replaced, repaired, or modified. Viking shall make the final determination as to the existence and cause of any defect. Viking will not repair or replace any product that has a "limited lifetime" which fails solely because its estimated life has expired. No warranty is made with respect to custom prod- ucts produced to original Buyer specifications, except as specifically stated in writing by Viking. Buyer acknowledges and agrees that neither Viking nor any agent or representative of Viking has made any warranty, promise or guarantee regarding the product or its suitability for any particular use except as expressly set forth herein. Viking's warranty shall not be enlarged, diminished, or affected by, and no obligation or liability shall arise or grow out of, Viking's rendering of technical advice or service in connection with any product furnished thereunder. Viking makes no representation or warranty whatsoever to Buyer with respect to the performance, appropriate use, safety or characteristics of the products, except as expressly provided herein.Viking reserves the right to make mod- ifications to both hardware and software without prior notification.THE FOREGOING EXPRESS WRITTEN WARRANTIES AND REMEDIES ARE EXCLUSIVE AND ARE IN LIEU OF ANY OTHER WARRANTIES OR REMEDIES, EXPRESS, IMPLIED OR STATUTORY, INCLUDING THE IMPLIED WARRANTIES OF MERCHANTABILITY AND FITNESS FOR A PARTICULAR PURPOSE.
Limitation of Liability
VIKING SHALL IN NO EVENT BE LIABLE TO BUYER OR ANY THIRD PARTY FOR ANY CONSEQUENTIAL, INDIRECT OR INCIDENTAL DAM- AGES, INCLUDING BUT NOT LIMITED TO LOSS OF PROFITS, LOSS OF BUSINESS INVESTMENT, LOSS OF GOODWILL, AND/OR INTERFER- ENCE WITH BUSINESS RELATIONSHIPS,EVEN IF ADVISED OF THE POSSIBILITY OF SUCH DAMAGES.VIKING SHALL NOT BE LIABLE IN THE EVENT THAT THE PRODUCTS OR ANY DEFECT THEREIN CAUSE ANY DAMAGE TO OR FAILURE OF OTHER EQUIPMENT.THE FOREGOING LIMITATION OF LIABILITY SHALL NOT APPLY TO THE EXTENT THAT IT IS ILLEGAL OR UNENFORCEABLE UNDER APPLICABLE LAW.
Rambus and RIMM are a registered trademarks of Rambus, Inc..
24/7 Technical Support: 800.845.8777 • email: techsupport@vikingcomponents.com