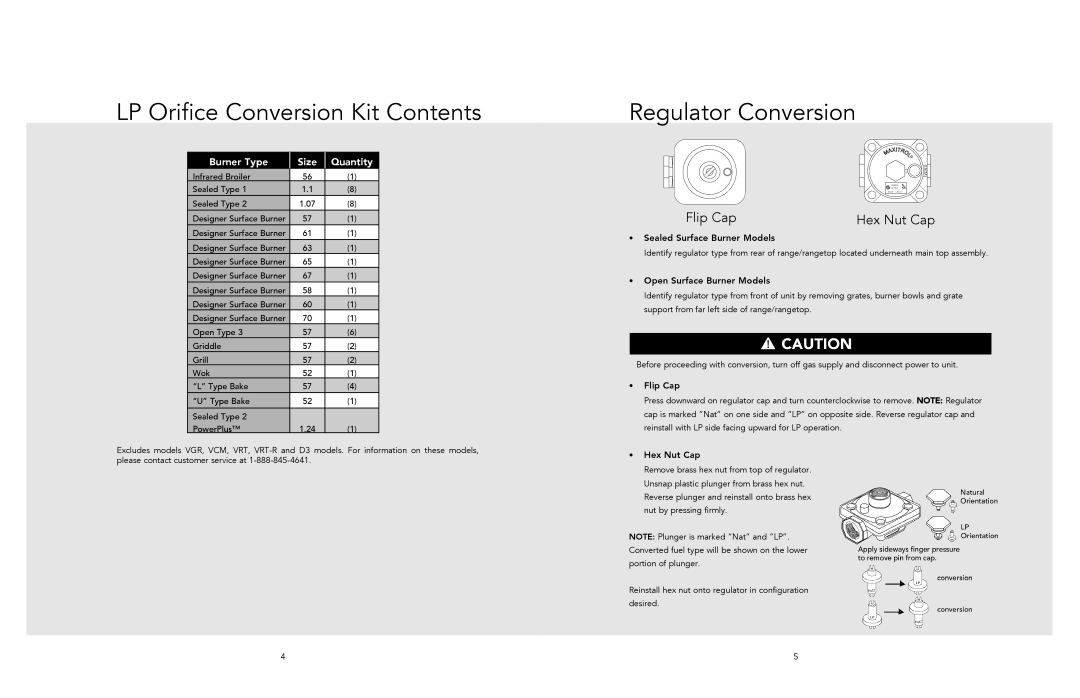
LP Orifice Conversion Kit Contents
Burner Type | Size | Quantity |
Infrared Broiler | 56 | (1) |
Sealed Type 1 | 1.1 | (8) |
Sealed Type 2 | 1.07 | (8) |
Designer Surface Burner | 57 | (1) |
Designer Surface Burner | 61 | (1) |
Designer Surface Burner | 63 | (1) |
Designer Surface Burner | 65 | (1) |
Designer Surface Burner | 67 | (1) |
Designer Surface Burner | 58 | (1) |
Designer Surface Burner | 60 | (1) |
Designer Surface Burner | 70 | (1) |
Open Type 3 | 57 | (6) |
Griddle | 57 | (2) |
Grill | 57 | (2) |
Wok | 52 | (1) |
“L” Type Bake | 57 | (4) |
“U” Type Bake | 52 | (1) |
Sealed Type 2 |
|
|
PowerPlus™ | 1.24 | (1) |
Excludes models VGR, VCM, VRT,
Regulator Conversion
Flip Cap | Hex Nut Cap |
•Sealed Surface Burner Models
Identify regulator type from rear of range/rangetop located underneath main top assembly.
•Open Surface Burner Models
Identify regulator type from front of unit by removing grates, burner bowls and grate support from far left side of range/rangetop.
Before proceeding with conversion, turn off gas supply and disconnect power to unit.
•Flip Cap
Press downward on regulator cap and turn counterclockwise to remove. NOTE: Regulator cap is marked “Nat” on one side and “LP” on opposite side. Reverse regulator cap and reinstall with LP side facing upward for LP operation.
•Hex Nut Cap
Remove brass hex nut from top of regulator. Unsnap plastic plunger from brass hex nut. Reverse plunger and reinstall onto brass hex nut by pressing firmly.
NOTE: Plunger is marked “Nat” and “LP”. Converted fuel type will be shown on the lower portion of plunger.
Reinstall hex nut onto regulator in configuration desired.
4 | 5 |