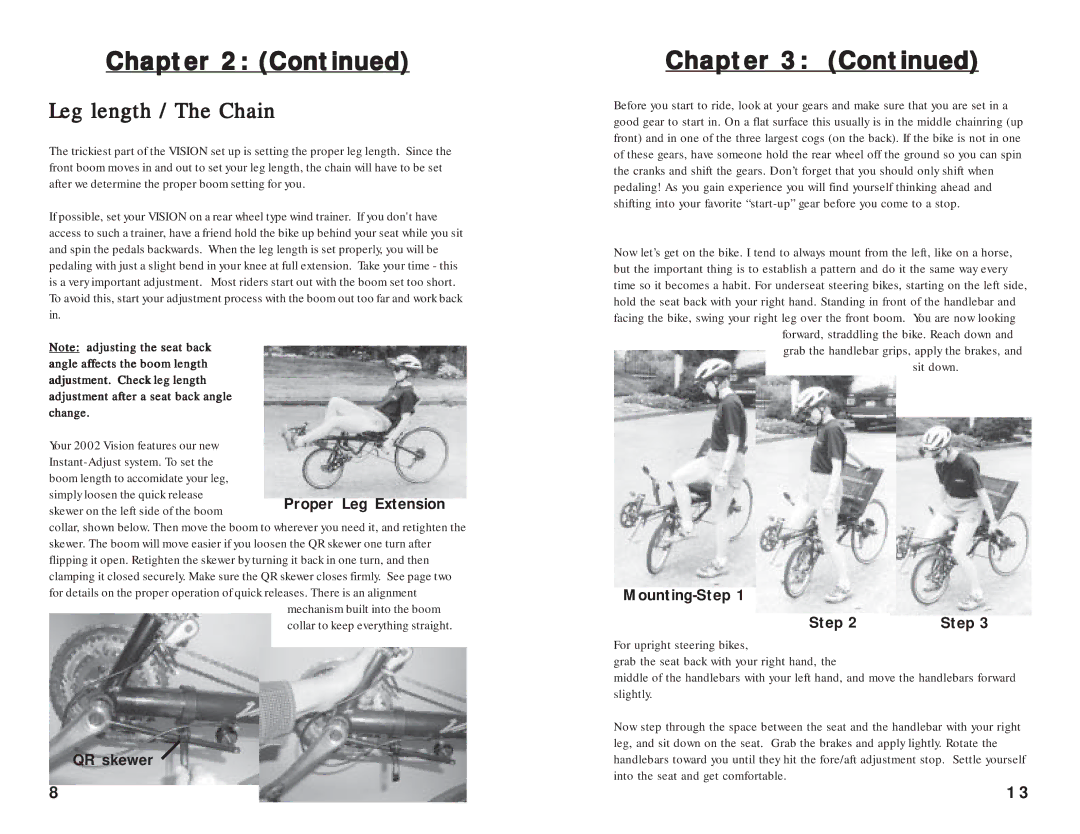
Proper Leg Extension

Chapter 2: (Continued)

Leg length / The Chain

The trickiest part of the VISION set up is setting the proper leg length. Since the front boom moves in and out to set your leg length, the chain will have to be set after we determine the proper boom setting for you.

If possible, set your VISION on a rear wheel type wind trainer. If you don't have access to such a trainer, have a friend hold the bike up behind your seat while you sit and spin the pedals backwards. When the leg length is set properly, you will be pedaling with just a slight bend in your knee at full extension. Take your time - this is a very important adjustment. Most riders start out with the boom set too short. To avoid this, start your adjustment process with the boom out too far and work back in.

Note: adjusting the seat back angle affects the boom length adjustment. Check leg length adjustment after a seat back angle change.

Your 2002 Vision features our new Instant-Adjust system. To set the boom length to accomidate your leg, simply loosen the quick release skewer on the left side of the boom

collar, shown below. Then move the boom to wherever you need it, and retighten the skewer. The boom will move easier if you loosen the QR skewer one turn after flipping it open. Retighten the skewer by turning it back in one turn, and then clamping it closed securely. Make sure the QR skewer closes firmly. See page two for details on the proper operation of quick releases. There is an alignment

mechanism built into the boom collar to keep everything straight.

QR skewer

Chapter 3: (Continued)

Before you start to ride, look at your gears and make sure that you are set in a good gear to start in. On a flat surface this usually is in the middle chainring (up front) and in one of the three largest cogs (on the back). If the bike is not in one of these gears, have someone hold the rear wheel off the ground so you can spin the cranks and shift the gears. Don’t forget that you should only shift when pedaling! As you gain experience you will find yourself thinking ahead and shifting into your favorite “start-up” gear before you come to a stop.

Now let’s get on the bike. I tend to always mount from the left, like on a horse, but the important thing is to establish a pattern and do it the same way every time so it becomes a habit. For underseat steering bikes, starting on the left side, hold the seat back with your right hand. Standing in front of the handlebar and facing the bike, swing your right leg over the front boom. You are now looking

forward, straddling the bike. Reach down and grab the handlebar grips, apply the brakes, and

sit down.

Mounting-Step 1

Step 2

Step 3

For upright steering bikes,

grab the seat back with your right hand, the

middle of the handlebars with your left hand, and move the handlebars forward slightly.

Now step through the space between the seat and the handlebar with your right leg, and sit down on the seat. Grab the brakes and apply lightly. Rotate the handlebars toward you until they hit the fore/aft adjustment stop. Settle yourself into the seat and get comfortable.

8

13

Page 8
Image 8
Vision Fitness R40, R68, R44, R45, R54, R65, R64, R55, R50 manual Leg length / The Chain, QR skewer

R40, R65, R55, R54, R50 specifications

Vision Fitness has established itself as a prominent brand in the realm of fitness equipment, delivering high-quality and effective machines for avid fitness enthusiasts and casual users alike. The R44, R45, R68, R64, and R50 recumbent bikes are a testament to the brand's commitment to innovation, performance, and user comfort, making them excellent choices for home workouts.

The Vision Fitness R44 and R45 models are designed with user-friendly features that cater to a wide range of fitness levels. Both bikes come equipped with adjustable seating and handlebars, ensuring that users can find their ideal position for maximum comfort during workouts. The R44 features a durable frame that supports up to 300 pounds, while the R45 boasts a broader range of resistance levels, providing a customizable workout experience.

Transitioning to the R64 model, this recumbent bike incorporates advanced technological features such as a built-in Bluetooth connection that syncs with popular fitness apps. Additionally, its oversized LCD display provides real-time feedback on metrics such as heart rate, speed, distance, and calories burned. The R64’s compact design makes it easy to fit into spaces of various sizes, making it a practical choice for home gyms.

Meanwhile, the R68 model takes comfort to the next level with its generous padding and ergonomic design. This bike also focuses on enhancing exercise safety, featuring a step-through frame that enables easy access for individuals with mobility challenges. It includes a variety of pre-set workout programs that cater to different fitness goals, whether it's weight loss, endurance training, or rehabilitation.

The cornerstone of these models, including the R50, is their magnetic resistance system, which allows for smooth and quiet operation. This feature is essential for users who prefer to work out while watching television or listening to music without the distraction of mechanical noise. The R50 also stands out due to its customizable user profiles, allowing multiple users to track their progress individually.

In summary, the Vision Fitness R44, R45, R68, R64, and R50 recumbent bikes encompass a blend of comfort, technology, and design. Each model offers unique features tailored to diverse fitness needs, ensuring that users can find a recumbent bike that perfectly suits their lifestyle. With their robust construction and innovative features, these bikes are an excellent investment for anyone seeking to enhance their fitness journey at home.