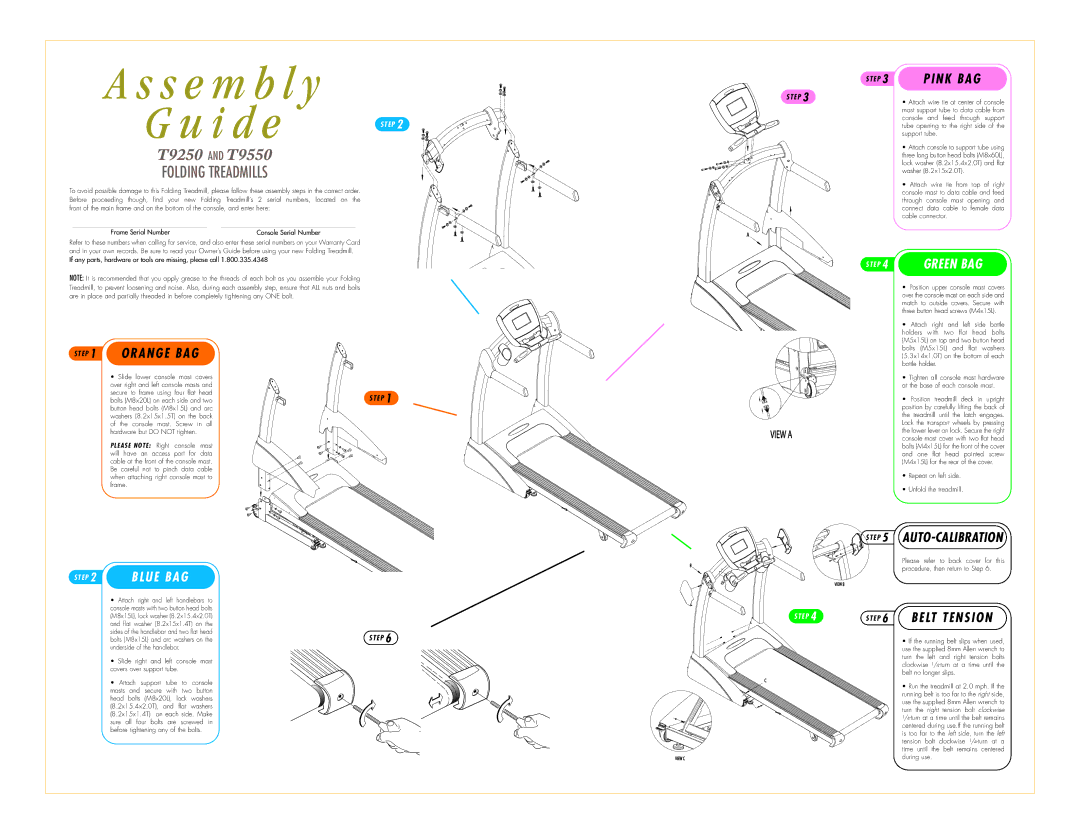
A s s e m b l y |
|
G u i d e | S T E P 2 |
|
T9250 AND T9550
FOLDING TREADMILLS
To avoid possible damage to this Folding Treadmill, please follow these assembly steps in the correct order. Before proceeding though, find your new Folding Treadmill’s 2 serial numbers, located on the front of the main frame and on the bottom of the console, and enter here:
Frame Serial Number | Console Serial Number |
Refer to these numbers when calling for service, and also enter these serial numbers on your Warranty Card and in your own records. Be sure to read your Owner’s Guide before using your new Folding Treadmill.
If any parts, hardware or tools are missing, please call 1.800.335.4348
NOTE: It is recommended that you apply grease to the threads of each bolt as you assemble your Folding Treadmill, to prevent loosening and noise. Also, during each assembly step, ensure that ALL nuts and bolts are in place and partially threaded in before completely tightening any ONE bolt.
S T E P 1 | ORANGE BAG |
|
| • Slide lower console mast covers |
|
| over right and left console masts and |
|
| secure to frame using four flat head | S T E P 1 |
| bolts (M8x20L) on each side and two | |
| button head bolts (M8x15L) and arc |
|
| washers (8.2x15x1.5T) on the back |
|
| of the console mast. Screw in all |
|
| hardware but DO NOT tighten. |
|
P L E A S E N O T E : Right console mast will have an access port for data cable at the front of the console mast. Be careful not to pinch data cable when attaching right console mast to frame.
S T E P 2 | BLUE BAG |
|
| • Attach right and left handlebars to |
|
| console masts with two button head bolts |
|
| (M8x15L), lock washer (8.2x15.4x2.0T) |
|
| and flat washer (8.2x15x1.4T) on the |
|
| sides of the handlebar and two flat head | S T E P 6 |
| bolts (M8x15L) and arc washers on the | |
| underside of the handlebar. |
|
• Slide right and left console mast |
covers over support tube. |
|
| S T E P 3 | PINK BAG |
| S T E P 3 |
| • Attach wire tie at center of console |
|
|
| mast support tube to data cable from |
|
|
| console and feed through support |
|
|
| tube opening to the right side of the |
|
|
| support tube. |
|
|
| • Attach console to support tube using |
|
|
| three long button head bolts (M8x60L), |
|
|
| lock washer (8.2x15.4x2.0T) and flat |
|
|
| washer (8.2x15x2.0T). |
|
|
| • Attach wire tie from top of right |
|
|
| console mast to data cable and feed |
|
|
| through console mast opening and |
|
|
| connect data cable to female data |
|
|
| cable connector. |
| A |
|
|
|
| S T E P 4 | GREEN BAG |
|
|
| • Position upper console mast covers |
|
|
| over the console mast on each side and |
|
|
| match to outside covers. Secure with |
|
|
| three button head screws (M4x15L). |
|
|
| • Attach right and left side bottle |
|
|
| holders with two flat head bolts |
|
|
| (M5x15L) on top and two button head |
|
|
| bolts (M5x15L) and flat washers |
|
|
| (5.3x14x1.0T) on the bottom of each |
|
|
| bottle holder. |
|
|
| • Tighten all console mast hardware |
|
|
| at the base of each console mast. |
|
|
| • Position treadmill deck in upright |
|
|
| position by carefully lifting the back of |
|
|
| the treadmill until the latch engages. |
|
|
| Lock the transport wheels by pressing |
| VIEW A |
| the lower lever on lock. Secure the right |
|
| console mast cover with two flat head | |
|
|
| bolts (M4x15L) for the front of the cover |
|
|
| and one flat head pointed screw |
|
|
| (M4x15L) for the rear of the cover. |
|
|
| • Repeat on left side. |
|
|
| • Unfold the treadmill. |
|
| S T E P 5 | |
VIEW B | B |
| Please refer to back cover for this |
| procedure, then return to Step 6. | ||
|
|
| |
| VIEW B | B |
|
| S T E P 4 | S T E P 6 | BELT TENSION |
|
|
| • If the running belt slips when used, |
|
|
| use the supplied 8mm Allen wrench to |
|
|
| turn the left and right tension bolts |
|
|
| clockwise |
|
|
| belt no longer slips. |
• Attach support tube to console |
masts and secure with two button head bolts (M8x20L), lock washers (8.2x15.4x2.0T), and flat washers (8.2x15x1.4T) on each side. Make sure all four bolts are screwed in before tightening any of the bolts.
C
VIEW C
•Run the treadmill at 2.0 mph. If the running belt is too far to the right side, use the supplied 8mm Allen wrench to turn the right tension bolt clockwise