Connecting the Air Supply
DANGER
Do not use oxygen, combustible gas- es or bottled gases as a power source for this tool. The tool will explode and cause death or serious injury.
![]() WARNING
WARNING
Always use a coupling that discharg- es all the compressed air in the tool at the time the fitting or hose coupling is disconnected. Using a coupling that does not discharge the compressed air could cause unintended operation and serious injury.
Use only clean, dry compressed air with a maximum pressure of 200 psi. Before con- necting the tool to the air supply, check the air compressor regulator gauge to be sure it is functioning properly, with a range between
To connect the air supply:
1.Remove the plastic plug from the tool air inlet.
2.Insert a 1/4" NPT quick connector into the tool air inlet.
NOTE: To improve the seal between the connector and the tool, and to help protect against oxidation, apply a PTFE tape or paste to the connector threads before insertion.
3.Snap the air hose onto the quick con- nector.
4.Check for air leakage.
Installing Fastener Strips
![]() WARNING
WARNING
Always point the tool away from yourself and others when installing fasteners. Failure to do so could result in injury.
Always make sure the tool's maga- zine is EMPTY before connecting to the air supply. The tool may actuate when the tool is first connected to the air supply. Always connect the tool to the air supply before loading nails to prevent injury from unintended actuation.
Never install fasteners with the workpiece contact or trigger acti- vated. Failure to do so could result in injury.
Use only recommended fasteners of the correct size, length, collation angle and head type, as indicated on the tool's nameplate. Refer to the "Accessories" section for informa- tion on recommended fasteners. Other fasteners could result in tool malfunction, leading to injury.
1.Lay the tool on its side and point the nose of the tool away from yourself and others.
2.Press the pusher release button and gently slide back the pusher assembly. Do not allow the pusher assembly to slide back fast.
Fig. 2
Pusher release button
3.Verify that the magazine is empty and then connect the air supply to the tool.
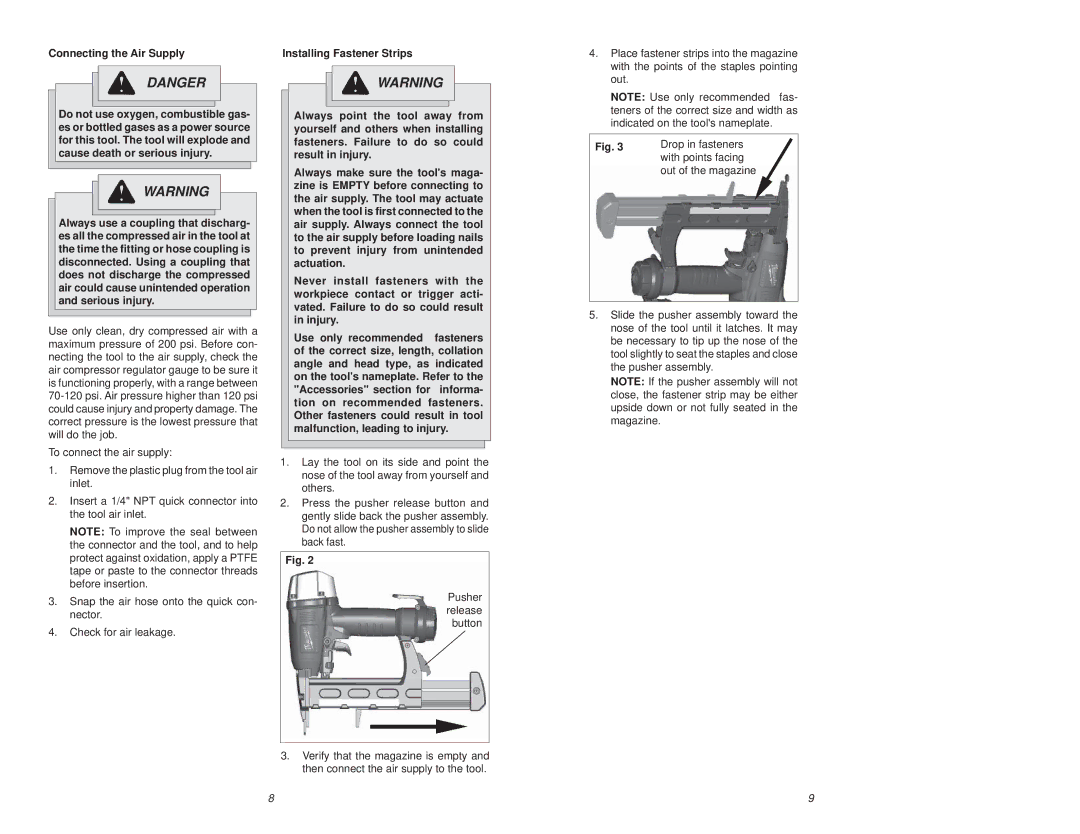
4.Place fastener strips into the magazine with the points of the staples pointing out.
NOTE: Use only recommended fas- teners of the correct size and width as indicated on the tool's nameplate.
Fig. 3 | Drop in fasteners |
| with points facing |
| out of the magazine |
5.Slide the pusher assembly toward the nose of the tool until it latches. It may be necessary to tip up the nose of the tool slightly to seat the staples and close the pusher assembly.
NOTE: If the pusher assembly will not close, the fastener strip may be either upside down or not fully seated in the magazine.
8 | 9 |