Approved

Torsion

spring(s)

If door still does not balance correctly, contact a qualified door agency. If the door still does not operate easily, lower the door into the closed position, UNWIND THE SPRING(S) FULLY (Reference the insert “Removing The Old Door/Preparing The Opening” section on torsion spring removal), and recheck the following the items:

1.) Check the door for level.

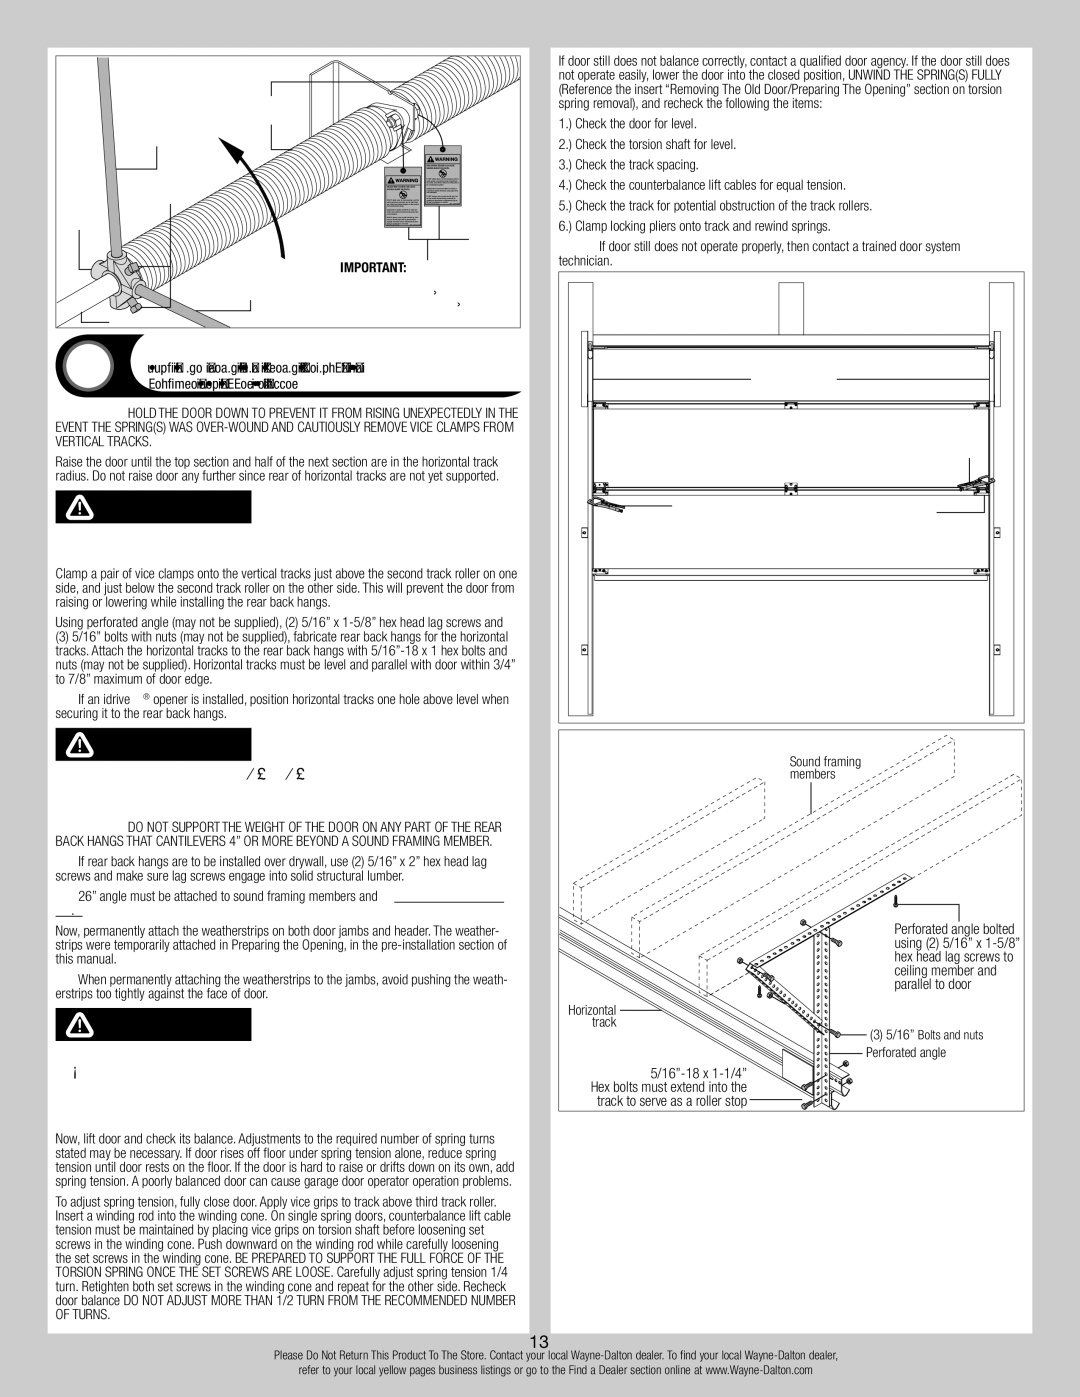
winding rod

Set

screws

Winding

cone

Approved winding rod

Torsion shaft

HIGH SPRING TENSION CAN CAUSE

SERIOUS INJURY OR DEATH.

HIGH SPRING TENSION CAN CAUSE

SERIOUS INJURY OR DEATH.

Warning

tag(s)

IMPORTANT: CHECK THE WARNING TAG(S) ATTACHED TO THE SPRING(S)

FOR THE REQUIRED NUMBER OF COMPLETE TURNS, TO BALANCE YOUR DOOR.

2.) Check the torsion shaft for level.

3.) Check the track spacing.

4.) Check the counterbalance lift cables for equal tension.

5.) Check the track for potential obstruction of the track rollers.

6.) Clamp locking pliers onto track and rewind springs.

IMPORTANT: If door still does not operate properly, then contact a trained door system technician.

Rear Back Hangs

24 Tools: Ratchet wrench, 1/2” Socket, 1/2” Wrench, (2) Vice clamps, Tape measure, Level, Hammer, Step Ladder

Important: Hold the door down to prevent it from rising unexpectedly in the event the spring(s) was over-wound and cautiously remove vice clamps from vertical tracks.

Raise the door until the top section and half of the next section are in the horizontal track radius. Do not raise door any further since rear of horizontal tracks are not yet supported.

WARNING

Raising door further can result in door falling and cause severe or fatal injury.

Clamp a pair of vice clamps onto the vertical tracks just above the second track roller on one side, and just below the second track roller on the other side. This will prevent the door from raising or lowering while installing the rear back hangs.

Using perforated angle (may not be supplied), (2) 5/16” x 1-5/8” hex head lag screws and

(3)5/16” bolts with nuts (may not be supplied), fabricate rear back hangs for the horizontal tracks. Attach the horizontal tracks to the rear back hangs with 5/16”-18 x 1 hex bolts and nuts (may not be supplied). Horizontal tracks must be level and parallel with door within 3/4” to 7/8” maximum of door edge.

NOTE: If an idrive® opener is installed, position horizontal tracks one hole above level when securing it to the rear back hangs.

WARNING

Keep horizontal tracks parallel and within 3/4” to 7/8” maxi- mum of door edge, otherwise door could fall, resulting in severe or fatal injury.

Important: Do not support the weight of the door on any part of the rear back hangs that cantilevers 4” or more beyond a sound framing member.

Note: If rear back hangs are to be installed over drywall, use (2) 5/16” x 2” hex head lag screws and make sure lag screws engage into solid structural lumber.

Note: 26” angle must be attached to sound framing members and nails should not be used.


Horizontal tracks


Vice clamp

Vice clamp

2nd Track roller


Sound framing


members

Now, permanently attach the weatherstrips on both door jambs and header. The weather- strips were temporarily attached in Preparing the Opening, in the pre-installation section of this manual.

NOTE: When permanently attaching the weatherstrips to the jambs, avoid pushing the weath- erstrips too tightly against the face of door.

WARNING

Prior to winding or making adjustments to the springs, ensure

Horizontal track

Perforated angle bolted using (2) 5/16” x 1-5/8” hex head lag screws to ceiling member and parallel to door

(3) 5/16” Bolts and nuts

Perforated angle

you’re winding in the proper direction as stated in the Instal- lation Instructions. Otherwise the spring fittings may release from spring if not wound in the proper direction and could result in severe or fatal injury.

Now, lift door and check its balance. Adjustments to the required number of spring turns stated may be necessary. If door rises off floor under spring tension alone, reduce spring tension until door rests on the floor. If the door is hard to raise or drifts down on its own, add spring tension. A poorly balanced door can cause garage door operator operation problems.

To adjust spring tension, fully close door. Apply vice grips to track above third track roller. Insert a winding rod into the winding cone. On single spring doors, counterbalance lift cable tension must be maintained by placing vice grips on torsion shaft before loosening set screws in the winding cone. Push downward on the winding rod while carefully loosening the set screws in the winding cone. BE PREPARED TO SUPPORT THE FULL FORCE OF THE TORSION SPRING ONCE THE SET SCREWS ARE LOOSE. Carefully adjust spring tension 1/4 turn. Retighten both set screws in the winding cone and repeat for the other side. Recheck door balance DO NOT ADJUST MORE THAN 1/2 TURN FROM THE RECOMMENDED NUMBER OF TURNS.

5/16”-18 x 1-1/4” Hex bolts must extend into the track to serve as a roller stop

13

Please Do Not Return This Product To The Store. Contact your local Wayne-Dalton dealer. To find your local Wayne-Dalton dealer,

refer to your local yellow pages business listings or go to the Find a Dealer section online at www.Wayne-Dalton.com

Page 13
Image 13
Wayne-Dalton 8700 installation instructions Rear Back Hangs, Check the door for level

8700 specifications

The Wayne-Dalton 8700 is a prominent model in the lineup of sectional overhead doors, designed for both residential and commercial applications. Known for its exceptional build quality and wide range of options, the 8700 series has become a favored choice among homeowners and business owners alike.

One of the main features of the Wayne-Dalton 8700 is its innovative design, which combines an aesthetic appeal with functional performance. The door is available in several attractive styles and colors, allowing customers to customize their entryways according to their preferences. The optional window panels enhance natural light infiltration while adding an elegant touch to the overall appearance.

The 8700 series boasts a robust construction featuring a polystyrene insulation core that provides impressive thermal efficiency. The insulation not only helps in maintaining indoor temperatures but also contributes to energy savings, making it an environmentally friendly choice. The door’s R-value, which measures its thermal resistance, is rated up to 14.0, providing excellent insulation for various climates.

Durability is another hallmark of the Wayne-Dalton 8700. Constructed from heavy-duty steel, this door is built to withstand the elements and resist dents and corrosion. The finish can be selected with a baked-on polyester coating, offering long-lasting protection against wear and tear, ensuring the door retains its appearance over time.

In terms of technology, the Wayne-Dalton 8700 utilizes advanced manufacturing techniques to ensure consistency and quality in each product. The doors are engineered to operate smoothly with minimal maintenance. The torsion spring system provides a reliable and quiet operation, enhancing the user experience when opening or closing the door.

Safety features are also a priority with the Wayne-Dalton 8700. The door comes equipped with various options for safety sensors that detect obstructions, automatically reversing the door’s operation to prevent accidents. Additionally, the design includes pinch-resistant panel edges to protect fingers during operation.

Overall, the Wayne-Dalton 8700 stands out in the market for its balance of aesthetics, performance, and safety. Whether for home use or commercial applications, its combination of style, durability, and advanced technology makes it a top choice for those seeking a quality overhead door solution.