Elbow

TubeSmall

Opening

Zipper

OpeningRib

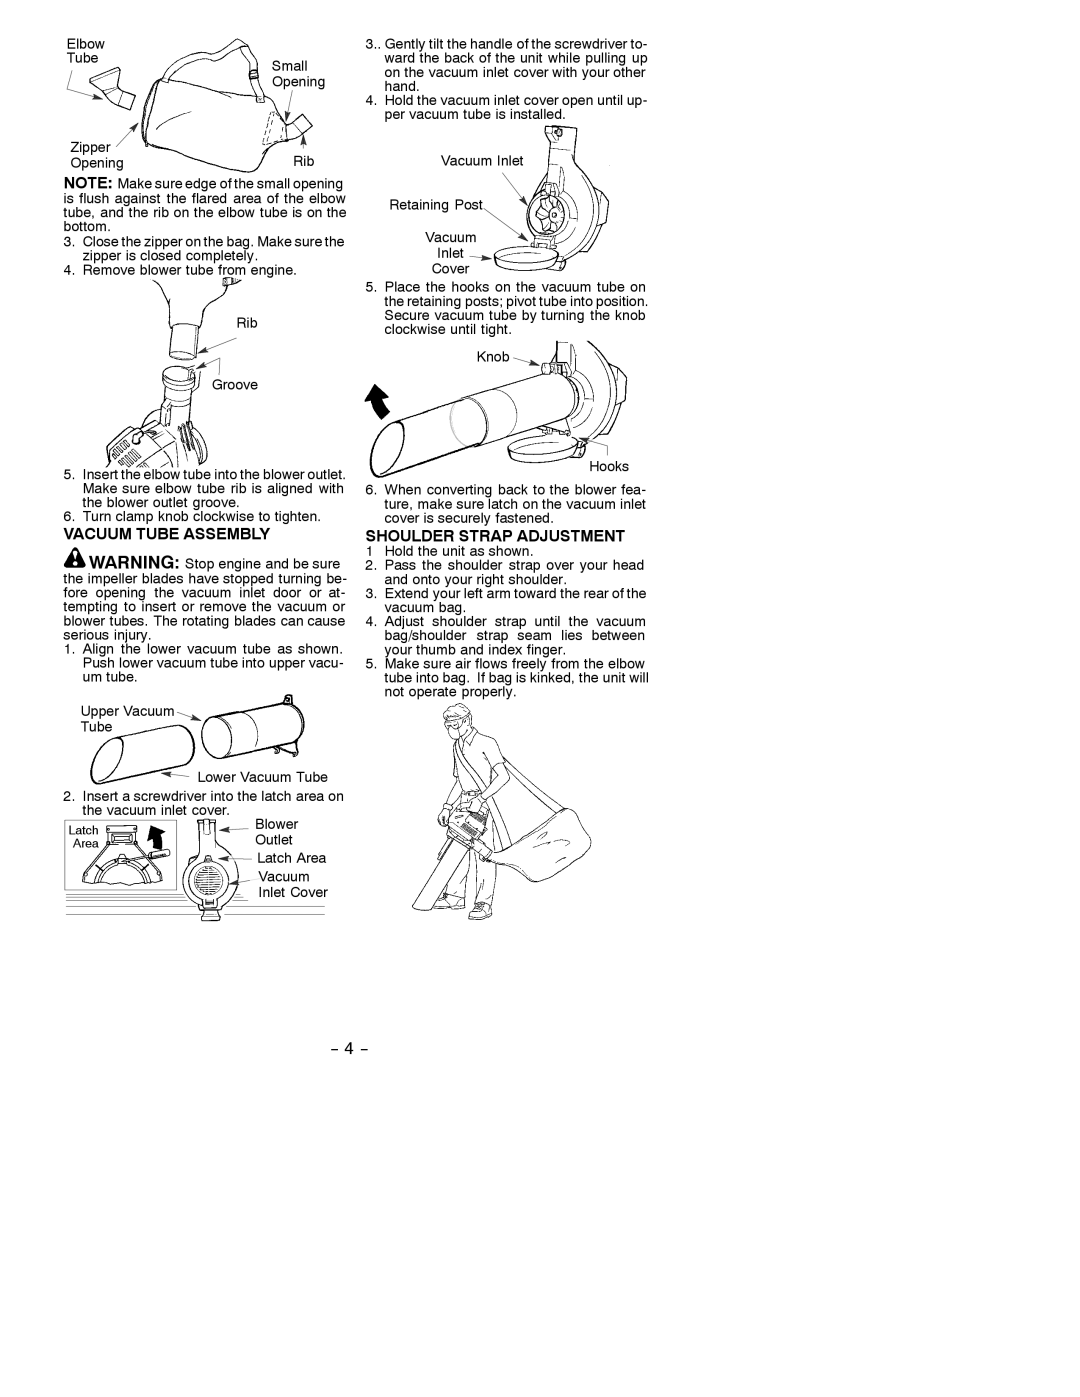
NOTE: Make sure edge of the small opening is flush against the flared area of the elbow tube, and the rib on the elbow tube is on the bottom.

3.Close the zipper on the bag. Make sure the zipper is closed completely.

4.Remove blower tube from engine.

Rib

Groove

5.Insert the elbow tube into the blower outlet. Make sure elbow tube rib is aligned with the blower outlet groove.

6.Turn clamp knob clockwise to tighten.

VACUUM TUBE ASSEMBLY

WARNING: Stop engine and be sure the impeller blades have stopped turning be- fore opening the vacuum inlet door or at- tempting to insert or remove the vacuum or blower tubes. The rotating blades can cause serious injury.

1.Align the lower vacuum tube as shown. Push lower vacuum tube into upper vacu- um tube.

Upper Vacuum

Tube

Lower Vacuum Tube

2.Insert a screwdriver into the latch area on the vacuum inlet cover.


Blower

Latch


Outlet

Area


Latch Area


Vacuum


Inlet Cover


3..Gently tilt the handle of the screwdriver to- ward the back of the unit while pulling up on the vacuum inlet cover with your other

hand.

4.Hold the vacuum inlet cover open until up- per vacuum tube is installed.

Vacuum Inlet

Retaining Post

Vacuum

Inlet

Cover

5.Place the hooks on the vacuum tube on the retaining posts; pivot tube into position. Secure vacuum tube by turning the knob clockwise until tight.

Knob

Hooks

6.When converting back to the blower fea- ture, make sure latch on the vacuum inlet cover is securely fastened.

SHOULDER STRAP ADJUSTMENT

1 Hold the unit as shown.

2.Pass the shoulder strap over your head and onto your right shoulder.

3.Extend your left arm toward the rear of the vacuum bag.

4.Adjust shoulder strap until the vacuum bag/shoulder strap seam lies between your thumb and index finger.

5.Make sure air flows freely from the elbow tube into bag. If bag is kinked, the unit will not operate properly.

-- 4 --

Page 4
Image 4
Weed Eater 530088127 instruction manual Vacuum Tube Assembly, Shoulder Strap Adjustment

530088127 specifications

The Weed Eater 530088127 is a notable product in the realm of outdoor lawn care equipment, embodying a perfect blend of power, efficiency, and user-friendly design. As a string trimmer, it is particularly designed for homeowners and gardeners who seek a reliable tool to maintain their lawns, gardens, and various landscapes.

One of the standout features of the Weed Eater 530088127 is its powerful engine, which provides ample cutting power to tackle even the toughest weeds and grass. Typically equipped with a 2-cycle engine, this trimmer offers a strong performance that ensures efficient trimming and edging, making it suitable for various gardening tasks. The ergonomic design of the trimmer significantly reduces user fatigue during extended use, providing enhanced comfort without compromising control.

The 530088127 is also known for its ease of use. Its lightweight design allows for effortless maneuverability around complex terrains, such as flower beds and tight corners. Additionally, the trimmer features an adjustable handle that accommodates various user heights, ensuring a customized experience for different individuals. The semi-automatic line feed system is another innovation that minimizes interruptions, allowing users to quickly resume work without hassle.

A notable characteristic of this model is its cutting width, which typically spans around 16 inches. This width strikes a great balance between effective cutting and precision, allowing users to cover more ground while still being able to navigate around delicate plants. The dual-line cutting capability further enhances the efficiency of the Weed Eater 530088127, facilitating a cleaner and more precise cut.

In terms of durability, the trimmer is built with high-quality materials, ensuring longevity even under rigorous usage conditions. With proper maintenance, users can expect the Weed Eater 530088127 to remain a reliable garden tool for countless seasons.

Moreover, it includes various safety features designed to protect users during operation, such as a protective guard and easy-start technology, which minimizes the effort needed to start the engine.

In summary, the Weed Eater 530088127 stands out in today’s market for its robust construction, thoughtful design, and efficient technology aimed at making lawn care a simpler, more enjoyable task for users of all skill levels. This trimmer is an excellent choice for anyone looking to maintain their outdoor spaces effectively and efficiently.