ASSEMBLY

WARNING: If received assembled, review all assembly steps to ensure your unit is properly assembled and all fasteners are secure.

TUBE ASSEMBLY

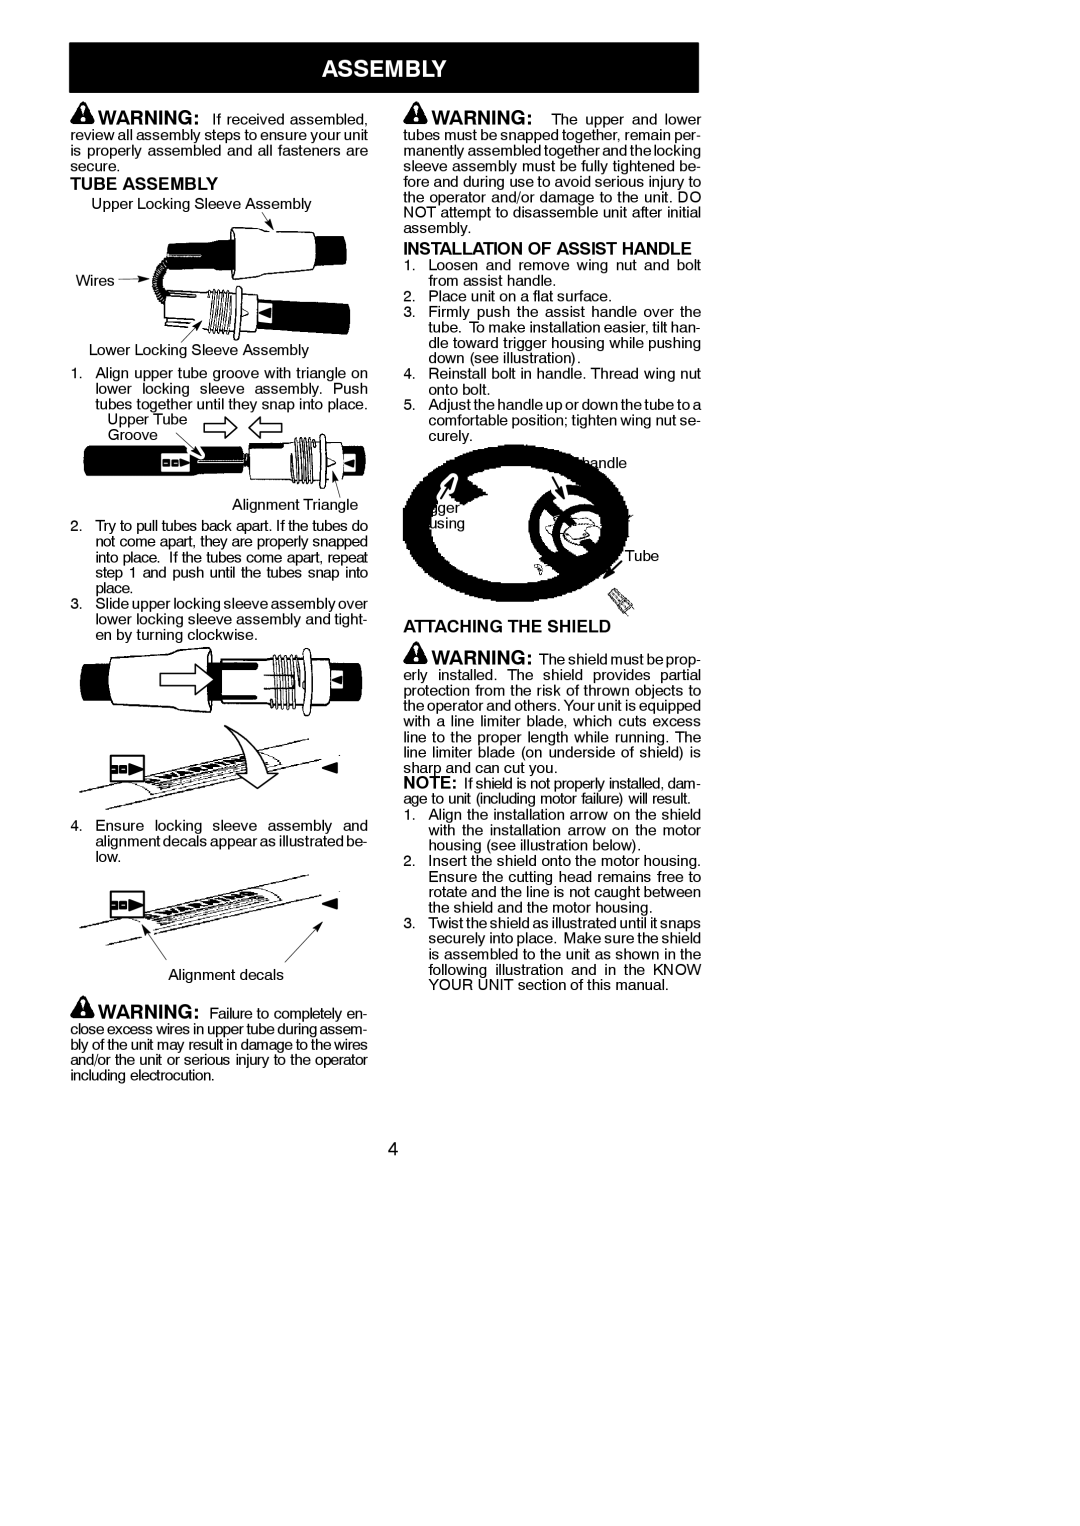
Upper Locking Sleeve Assembly

Wires

Lower Locking Sleeve Assembly

1.Align upper tube groove with triangle on lower locking sleeve assembly. Push tubes together until they snap into place.

Upper Tube Groove

Alignment Triangle

2.Try to pull tubes back apart. If the tubes do not come apart, they are properly snapped into place. If the tubes come apart, repeat step 1 and push until the tubes snap into place.

3.Slide upper locking sleeve assembly over lower locking sleeve assembly and tight- en by turning clockwise.

4.Ensure locking sleeve assembly and alignment decals appear as illustrated be- low.

Alignment decals

WARNING: Failure to completely en- close excess wires in upper tube during assem- bly of the unit may result in damage to the wires and/or the unit or serious injury to the operator including electrocution.

WARNING: The upper and lower tubes must be snapped together, remain per- manently assembled together and the locking sleeve assembly must be fully tightened be- fore and during use to avoid serious injury to the operator and/or damage to the unit. DO NOT attempt to disassemble unit after initial assembly.

INSTALLATION OF ASSIST HANDLE

1.Loosen and remove wing nut and bolt from assist handle.

2.Place unit on a flat surface.

3.Firmly push the assist handle over the tube. To make installation easier, tilt han- dle toward trigger housing while pushing down (see illustration).

4.Reinstall bolt in handle. Thread wing nut onto bolt.

5.Adjust the handle up or down the tube to a comfortable position; tighten wing nut se- curely.

Assist handle

Trigger housing

Tube

ATTACHING THE SHIELD

WARNING: The shield must be prop- erly installed. The shield provides partial protection from the risk of thrown objects to the operator and others. Your unit is equipped with a line limiter blade, which cuts excess line to the proper length while running. The line limiter blade (on underside of shield) is sharp and can cut you.

NOTE: If shield is not properly installed, dam- age to unit (including motor failure) will result.

1.Align the installation arrow on the shield with the installation arrow on the motor housing (see illustration below).

2.Insert the shield onto the motor housing. Ensure the cutting head remains free to rotate and the line is not caught between the shield and the motor housing.

3.Twist the shield as illustrated until it snaps securely into place. Make sure the shield is assembled to the unit as shown in the following illustration and in the KNOW YOUR UNIT section of this manual.

4

Page 4
Image 4
Weed Eater 952711865 instruction manual Tube Assembly, Installation of Assist Handle, Attaching the Shield

952711865 specifications

The Weed Eater 952711865 is a versatile, powerful string trimmer designed to make yard work more efficient and effective. This model stands out for its robust performance, ease of use, and innovative technologies that cater to both novice gardeners and seasoned landscapers.

One of the main features of the Weed Eater 952711865 is its lightweight design, which allows for effortless maneuverability. Weighing in at just around 10 pounds, this trimmer enables users to work for extended periods without experiencing excessive fatigue. Its ergonomic handle is designed to provide comfort and control, ensuring a pleasant trimming experience.

The engine of the Weed Eater 952711865 is a reliable 2-cycle gasoline engine that delivers impressive power. With a displacement of 25cc, it offers adequate strength to tackle thick grass, weeds, and brush, making it suitable for various lawn maintenance tasks. The easy starting system reduces the hassle often associated with starting small engines, allowing users to get to work quickly.

The trimmer is equipped with a dual-line feed head that allows for efficient cutting. This feature enables users to quickly replace or refill the trimmer line, minimizing downtime during work. Additionally, the auto-feed function ensures that the line advances automatically, providing continuous cutting without manual intervention.

One noteworthy technology featured in the Weed Eater 952711865 is its Smart Start feature. This innovation significantly reduces the effort needed to start the engine, allowing users to pull the starter rope with minimal resistance. This is especially beneficial for older users or those unfamiliar with operating gas-powered equipment.

The Weed Eater 952711865 also offers adjustable shaft length, allowing users to customize it according to their height or preference. This adaptability ensures that everyone can find a comfortable working position, which enhances precision and reduces strain on the back and arms.

In terms of maintenance, the model is designed for easy access to key components, making routine upkeep straightforward. The air filter and spark plug are easily reachable, simplifying the maintenance process and extending the trimmer's lifespan.

Overall, the Weed Eater 952711865 blends power, comfort, and modern technology, making it an excellent choice for anyone looking to maintain a well-groomed lawn. Whether tackling overgrown areas or performing regular touch-ups, this string trimmer delivers reliable results with minimal effort.