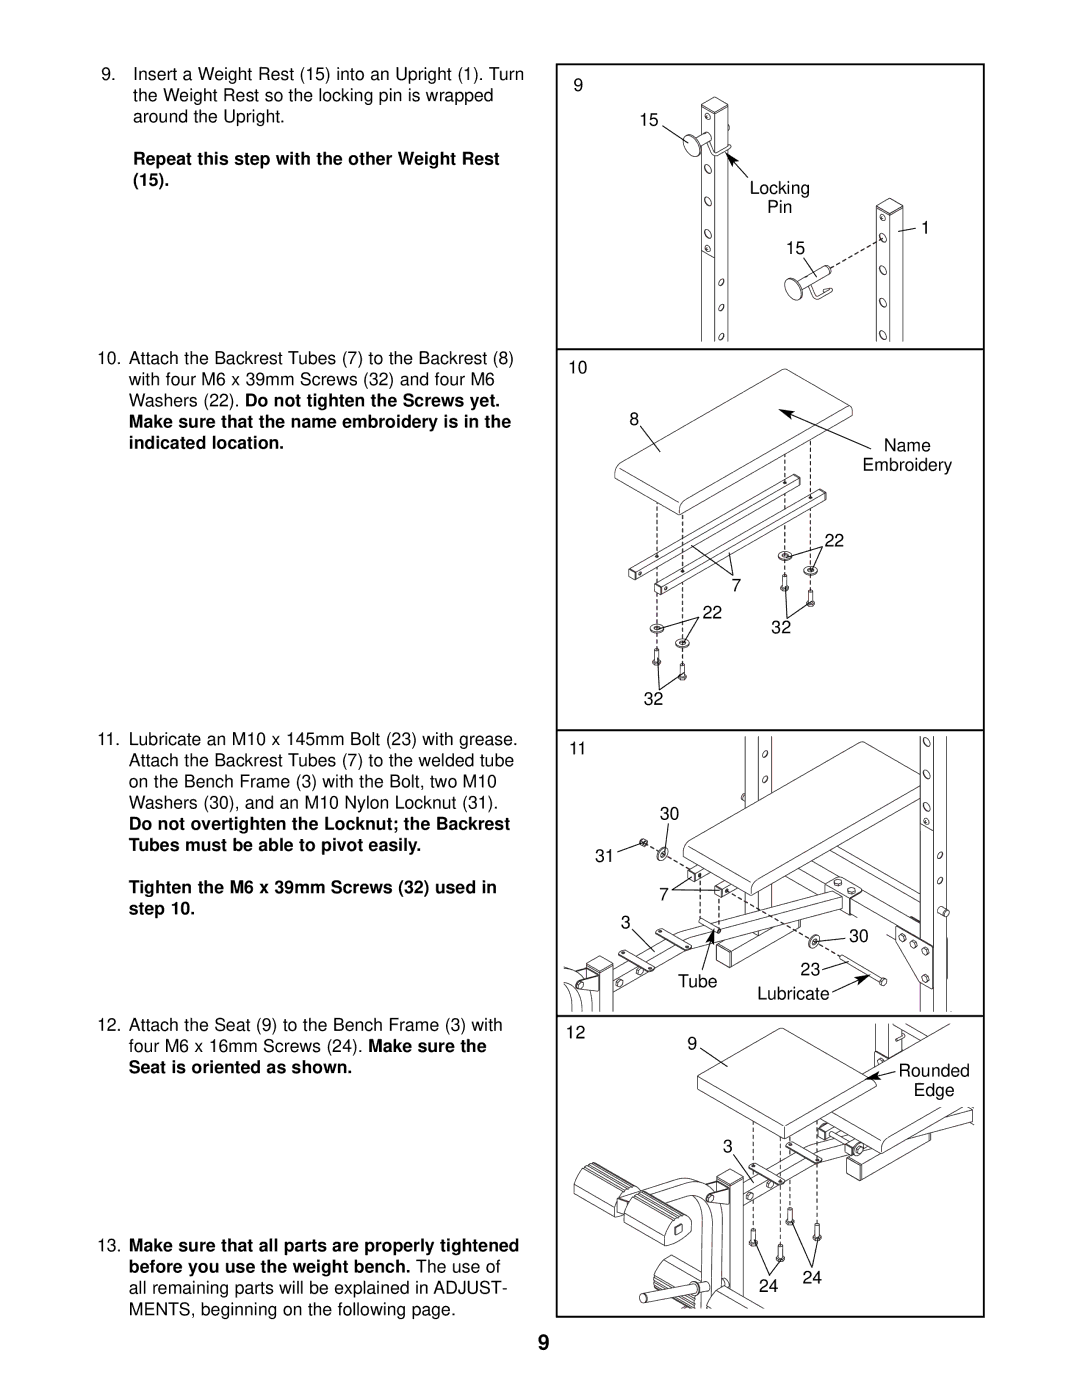
9. Insert a Weight Rest (15) into an Upright (1). Turn | 9 |
|
|
|
the Weight Rest so the locking pin is wrapped |
|
|
| |
|
|
|
| |
around the Upright. |
| 15 |
|
|
Repeat this step with the other Weight Rest |
|
|
|
|
(15). |
|
| Locking | |
|
|
| ||
|
|
| Pin |
|
|
|
|
| 1 |
|
|
| 15 | |
10. Attach the Backrest Tubes (7) to the Backrest (8) | 10 |
|
|
|
with four M6 x 39mm Screws (32) and four M6 |
|
|
| |
|
|
|
| |
Washers (22). Do not tighten the Screws yet. |
| 8 |
|
|
Make sure that the name embroidery is in the |
|
|
| |
indicated location. |
|
|
| Name |
|
|
|
| Embroidery |
|
|
|
| 22 |
|
|
| 7 |
|
|
| 22 | 32 |
|
|
|
|
| |
|
| 32 |
|
|
11. Lubricate an M10 x 145mm Bolt (23) with grease. | 11 |
|
|
|
Attach the Backrest Tubes (7) to the welded tube |
|
|
| |
|
|
|
| |
on the Bench Frame (3) with the Bolt, two M10 |
|
|
|
|
Washers (30), and an M10 Nylon Locknut (31). |
| 30 |
|
|
Do not overtighten the Locknut; the Backrest |
|
|
| |
|
|
|
| |
Tubes must be able to pivot easily. |
| 31 |
|
|
|
|
|
| |
Tighten the M6 x 39mm Screws (32) used in |
| 7 |
|
|
step 10. |
|
|
| |
| 3 |
|
| |
|
|
| 30 | |
|
|
|
| |
|
| Tube |
| 23 |
|
| Lubricate | ||
|
|
| ||
12. Attach the Seat (9) to the Bench Frame (3) with | 12 | 9 |
|
|
four M6 x 16mm Screws (24). Make sure the |
|
| ||
|
|
| ||
Seat is oriented as shown. |
|
|
| Rounded |
|
|
|
| Edge |
|
|
| 3 |
|
13. Make sure that all parts are properly tightened |
|
|
|
|
before you use the weight bench. The use of |
|
| 24 | 24 |
all remaining parts will be explained in ADJUST- |
|
| ||
|
|
| ||
MENTS, beginning on the following page. |
|
|
|
|
9
