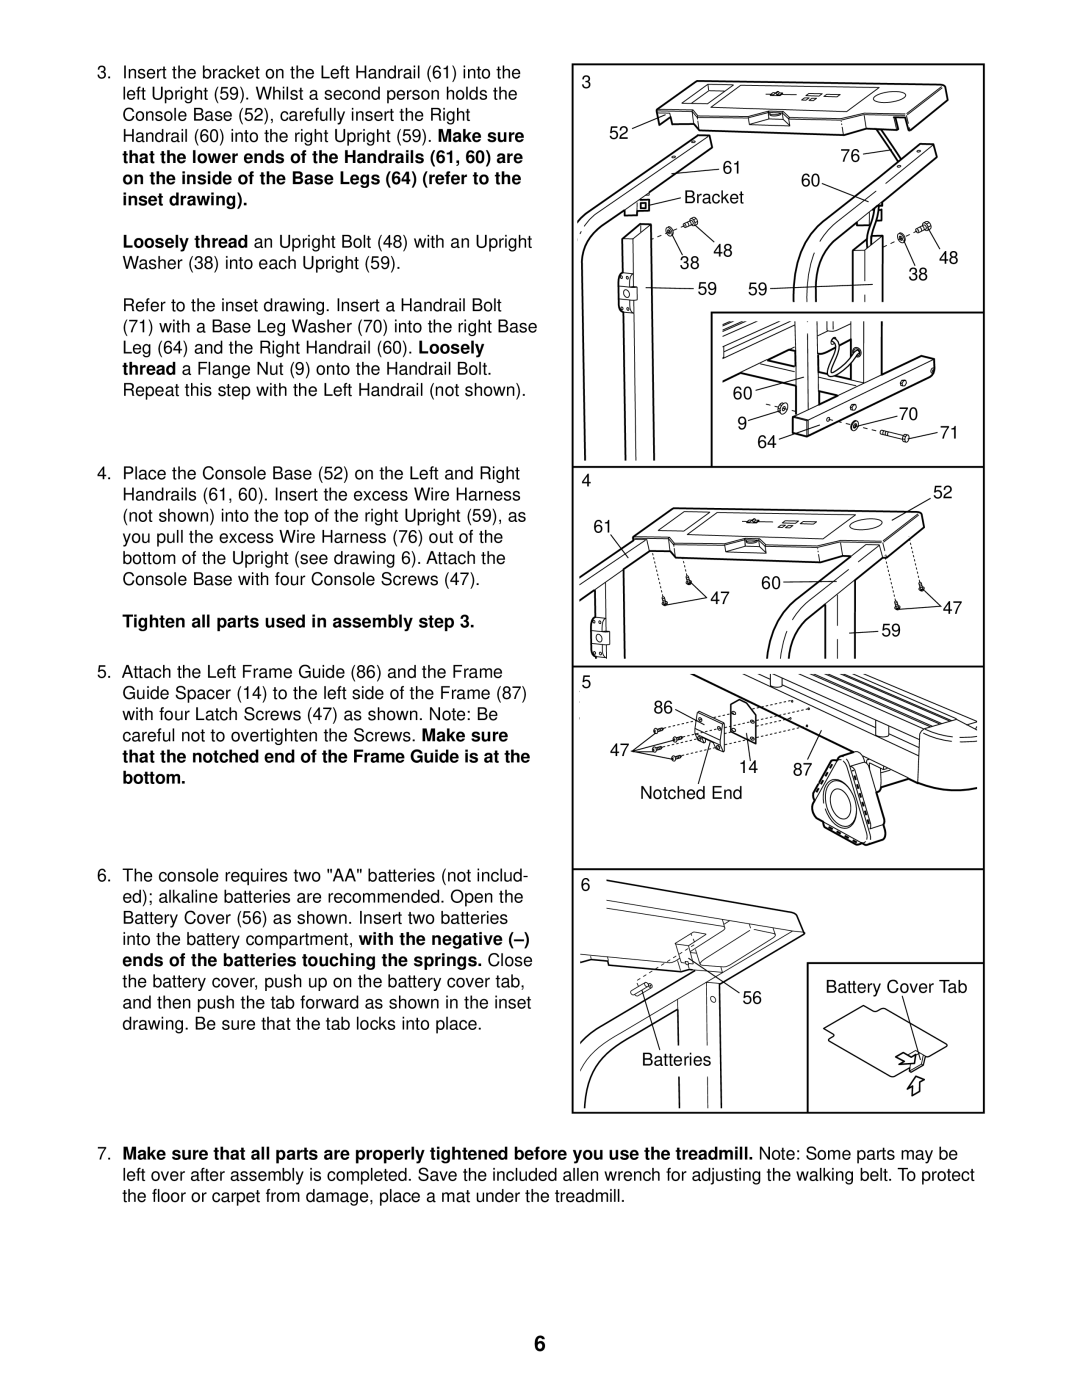
3. Insert the bracket on the Left Handrail (61) into the | 3 |
|
| |
left Upright (59). Whilst a second person holds the |
|
| ||
|
|
| ||
Console Base (52), carefully insert the Right | 52 |
|
| |
Handrail (60) into the right Upright (59). Make sure |
| 76 | ||
that the lower ends of the Handrails (61, 60) are | 61 | |||
on the inside of the Base Legs (64) (refer to the | 60 | |||
Bracket | ||||
inset drawing). |
| |||
Loosely thread an Upright Bolt (48) with an Upright | 38 48 |
| 48 | |
Washer (38) into each Upright (59). |
| |||
| 59 | 59 | 38 | |
Refer to the inset drawing. Insert a Handrail Bolt |
| |||
|
|
| ||
(71) with a Base Leg Washer (70) into the right Base |
|
|
| |
Leg (64) and the Right Handrail (60). Loosely |
|
|
| |
thread a Flange Nut (9) onto the Handrail Bolt. |
|
|
| |
Repeat this step with the Left Handrail (not shown). |
| 60 |
| |
|
| 9 | 70 | |
|
| 71 | ||
|
| 64 | ||
|
|
| ||
4. Place the Console Base (52) on the Left and Right | 4 |
| 52 | |
Handrails (61, 60). Insert the excess Wire Harness |
| |||
|
| |||
(not shown) into the top of the right Upright (59), as | 61 |
|
| |
you pull the excess Wire Harness (76) out of the |
|
| ||
|
|
| ||
bottom of the Upright (see drawing 6). Attach the |
|
|
| |
Console Base with four Console Screws (47). | 47 | 60 |
| |
|
| 47 | ||
Tighten all parts used in assembly step 3. |
|
| ||
|
| 59 | ||
|
|
| ||
5. Attach the Left Frame Guide (86) and the Frame | 5 |
|
| |
Guide Spacer (14) to the left side of the Frame (87) |
|
| ||
86 |
|
| ||
with four Latch Screws (47) as shown. Note: Be |
|
| ||
|
|
| ||
careful not to overtighten the Screws. Make sure | 47 |
|
| |
that the notched end of the Frame Guide is at the | 14 | 87 | ||
| ||||
bottom. |
| |||
Notched End |
| |||
|
| |||
6. The console requires two "AA" batteries (not includ- | 6 |
|
| |
ed); alkaline batteries are recommended. Open the |
|
| ||
|
|
| ||
Battery Cover (56) as shown. Insert two batteries |
|
|
| |
into the battery compartment, with the negative |
|
|
| |
ends of the batteries touching the springs. Close |
|
|
| |
the battery cover, push up on the battery cover tab, |
| 56 | Battery Cover Tab | |
and then push the tab forward as shown in the inset |
| |||
|
| |||
drawing. Be sure that the tab locks into place. |
|
|
| |
| Batteries |
|
| |
7.Make sure that all parts are properly tightened before you use the treadmill. Note: Some parts may be left over after assembly is completed. Save the included allen wrench for adjusting the walking belt. To protect the floor or carpet from damage, place a mat under the treadmill.
6