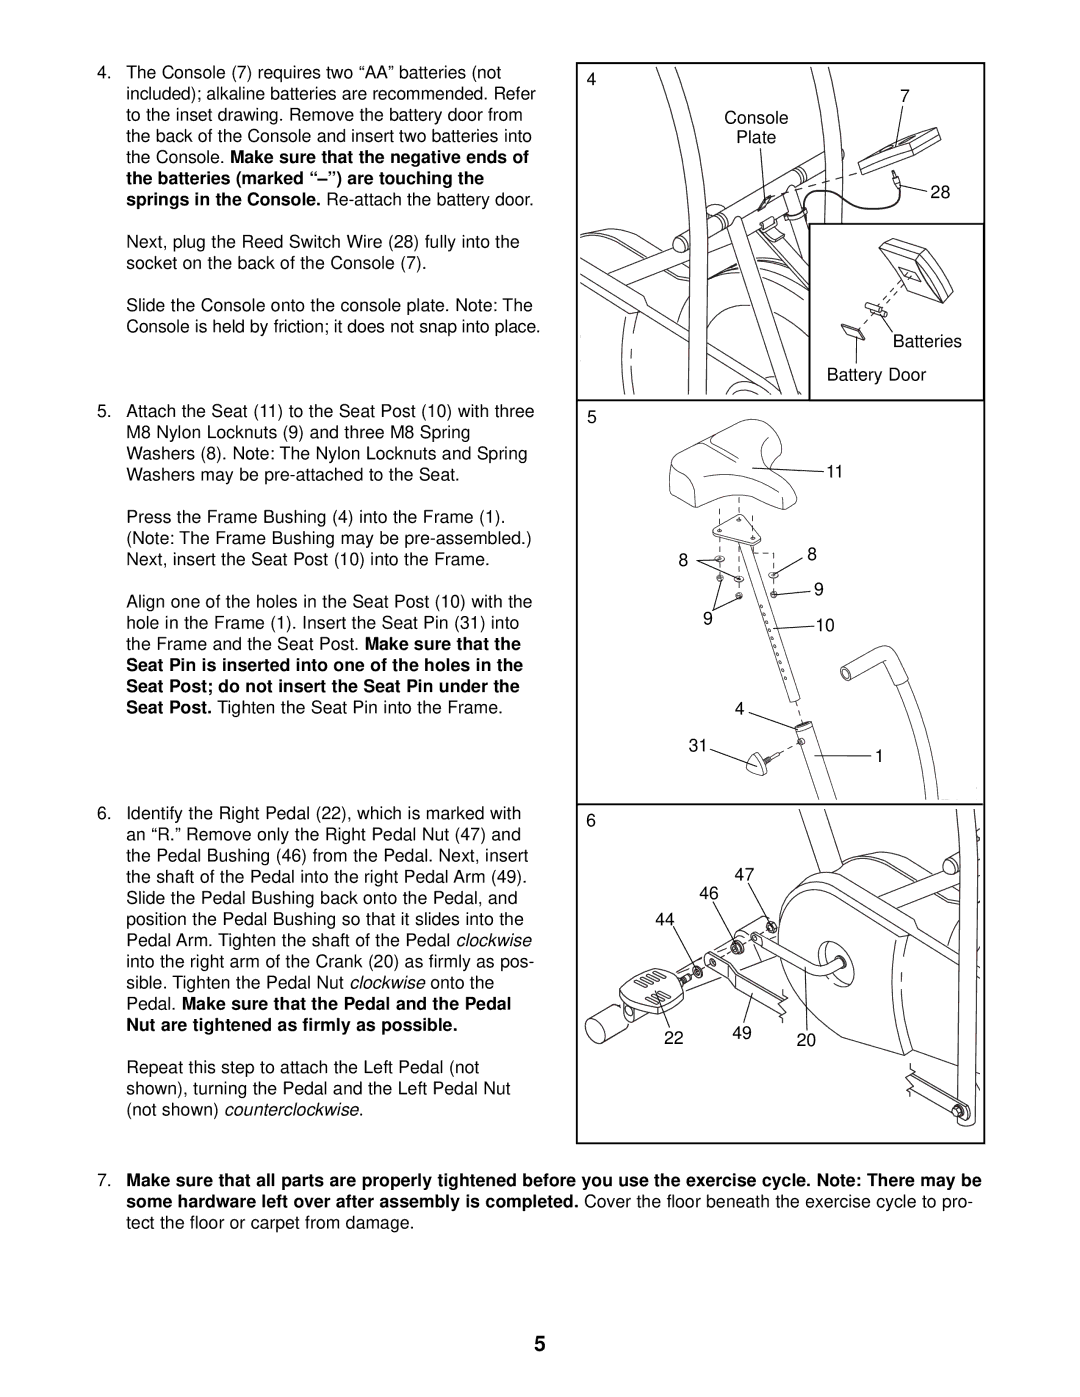
4. The Console (7) requires two “AA” batteries (not | 4 |
|
|
included); alkaline batteries are recommended. Refer |
| 7 | |
|
| ||
to the inset drawing. Remove the battery door from |
| Console |
|
the back of the Console and insert two batteries into |
| Plate |
|
the Console. Make sure that the negative ends of |
|
|
|
the batteries (marked |
|
| 28 |
springs in the Console. |
|
| |
|
|
| |
Next, plug the Reed Switch Wire (28) fully into the |
|
|
|
socket on the back of the Console (7). |
|
|
|
Slide the Console onto the console plate. Note: The |
|
|
|
Console is held by friction; it does not snap into place. |
|
| Batteries |
|
|
| |
|
|
| Battery Door |
5. Attach the Seat (11) to the Seat Post (10) with three | 5 |
|
|
M8 Nylon Locknuts (9) and three M8 Spring |
|
| |
|
|
| |
Washers (8). Note: The Nylon Locknuts and Spring |
|
| 11 |
Washers may be |
|
| |
Press the Frame Bushing (4) into the Frame (1). |
|
|
|
(Note: The Frame Bushing may be |
|
| 8 |
Next, insert the Seat Post (10) into the Frame. | 8 |
| |
Align one of the holes in the Seat Post (10) with the |
|
| 9 |
9 |
|
| |
hole in the Frame (1). Insert the Seat Pin (31) into |
| 10 | |
the Frame and the Seat Post. Make sure that the |
|
|
|
Seat Pin is inserted into one of the holes in the |
|
|
|
Seat Post; do not insert the Seat Pin under the |
|
|
|
Seat Post. Tighten the Seat Pin into the Frame. |
| 4 |
|
| 31 |
| 1 |
|
|
| |
6. Identify the Right Pedal (22), which is marked with | 6 |
|
|
an “R.” Remove only the Right Pedal Nut (47) and |
|
| |
|
|
| |
the Pedal Bushing (46) from the Pedal. Next, insert |
| 47 |
|
the shaft of the Pedal into the right Pedal Arm (49). | 46 |
| |
Slide the Pedal Bushing back onto the Pedal, and |
|
| |
position the Pedal Bushing so that it slides into the | 44 |
|
|
Pedal Arm. Tighten the shaft of the Pedal clockwise |
|
|
|
into the right arm of the Crank (20) as firmly as pos- |
|
|
|
sible. Tighten the Pedal Nut clockwise onto the |
|
|
|
Pedal. Make sure that the Pedal and the Pedal |
|
|
|
Nut are tightened as firmly as possible. | 22 | 49 | 20 |
| |||
Repeat this step to attach the Left Pedal (not |
|
|
|
shown), turning the Pedal and the Left Pedal Nut |
|
|
|
(not shown) counterclockwise. |
|
|
|
7. Make sure that all parts are properly tightened before you use the exercise cycle. Note: There may be | |||
some hardware left over after assembly is completed. Cover the floor beneath the exercise cycle to pro- | |||
tect the floor or carpet from damage. |
|
|
|
5