ASSEMBLY
Assembly requires two persons. | Set the treadmill in a cleared area and remove all packing materials; | do not | |
dispose of the packing materials until assembly is completed. | Note: The underside of the treadmill walking | ||
belt is coated with |
| ||
the top of the walking belt or the shipping carton. This does not affect treadmill performance. If there is lubricant | |||
on top of the walking belt, simply wipe off the lubricant with a soft cloth and a mild, |
| ||
Assembly requires a phillips screwdriver | and two adjustable wrenches | . | |
Note: To identify small parts used during assembly, refer |
|
| |
to the PART IDENTIFICATION CHART in the center of this |
|
| |
manual. |
| •Hazardous Voltage | |
|
| ||
•Risk of Electric Shock
|
|
| •Unplug Treadmill before Assembly | ||
|
|
| /Disassembly. |
| |
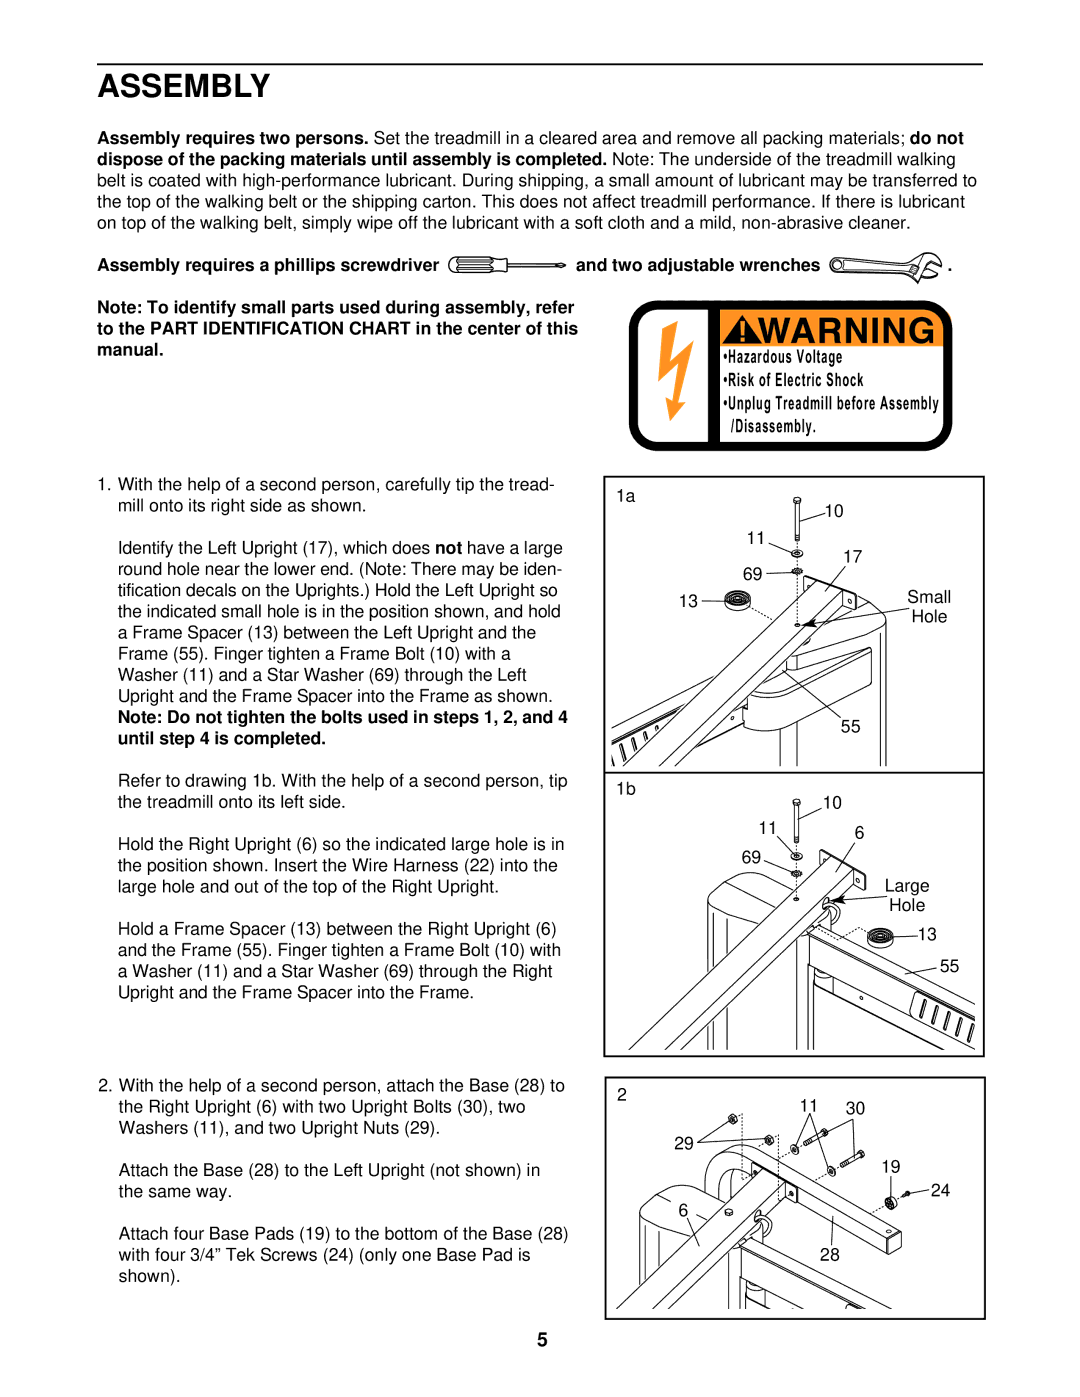
1. With the help of a second person, carefully tip the tread- | 1a |
|
| ||
mill onto its right side as shown. |
|
| 10 | ||
|
|
| |||
|
|
|
| ||
Identify the Left Upright (17), which does | not have a large |
| 11 | 17 | |
|
| ||||
round hole near the lower end. (Note: There may be iden- |
| 69 | |||
|
| ||||
tification decals on the Uprights.) Hold the Left Upright so | 13 |
| Small | ||
the indicated small hole is in the position shown, and hold |
| ||||
|
| Hole | |||
a Frame Spacer (13) between the Left Upright and the |
|
|
|
| |
Frame (55). Finger tighten a Frame Bolt (10) with a |
|
|
| ||
Washer (11) and a Star Washer (69) through the Left |
|
|
| ||
Upright and the Frame Spacer into the Frame as shown. |
|
|
|
| |
Note: Do not tighten the bolts used in steps 1, 2, and 4 |
|
| 55 | ||
until step 4 is completed. |
|
|
| ||
|
|
|
| ||
Refer to drawing 1b. With the help of a second person, tip | 1b |
|
| ||
the treadmill onto its left side. |
| 10 | |||
|
| ||||
Hold the Right Upright (6) so the indicated large hole is in |
| 11 | 6 | ||
| 69 |
| |||
the position shown. Insert the Wire Harness (22) into the |
|
| |||
|
|
| |||
large hole and out of the top of the Right Upright. |
|
|
| Large | |
|
|
|
| Hole | |
Hold a Frame Spacer (13) between the Right Upright (6) |
|
| 13 | ||
and the Frame (55). Finger tighten a Frame Bolt (10) with |
|
| |||
|
| 55 | |||
a Washer (11) and a Star Washer (69) through the Right |
|
| |||
|
|
| |||
Upright and the Frame Spacer into the Frame. |
|
|
|
| |
2. With the help of a second person, attach the Base (28) to | 2 |
|
| ||
the Right Upright (6) with two Upright Bolts (30), two | 11 | 30 | |||
| |||||
Washers (11), and two Upright Nuts (29). |
| 29 |
|
| |
|
|
|
| ||
Attach the Base (28) to the Left Upright (not shown) in |
|
| 19 | ||
the same way. |
| 6 |
| 24 | |
|
|
|
| ||
Attach four Base Pads (19) to the bottom of the Base (28) |
|
|
| ||
with four 3/4” Tek Screws (24) (only one Base Pad is |
| 28 | |||
shown). |
|
|
|
| |
5