ASSEMBLY
Assembly requires two people. Set the treadmill in a cleared area and remove all packing materials. Do not dis- pose of the packing materials until assembly is completed. In addition to the included allen wrench, assembly
requires a phillips screwdriver ![]()
![]() , an adjustable wrench
, an adjustable wrench ![]()
![]() and scissors
and scissors ![]() .
.
Note: The underside of the treadmill walking belt is coated with
Handrail Bolt
Handrail Washer
Handrail Star Washer
Latch Screw/Rack Screw | Console Screw |
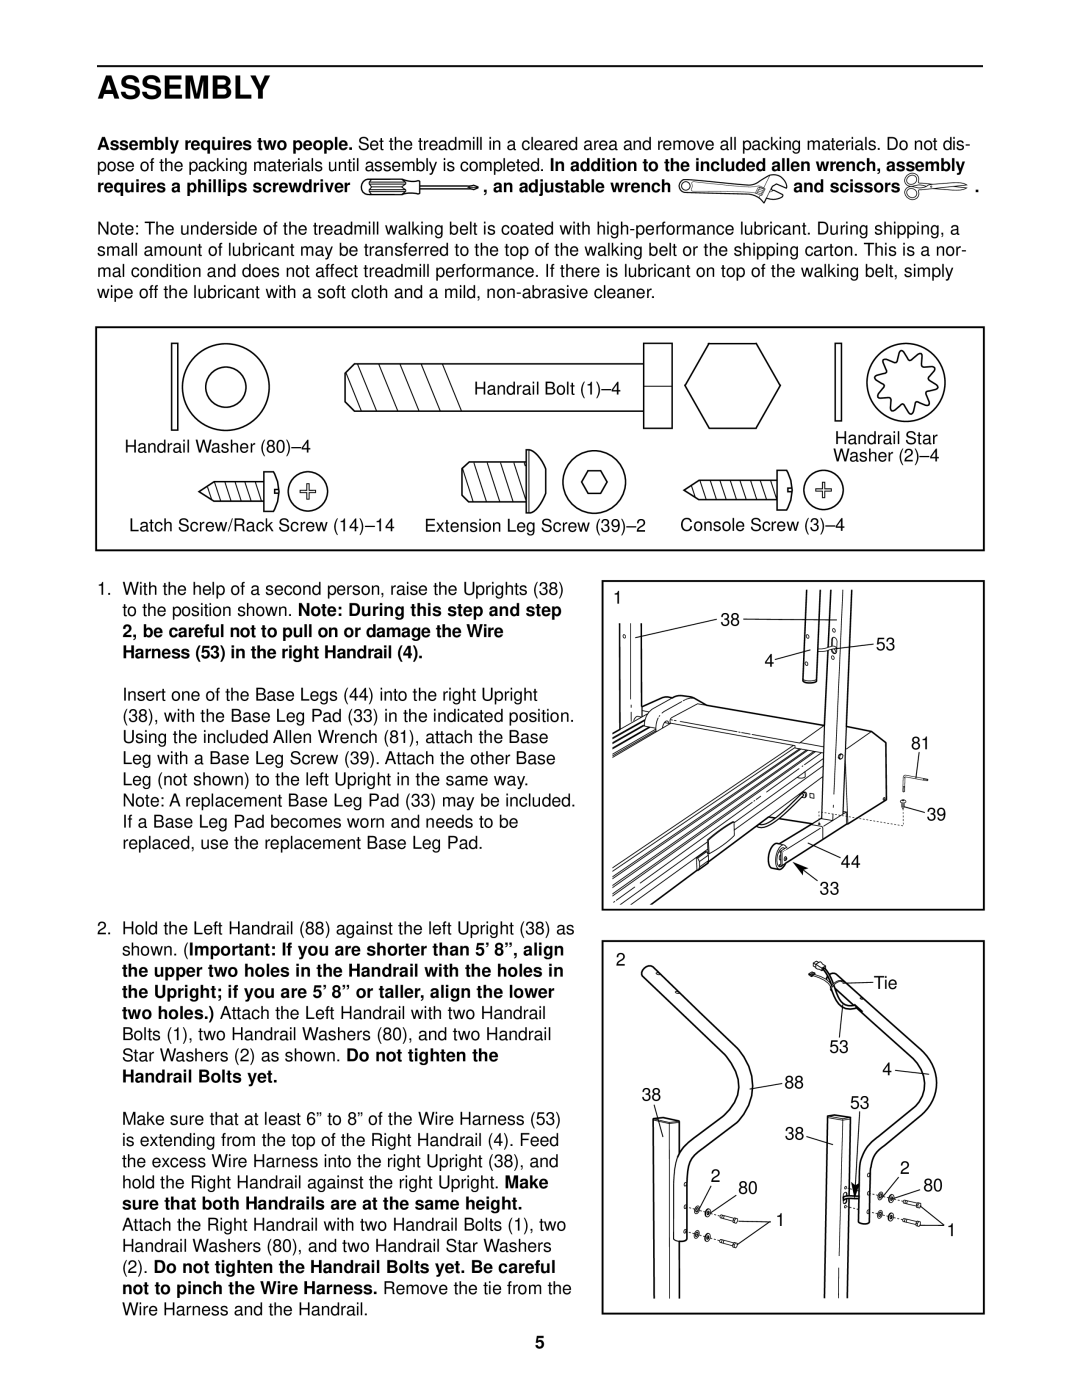
1. With the help of a second person, raise the Uprights (38) | 1 |
|
|
|
to the position shown. Note: During this step and step |
|
|
| |
| 38 |
|
| |
2, be careful not to pull on or damage the Wire |
|
|
| |
|
|
| 53 | |
Harness (53) in the right Handrail (4). |
|
| 4 | |
|
|
| ||
|
|
|
| |
Insert one of the Base Legs (44) into the right Upright |
|
|
|
|
(38), with the Base Leg Pad (33) in the indicated position. |
|
|
|
|
Using the included Allen Wrench (81), attach the Base |
|
|
| 81 |
Leg with a Base Leg Screw (39). Attach the other Base |
|
|
| |
|
|
|
| |
Leg (not shown) to the left Upright in the same way. |
|
|
|
|
Note: A replacement Base Leg Pad (33) may be included. |
|
|
| 39 |
If a Base Leg Pad becomes worn and needs to be |
|
|
| |
|
|
|
| |
replaced, use the replacement Base Leg Pad. |
|
|
| 44 |
|
|
|
| |
|
|
|
| 33 |
2. Hold the Left Handrail (88) against the left Upright (38) as |
|
|
|
|
shown. (Important: If you are shorter than 5’ 8”, align | 2 |
|
|
|
the upper two holes in the Handrail with the holes in |
|
|
| |
|
|
| Tie | |
the Upright; if you are 5’ 8” or taller, align the lower |
|
|
| |
|
|
|
| |
two holes.) Attach the Left Handrail with two Handrail |
|
|
|
|
Bolts (1), two Handrail Washers (80), and two Handrail |
|
|
| 53 |
Star Washers (2) as shown. Do not tighten the |
|
|
| |
|
|
| 4 | |
Handrail Bolts yet. |
|
| 88 | |
38 |
|
| ||
|
|
| ||
|
|
| 53 | |
Make sure that at least 6” to 8” of the Wire Harness (53) |
|
|
| |
|
| 38 |
| |
is extending from the top of the Right Handrail (4). Feed |
|
|
| |
|
|
|
| |
the excess Wire Harness into the right Upright (38), and | 2 |
|
| 2 |
hold the Right Handrail against the right Upright. Make |
|
| ||
80 |
| 80 | ||
sure that both Handrails are at the same height. |
|
| 1 |
|
Attach the Right Handrail with two Handrail Bolts (1), two |
|
| 1 | |
Handrail Washers (80), and two Handrail Star Washers |
|
|
| |
|
|
|
| |
(2). Do not tighten the Handrail Bolts yet. Be careful |
|
|
|
|
not to pinch the Wire Harness. Remove the tie from the |
|
|
|
|
Wire Harness and the Handrail. |
|
|
|
|
5
