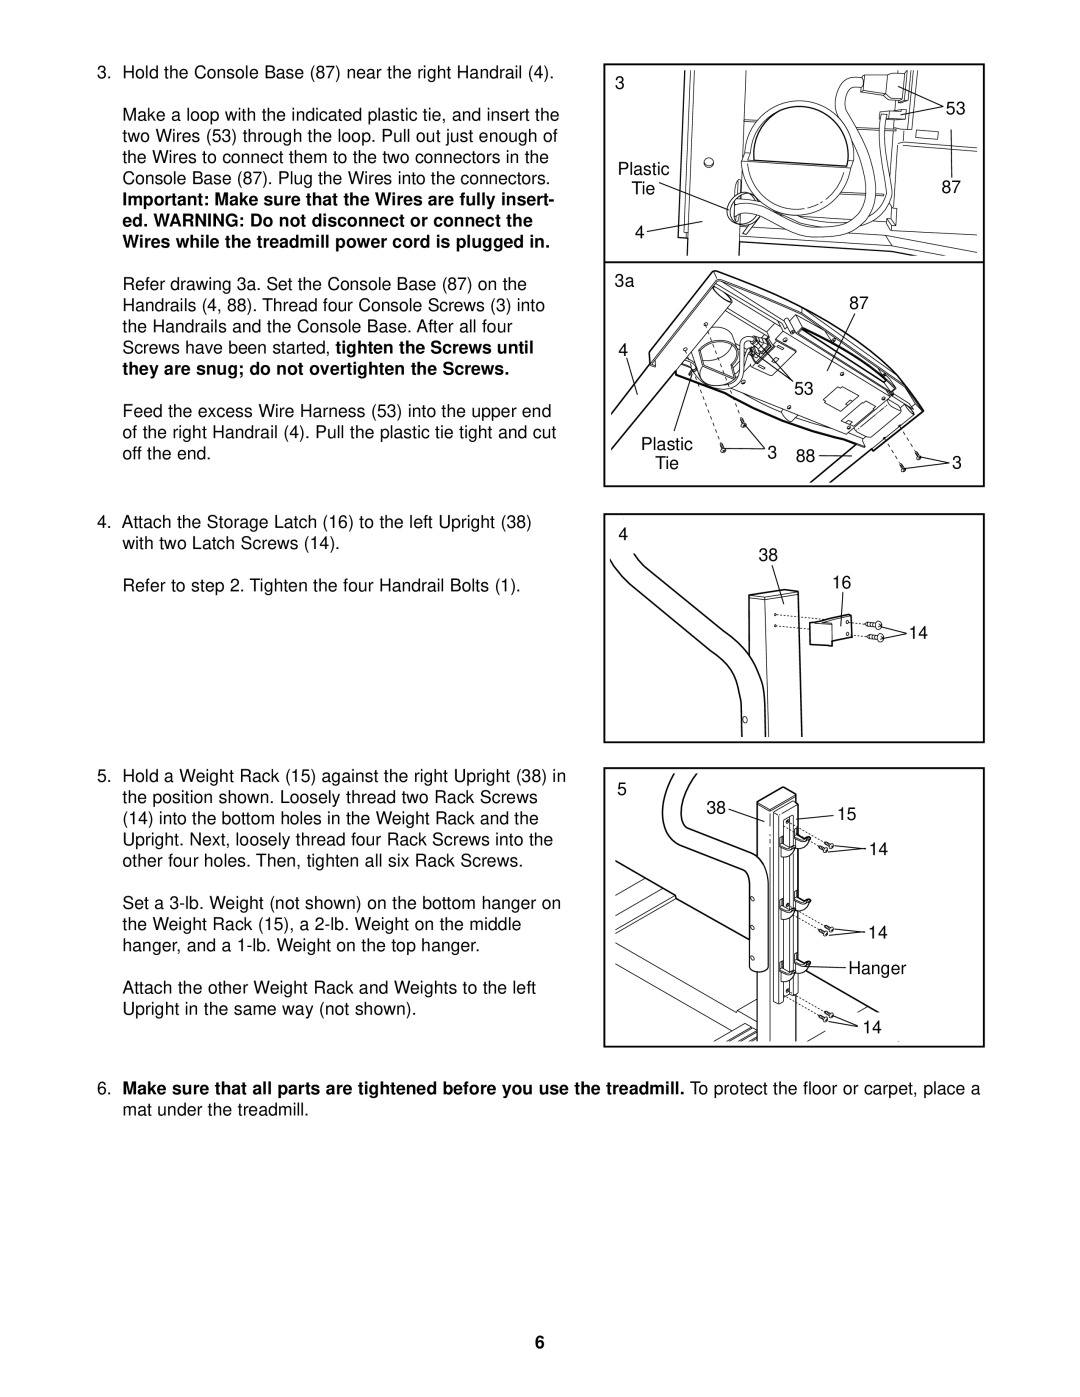
3. Hold the Console Base (87) near the right Handrail (4). | 3 |
|
|
| |
|
|
|
| ||
Make a loop with the indicated plastic tie, and insert the |
|
|
| 53 | |
|
|
|
| ||
two Wires (53) through the loop. Pull out just enough of |
|
|
|
| |
the Wires to connect them to the two connectors in the | Plastic |
|
|
| |
Console Base (87). Plug the Wires into the connectors. |
|
| 87 | ||
Tie |
|
| |||
Important: Make sure that the Wires are fully insert- |
|
| |||
|
|
|
| ||
ed. WARNING: Do not disconnect or connect the | 4 |
|
|
| |
Wires while the treadmill power cord is plugged in. |
|
|
| ||
|
|
|
| ||
Refer drawing 3a. Set the Console Base (87) on the | 3a |
|
| 87 | |
Handrails (4, 88). Thread four Console Screws (3) into |
|
|
| ||
the Handrails and the Console Base. After all four |
|
|
|
| |
Screws have been started, tighten the Screws until | 4 |
|
|
| |
they are snug; do not overtighten the Screws. |
|
| 53 |
| |
|
|
|
| ||
Feed the excess Wire Harness (53) into the upper end |
|
|
|
| |
of the right Handrail (4). Pull the plastic tie tight and cut | Plastic |
|
|
| |
off the end. | 3 | 88 | 3 | ||
Tie | |||||
|
|
| |||
4. Attach the Storage Latch (16) to the left Upright (38) | 4 |
|
|
| |
with two Latch Screws (14). |
|
|
| ||
| 38 |
|
| ||
|
|
|
| ||
Refer to step 2. Tighten the four Handrail Bolts (1). |
|
|
| 16 | |
|
|
|
| 14 |
5. Hold a Weight Rack (15) against the right Upright (38) in | 5 |
| |
the position shown. Loosely thread two Rack Screws |
| ||
38 | 15 | ||
(14) into the bottom holes in the Weight Rack and the | |||
| |||
Upright. Next, loosely thread four Rack Screws into the |
| 14 | |
other four holes. Then, tighten all six Rack Screws. |
| ||
|
| ||
Set a |
|
| |
the Weight Rack (15), a |
| 14 | |
hanger, and a |
| ||
|
| ||
Attach the other Weight Rack and Weights to the left |
| Hanger | |
|
| ||
Upright in the same way (not shown). |
| 14 | |
|
|
6.Make sure that all parts are tightened before you use the treadmill. To protect the floor or carpet, place a mat under the treadmill.
6
