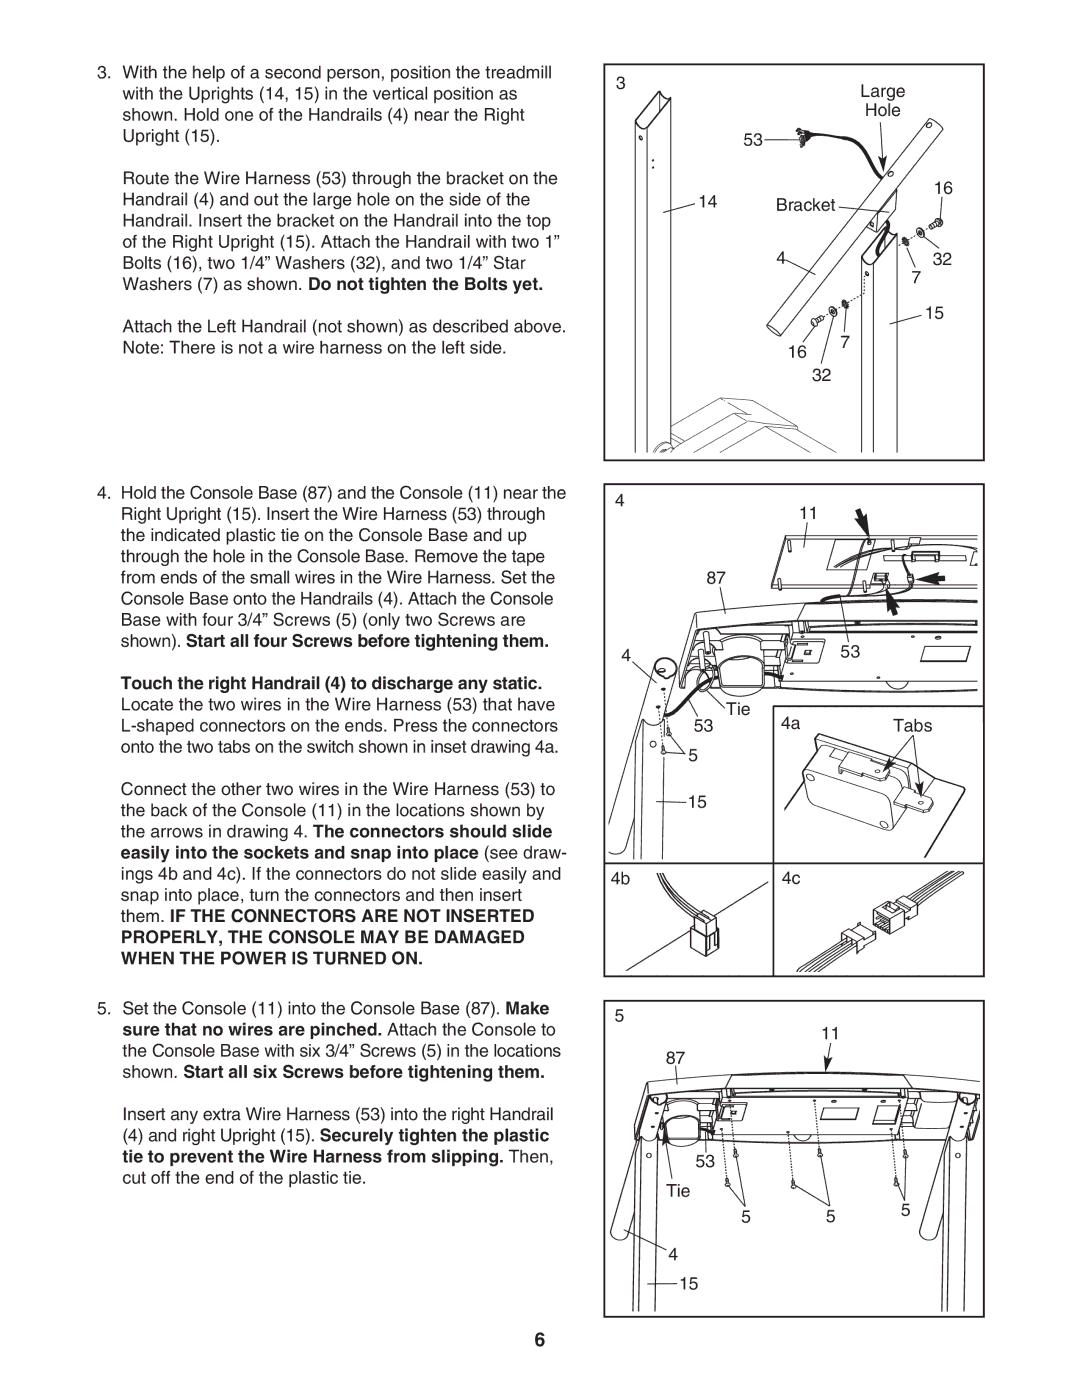
3.With the help of a second person, position the treadmill with the Uprights (14, 15) in the vertical position as shown. Hold one of the Handrails (4) near the Right Upright (15).
Route the Wire Harness (53) through the bracket on the Handrail (4) and out the large hole on the side of the Handrail. Insert the bracket on the Handrail into the top of the Right Upright (15). Attach the Handrail with two 1” Bolts (16), two 1/4” Washers (32), and two 1/4” Star Washers (7) as shown. Do not tighten the Bolts yet.
Attach the Left Handrail (not shown) as described above. Note: There is not a wire harness on the left side.
4.Hold the Console Base (87) and the Console (11) near the Right Upright (15). Insert the Wire Harness (53) through the indicated plastic tie on the Console Base and up through the hole in the Console Base. Remove the tape from ends of the small wires in the Wire Harness. Set the Console Base onto the Handrails (4). Attach the Console Base with four 3/4” Screws (5) (only two Screws are shown). Start all four Screws before tightening them.
Touch the right Handrail (4) to discharge any static. Locate the two wires in the Wire Harness (53) that have
Connect the other two wires in the Wire Harness (53) to the back of the Console (11) in the locations shown by the arrows in drawing 4. The connectors should slide easily into the sockets and snap into place (see draw- ings 4b and 4c). If the connectors do not slide easily and snap into place, turn the connectors and then insert them. IF THE CONNECTORS ARE NOT INSERTED
PROPERLY, THE CONSOLE MAY BE DAMAGED WHEN THE POWER IS TURNED ON.
5.Set the Console (11) into the Console Base (87). Make sure that no wires are pinched. Attach the Console to the Console Base with six 3/4” Screws (5) in the locations shown. Start all six Screws before tightening them.
Insert any extra Wire Harness (53) into the right Handrail
(4) and right Upright (15). Securely tighten the plastic tie to prevent the Wire Harness from slipping. Then, cut off the end of the plastic tie.
6
3 |
| Large | |
|
| ||
|
| Hole | |
53 |
|
| |
14 | Bracket | 16 | |
| |||
| 4 | 32 | |
|
| 7 | |
|
| 15 | |
| 16 | 7 | |
|
| ||
| 32 |
| |
4 | 11 |
| |
|
| ||
87 |
|
| |
4 |
| 53 | |
Tie | 4a | Tabs | |
53 | |||
5 |
|
| |
15 |
|
| |
4b | 4c |
| |
5 | 11 |
| |
|
| ||
87 |
|
| |
53 |
|
| |
Tie |
| 5 | |
5 | 5 | ||
| |||
4 |
|
| |
15 |
|
|
