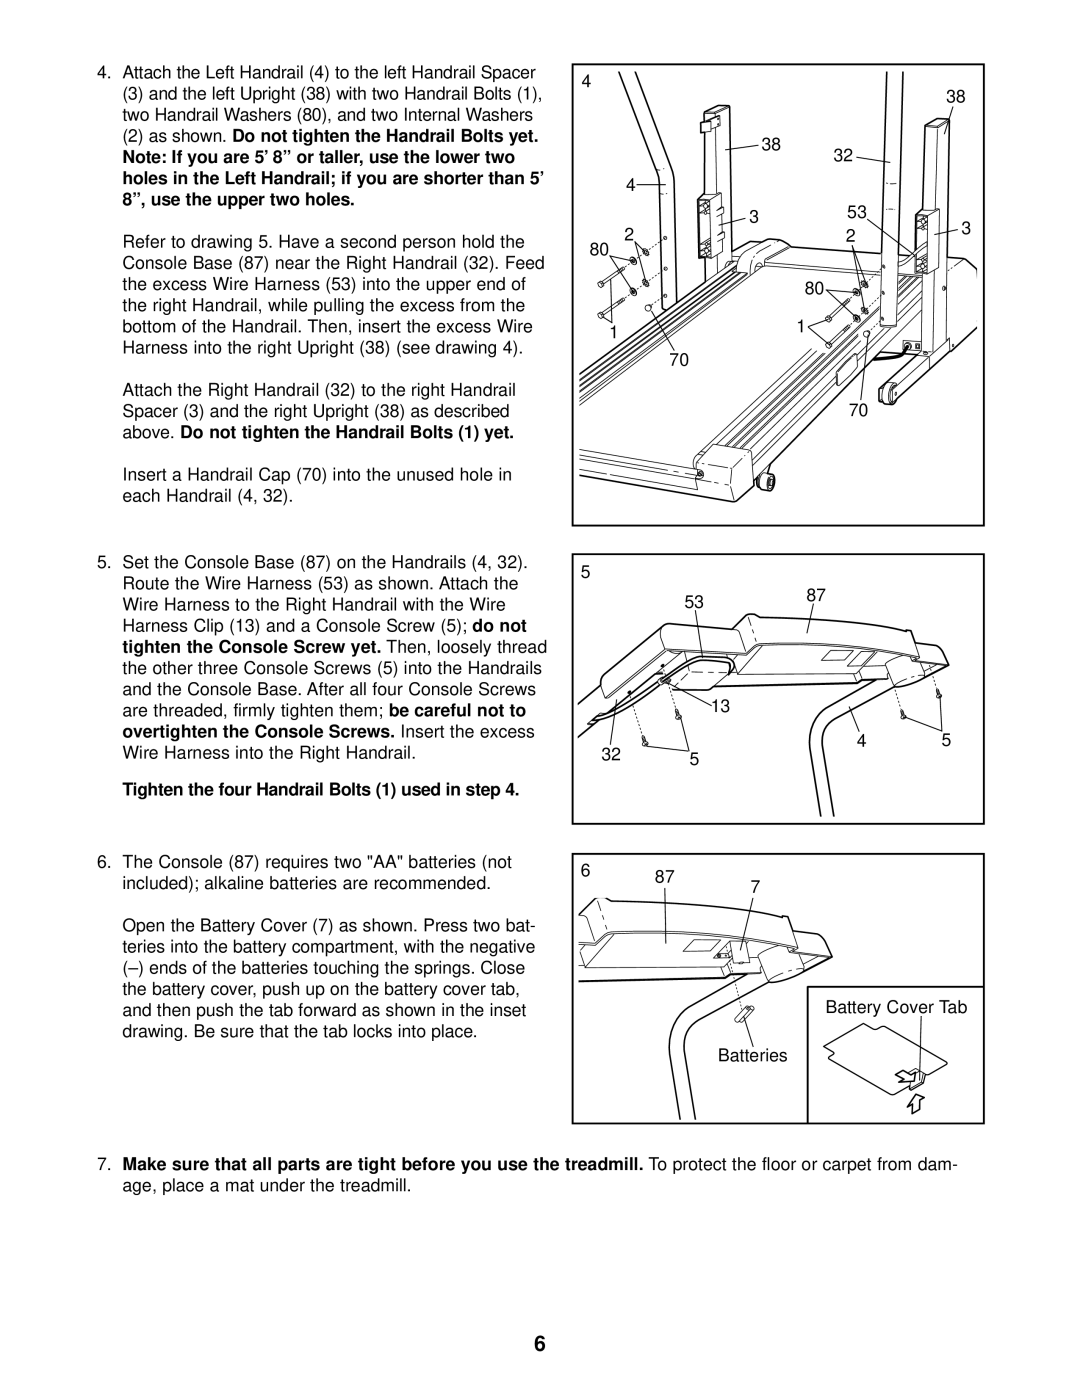
4. Attach the Left Handrail (4) to the left Handrail Spacer | 4 |
|
|
|
|
|
(3) and the left Upright (38) with two Handrail Bolts (1), |
|
|
|
| 38 | |
|
|
|
|
| ||
two Handrail Washers (80), and two Internal Washers |
|
|
|
|
|
|
(2) as shown. Do not tighten the Handrail Bolts yet. |
|
|
| 38 | 32 |
|
Note: If you are 5’ 8” or taller, use the lower two |
|
|
|
| ||
|
|
|
|
| ||
holes in the Left Handrail; if you are shorter than 5’ | 4 |
|
|
|
|
|
8”, use the upper two holes. |
|
|
|
|
| |
|
| 3 |
| 53 |
| |
| 2 |
|
| 3 | ||
Refer to drawing 5. Have a second person hold the |
|
|
| 2 | ||
|
|
|
| |||
80 |
|
|
|
|
| |
Console Base (87) near the Right Handrail (32). Feed |
|
|
|
|
| |
|
|
|
|
|
| |
the excess Wire Harness (53) into the upper end of |
|
|
|
| 80 |
|
the right Handrail, while pulling the excess from the |
|
|
|
|
|
|
bottom of the Handrail. Then, insert the excess Wire | 1 |
|
|
| 1 |
|
Harness into the right Upright (38) (see drawing 4). |
|
|
|
|
| |
| 70 |
|
|
|
| |
|
|
|
|
|
| |
Attach the Right Handrail (32) to the right Handrail |
|
|
|
|
|
|
Spacer (3) and the right Upright (38) as described |
|
|
|
| 70 |
|
above. Do not tighten the Handrail Bolts (1) yet. |
|
|
|
|
|
|
Insert a Handrail Cap (70) into the unused hole in |
|
|
|
|
|
|
each Handrail (4, 32). |
|
|
|
|
|
|
5. Set the Console Base (87) on the Handrails (4, 32). | 5 |
|
|
|
|
|
Route the Wire Harness (53) as shown. Attach the |
|
|
|
|
| |
| 53 |
|
| 87 |
| |
Wire Harness to the Right Handrail with the Wire |
|
|
|
| ||
|
|
|
|
| ||
Harness Clip (13) and a Console Screw (5); do not |
|
|
|
|
|
|
tighten the Console Screw yet. Then, loosely thread |
|
|
|
|
|
|
the other three Console Screws (5) into the Handrails |
|
|
|
|
|
|
and the Console Base. After all four Console Screws |
|
| 13 |
|
|
|
are threaded, firmly tighten them; be careful not to |
|
|
|
|
| |
overtighten the Console Screws. Insert the excess |
|
|
|
| 4 | 5 |
Wire Harness into the Right Handrail. | 32 | 5 |
|
| ||
|
|
|
| |||
Tighten the four Handrail Bolts (1) used in step 4. |
|
|
|
|
|
|
6. The Console (87) requires two "AA" batteries (not | 6 | 87 |
|
|
|
|
included); alkaline batteries are recommended. | 7 |
|
|
| ||
|
|
|
| |||
|
|
|
|
|
Open the Battery Cover (7) as shown. Press two bat- |
|
teries into the battery compartment, with the negative |
|
| |
the battery cover, push up on the battery cover tab, | Battery Cover Tab |
and then push the tab forward as shown in the inset | |
drawing. Be sure that the tab locks into place. |
|
| Batteries |
7.Make sure that all parts are tight before you use the treadmill. To protect the floor or carpet from dam- age, place a mat under the treadmill.
6