Wharfedale Xarus Series Installation and User Guide
Introduction
The Wharfedale Xarus Series is a range of versatile loudspeakers using advanced materials and the latest precision drive units. The XR 1000, XR 2000 and XR 3000 are small stand mounting loudspeakers. The XR 3500, XR 4000 and XR 5000 are floor-standing models. The range includes a centre channel, XR CEN. The XR 1000 and XR 2000 may be used as either surround sound speakers in Home Theatre applications, or as the main speakers in a small stereo system. To complement your system, choose from our range of Powercube powered subwoofers for the perfect Home Cinema experience. Thank you for purchasing Wharfedale. We hope your loudspeakers will give you a rewarding listening experience for many years .
Please read these instructions carefully before installing your Wharfedale loudspeakers.
Before making connections to any part of your sound system make sure the amplifier and all connected sources are switched off.
When you switch on your system or change sources, set the volume control to minimum and turn up the level gradually.
DO NOT use your amplifier at full volume. The position of the Volume Control is NOT a reliable guide as to the maximum volume level or capabilities of your sound system. Playing the system with extreme high settings of volume and tone controls will result in distorted sound and may
Preparing and connecting Your Loudspeakers
Unpacking the Speakers
Carefully remove each loudspeaker from its packing carton. Be especially careful when removing the polythene bag.
DO NOT attempt to lift the loudspeaker by the polythene bag.
Retain the packing for future use. If you decide to dispose of the packing, please do so safely.
Stands and Brackets Stands and Brackets
The XR 1000, XR 2000 and XR 3000 are suitable for stand mounting. The quality of loudspeaker stands makes a considerable difference to the performance of your loudspeakers so do not use flimsy inferior products.
The XR1000 and XR2000 can be mounted on walls or even sturdy shelves.
The XR1000 and XR2000 are provided with Keyhole slots for wall mounting.
Please ensure they are out of reach of children .
Ensure that the wall is sound and can support the product. Drill 5mm holes in the wall. Fix a suitable No 8 round head screw firmly into each hole using wall plugs appropriate for this purpose. Leave a stub of 5mm protruding from the wall. Align the hole in the mounting bracket over the screw head and carefully lower the unit onto the screw.
XR CEN Centre Channel Loudspeaker
A set of self adhesive pads is provided. Peel off the backing material and fix a pad close to each corner of the bottom surface of the loudspeaker.
Choosing and Preparing Cables
Specialist audio cable usually offers better performance than general purpose 'bell' or 'zip' wire.
Choose a cable of suitable diameter - cable that is too thin will limit the dynamics of the sound and may impair the bass response. Audio cable is polarised, with two cores of different colours, or often a raised rib or coloured tracer in the case of twin cable.
Split the twin cores to a depth of about 40mm. Carefully strip the insulation from each end,
damage the amplifier and loudspeakers.
DO NOT connect loudspeaker terminals to the mains supply.
Ensure that all loudspeakers in the system are correctly wired and are in phase.
DO NOT subject your loudspeakers to excessive cold, heat, humidity or sunlight.
WARNING: To reduce the risk of fire or electrical shock do not expose this product to rain or moisture. The product must not be exposed to dripping and splashing and no object filled with liquids such as a vase of flowers should be placed on the product.
No naked flame sources - such as candles - must be placed on the product.
DO NOT place heavy objects on top of loudspeaker cabinets.
NEVER let anyone, especially children push anything into holes, slots or other opening in the case.
NEVER touch the drive units which are easily damaged. If you wish to play your loudspeakers with their grilles removed be careful to protect the drive units from children and pets.
DO NOT use makeshift stands. Always fit a manufacturer's approved stand according to the instructions and using the fixings provided. Your dealer will advise you.
leaving about 10mm of bare wire. If the cable is stranded, lightly twist to gather any loose strands.
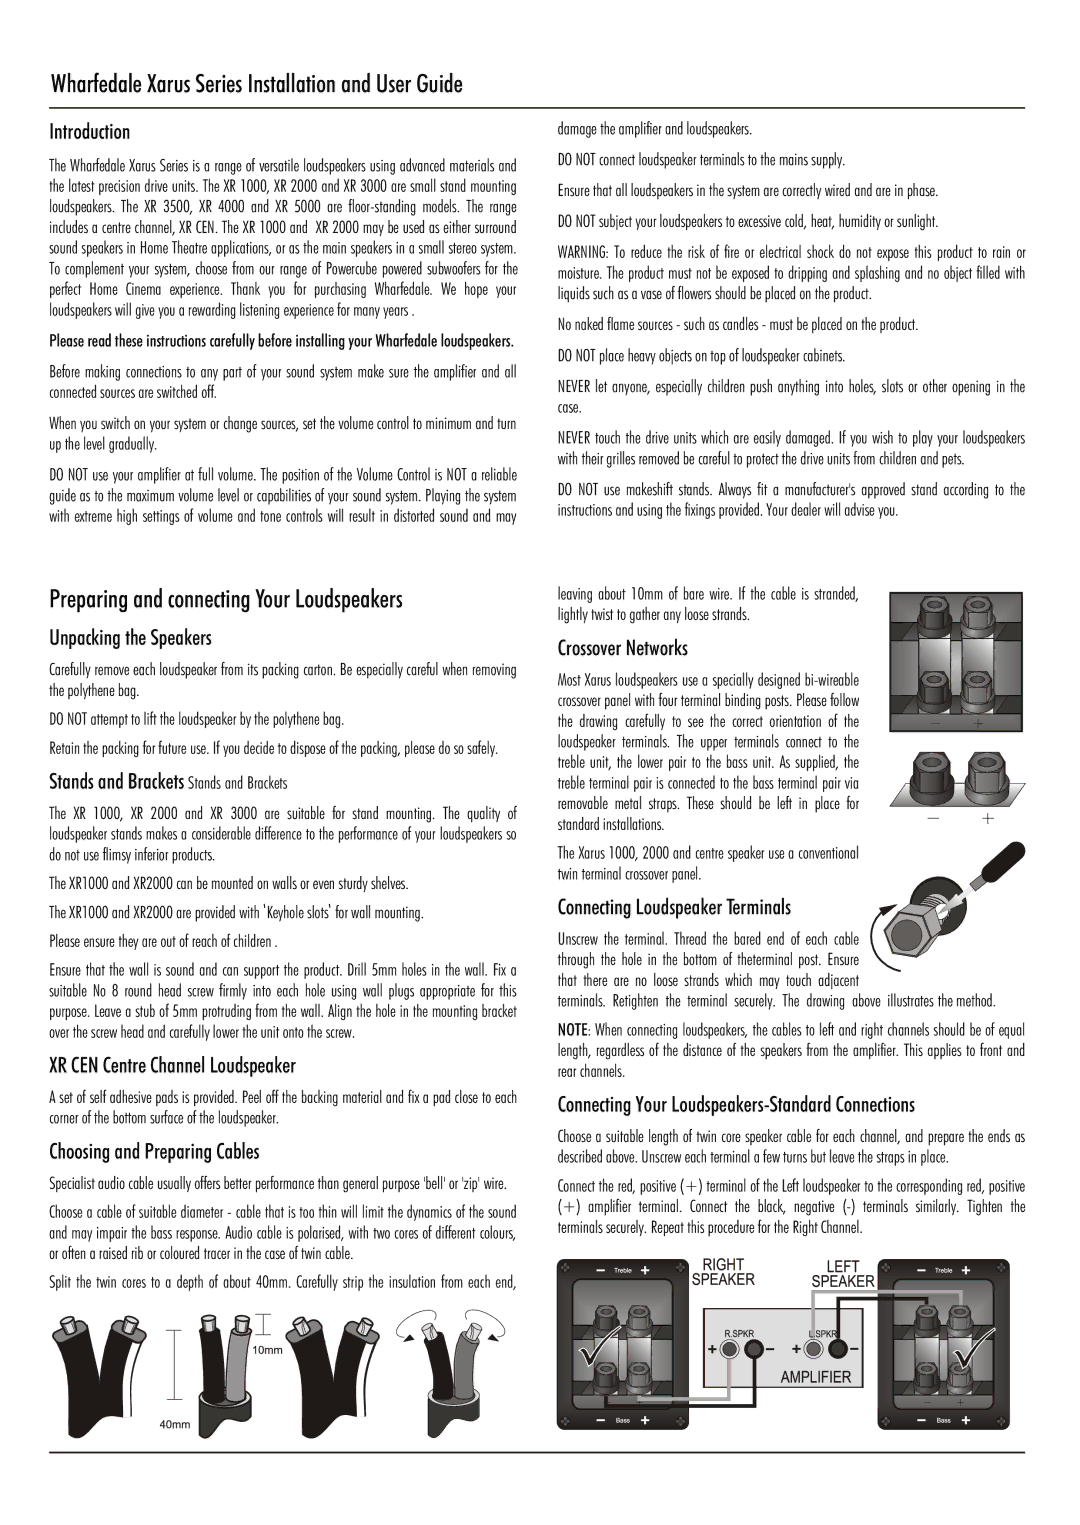
Crossover Networks
Most Xarus loudspeakers use a specially designed bi-wireable crossover panel with four terminal binding posts. Please follow the drawing carefully to see the correct orientation of the loudspeaker terminals. The upper terminals connect to the treble unit, the lower pair to the bass unit. As supplied, the treble terminal pair is connected to the bass terminal pair via removable metal straps. These should be left in place for standard installations.
The Xarus 1000, 2000 and centre speaker use a conventional twin terminal crossover panel.
Connecting Loudspeaker Terminals
Unscrew the terminal. Thread the bared end of each cable through the hole in the bottom of theterminal post. Ensure
that there are no loose strands which may touch adjacent
terminals. Retighten the terminal securely. The drawing above illustrates the method.
NOTE: When connecting loudspeakers, the cables to left and right channels should be of equal length, regardless of the distance of the speakers from the amplifier. This applies to front and rear channels.
Connecting Your Loudspeakers-Standard Connections
Choose a suitable length of twin core speaker cable for each channel, and prepare the ends as described above. Unscrew each terminal a few turns but leave the straps in place.
Connect the red, positive (+) terminal of the Left loudspeaker to the corresponding red, positive
(+)amplifier terminal. Connect the black, negative (-) terminals similarly. Tighten the terminals securely. Repeat this procedure for the Right Channel.