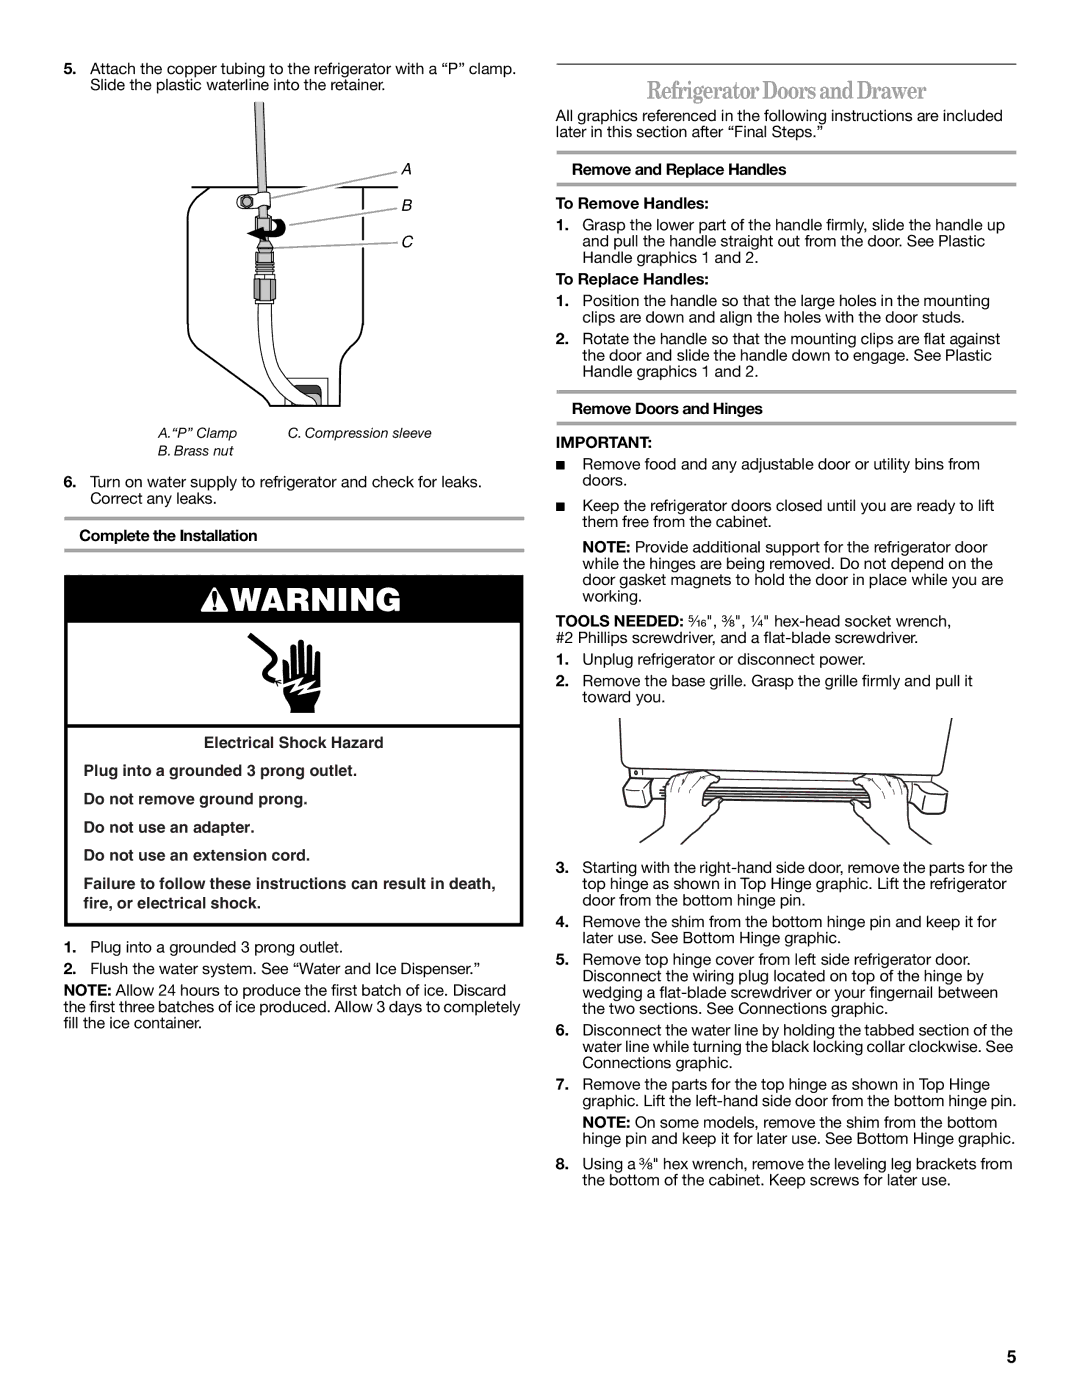
5.Attach the copper tubing to the refrigerator with a “P” clamp. Slide the plastic waterline into the retainer.

A

B

C

A.“P” Clamp

C. Compression sleeve

B. Brass nut


6.Turn on water supply to refrigerator and check for leaks. Correct any leaks.

Complete the Installation

WARNING

Electrical Shock Hazard

Plug into a grounded 3 prong outlet.

Do not remove ground prong.

Do not use an adapter.

Do not use an extension cord.

Failure to follow these instructions can result in death, fire, or electrical shock.

1.Plug into a grounded 3 prong outlet.

2.Flush the water system. See “Water and Ice Dispenser.”

NOTE: Allow 24 hours to produce the first batch of ice. Discard the first three batches of ice produced. Allow 3 days to completely fill the ice container.

Refrigerator Doors and Drawer

All graphics referenced in the following instructions are included later in this section after “Final Steps.”

Remove and Replace Handles

To Remove Handles:

1.Grasp the lower part of the handle firmly, slide the handle up and pull the handle straight out from the door. See Plastic Handle graphics 1 and 2.

To Replace Handles:

1.Position the handle so that the large holes in the mounting clips are down and align the holes with the door studs.

2.Rotate the handle so that the mounting clips are flat against the door and slide the handle down to engage. See Plastic Handle graphics 1 and 2.

Remove Doors and Hinges

IMPORTANT:

Remove food and any adjustable door or utility bins from doors.

Keep the refrigerator doors closed until you are ready to lift them free from the cabinet.

NOTE: Provide additional support for the refrigerator door while the hinges are being removed. Do not depend on the door gasket magnets to hold the door in place while you are working.

TOOLS NEEDED: ⁵⁄₁₆", ³⁄₈", ¹⁄₄" hex-head socket wrench, #2 Phillips screwdriver, and a flat-blade screwdriver.

1.Unplug refrigerator or disconnect power.

2.Remove the base grille. Grasp the grille firmly and pull it toward you.

3.Starting with the right-hand side door, remove the parts for the top hinge as shown in Top Hinge graphic. Lift the refrigerator door from the bottom hinge pin.

4.Remove the shim from the bottom hinge pin and keep it for later use. See Bottom Hinge graphic.

5.Remove top hinge cover from left side refrigerator door. Disconnect the wiring plug located on top of the hinge by wedging a flat-blade screwdriver or your fingernail between the two sections. See Connections graphic.

6.Disconnect the water line by holding the tabbed section of the water line while turning the black locking collar clockwise. See Connections graphic.

7.Remove the parts for the top hinge as shown in Top Hinge graphic. Lift the left-hand side door from the bottom hinge pin.

NOTE: On some models, remove the shim from the bottom hinge pin and keep it for later use. See Bottom Hinge graphic.

8.Using a ³⁄₈" hex wrench, remove the leveling leg brackets from the bottom of the cabinet. Keep screws for later use.

5

Page 5
Image 5
Whirlpool 12828185A Refrigerator Doors and Drawer, Remove and Replace Handles To Remove Handles, To Replace Handles

12828185A, 12828188A specifications

The Whirlpool 12828185A and 12828188A are two innovative appliances designed to enhance the efficiency and convenience of modern kitchens. Both models are well-regarded for their reliability and blend seamlessly into various kitchen designs, featuring contemporary finishes that appeal to a wide range of consumers.

One of the standout features of the Whirlpool 12828185A is its spacious interior. This refrigerator provides ample storage space, making it an ideal choice for families and individuals who require room for groceries and meal preparation. The adjustable shelving allows users to customize the interior layout to accommodate taller items, such as large bottles or cakes, enhancing overall usability.

On the other hand, the Whirlpool 12828188A model takes convenience a step further with its advanced cooling technologies. It employs a multi-flow air system that enhances airflow throughout the refrigerator, ensuring that food stays fresher for longer. This system helps maintain a consistent temperature across all compartments, preventing spoilage and preserving the quality of perishable items.

Both models also offer energy-efficient performance, complying with Energy Star qualifications. This not only helps users save money on energy bills but also minimizes environmental impact, aligning with the growing trend toward sustainable living. The efficient use of energy is complemented by an intuitive control panel that simplifies temperature adjustments.

In terms of design, the Whirlpool 12828185A and 12828188A come equipped with easy-to-clean surfaces, which are especially beneficial for busy kitchens. The stainless steel finish is both stylish and practical, making it a popular choice for homeowners looking to maintain a polished and modern aesthetic.

Additional features include humidity-controlled crisper drawers, which are essential for prolonging the freshness of fruits and vegetables. The crispers create the optimal environment for produce, allowing users to enjoy healthier meals without the frequent trips to the grocery store.

Furthermore, both models have been crafted with noise reduction technology, ensuring that they operate quietly, allowing for a peaceful kitchen atmosphere. With easy access through well-designed door bins and compartments, these Whirlpool refrigerators are tailored to meet the dynamic needs of modern-day cooking and food storage.

In conclusion, the Whirlpool 12828185A and 12828188A are exemplary appliances that combine functionality, style, and energy efficiency, making them indispensable in any contemporary kitchen setting. Their emphasis on innovative design and user-friendly features solidifies their reputation as reliable kitchen companions. Whether you prioritize storage space, freshness, or energy efficiency, these refrigerators are sure to meet and exceed consumer expectations.