Whirlpool 3149595 installation instructions EIectrkaI Connection, Now start, Where Local

Models: 3149595

1 5
Download 5 pages 51.04 Kb
Page 3
Image 3

F

A

3/4’.

U.L.-listed


strain

relief

junctronmust be

box.provided


at

the


It

is the

personal


w


responsibilrty


and

ObliQOtlOn

Gof the customer


to

contact


0


qualified


electrician


to

assure

that

the


electrical


installation


is

odeauote

and


in

conformance


with

the


Notronol


Electrrcol


Code


ANSVNFPA

70.lotest


edition,


and

011 loco1

codes

ond


ordrnonces,


’ Copies


of

the

standord


listed

may

be


obtained


from,


National


tire

Protection


Associoiion

Battery


March

Park


Quincy,


Massachusetts


02169


A

wiring

diagrom


is rncluded


n


in

the

Tech-sheet


(located

behind

the

oir

grille)


with


H


self-cleaning


ovens.


For

other


models,


the

wiring


diOQram

IS

located


on


the

back,

right-hand

srde

of the

oven.


EIectrkaI


connection


Electrical


around

is rewired

on this

appliance:


Electrical

Shock

Hazard


l

Do

Not


connecl


appliance


to


ele-olrtcal


supply


untrl

opplronce


IS permanenlly


grounded.


Disconnect


power

to

the

junclion


box

before

making


the

electrrcol


co”“ec1l0”.


l

This

appliance


musl

be


connecled


to

o

grounded,


melallrc,


permanent


wiring


system,


or

a groundrng


conductor


should

be

connected


lo

the


groundrng


termrnol


or lead


on

the


opplmnce.


Failure


to

follow


lhese

~nslrucr~ons


could


result

rn o

fire,


personal


rnrury.


or

elecrrrcal


shock.


This

oppl~ance


IS manufactured


with

the


neutral


White)


power


supply

wire and a cobrnet-connected


grounding


wire

(green)


twisted


together.


Connect


the

appliance


cable

to the

junction


box

through


the

3/4’,


U.L.-listed


strain

relief.

Complete

the

electrical


connectron


according

to

local

codes


ond

ordinances.


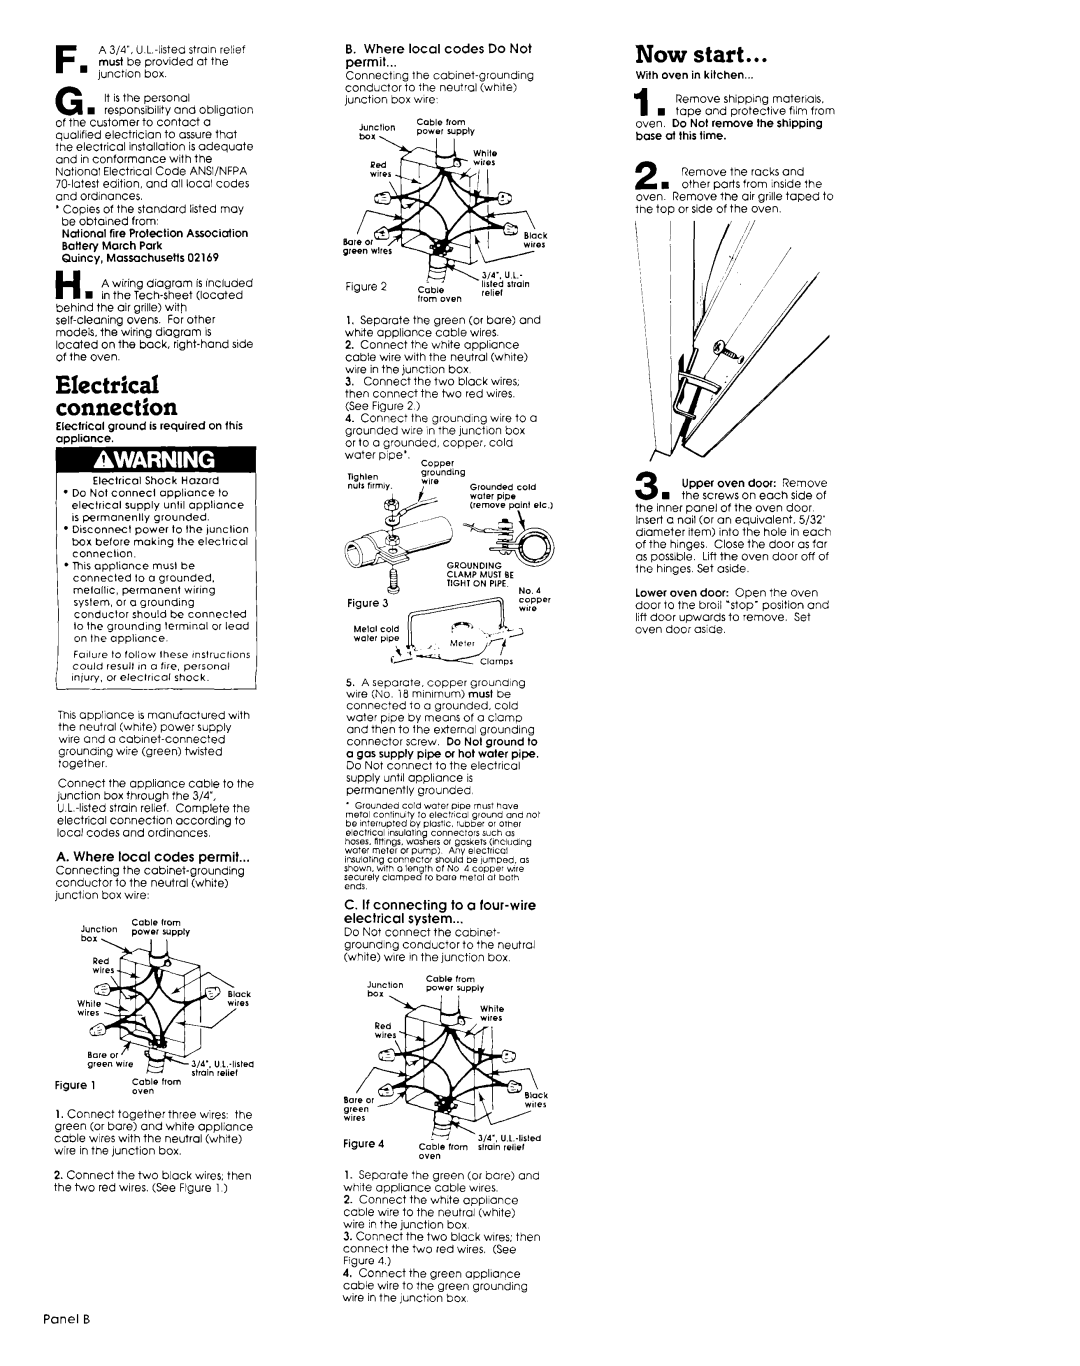
A. Where


local


codes

permit...

Connecting


the

cabinet-grounding


conductor


to

the

neutral


(white)

junctron


box

wire:


Fig

I. Connect togetherthree wires: the green (or bore) and white appliance cable wires with the neutral (whrte)

wire in the junction box.

2.Connect the two black wires, then the two red wires. (See Figure 1 )

Panel B

6.Where local codes Do Not permit...

Connecting the cabinet-groundrng

conductor to the neutral White)

junction box wrre’

k

I.

Separote

the

green

(or

bore)

and

whrte

appliance

cable

wires.


2.

Connect

the

white

appliance


cable

wire

with

the neutral

(white)


wire


in the

junction

box


3.Connect the two block wires,

then connect the two red wires. (See Figure 2 )

4.Connect the Qroundlng wire to 0

grounded wrre Inthe junciion box

or to o grounded, copper. cold

water pipe’. cODPer

Ilghlen

grotinding


““ISmm

Grounded

cold


voter

pipe


(remove


pain1 elc.)

%

GROUNDING CLAMP MUST SE

IIGHI ON PlPE

NO. *

Figure 3

5. A separate. copper grounding

wrre (No. 18 mrnrmum) must be

connected too grounded. cold water pipe by means of o clamp and then to the external QrOUndlnQ

connector screw. Do Nol ground to

a gos supply pipe of hot water pipe.

Do Not connect

to

the

electrical


supply

until


appliance


is


permanently


grounded


Grounded

cold

w,+e,


DID~ muzr

have


metal

contlnu~~cont,nu~~

to

electrical

ground

and

no,

be

Interrupted


by

plostlc.

rubber

0,

o,har


elettrlcol

i”sulo+l”

cO”“ecfo,S

such

OS


hoses.

mlngrm~ngr. .

WCSR err

or

gaskers

C,“ciud,“g

WOtel

meter

or

pump)

A””

ele‘trlca,


lmuloting

connector

shoula

be

,“mped.

OS

shown. With 0 len th of NO 4 COPWF vnre

~n~s~d~

clampe

8

to bore

me,ol

01

bofh


C. If connecting to a four-wire

electrical system...

Do Not connect the cabinet-

QrOUndlng conductor to the neutral

(white) wrre In the junction box.

Cob,* from

J”“CllO” power lupply

1.Separate the green (or bore) and

white applronce cable wires.

2.Connect the whrte oppllonce

cable wire to the neutral (whrte)

wire in the junction box

3.Connect the two black wares: then

connect the two red wires. (See Figure 4.)

4.Connect the green opplrance

cable wire to the Qreen grounding

wire in the junction box

Now start...

1With oven in kitchen...

Remove Shipping materials.

w tape and protective film from

oven. Do Not remove the shipping base al this time.

2

Remove

the

rocks

and


n

other

parts

from Inside the


oven.

Remove

the

air grille

taped

to

the top

or side

of the

oven.


Upper

oven

door: Remove


n

the

screws


on

each

side

of

3the inner

panel

of

the oven

door


Insert

a nail

(or

on

equivalent.


5/32”

drometer

item)

into


the

hole

in

each

of

the

hinges.


Close

the

door


OS far

as

possible.


Lift

the


oven

door

off

of

the

hinges.


Set

oside.


tower oven door: Open the oven door to the broil ‘stop- position and

lift door Upwards to remove. Set oven door aside.

Page 3
Image 3
Whirlpool 3149595 EIectrkaI Connection, Now start, Where Local, If connecting to a four-wire Electrical system