Before you start...
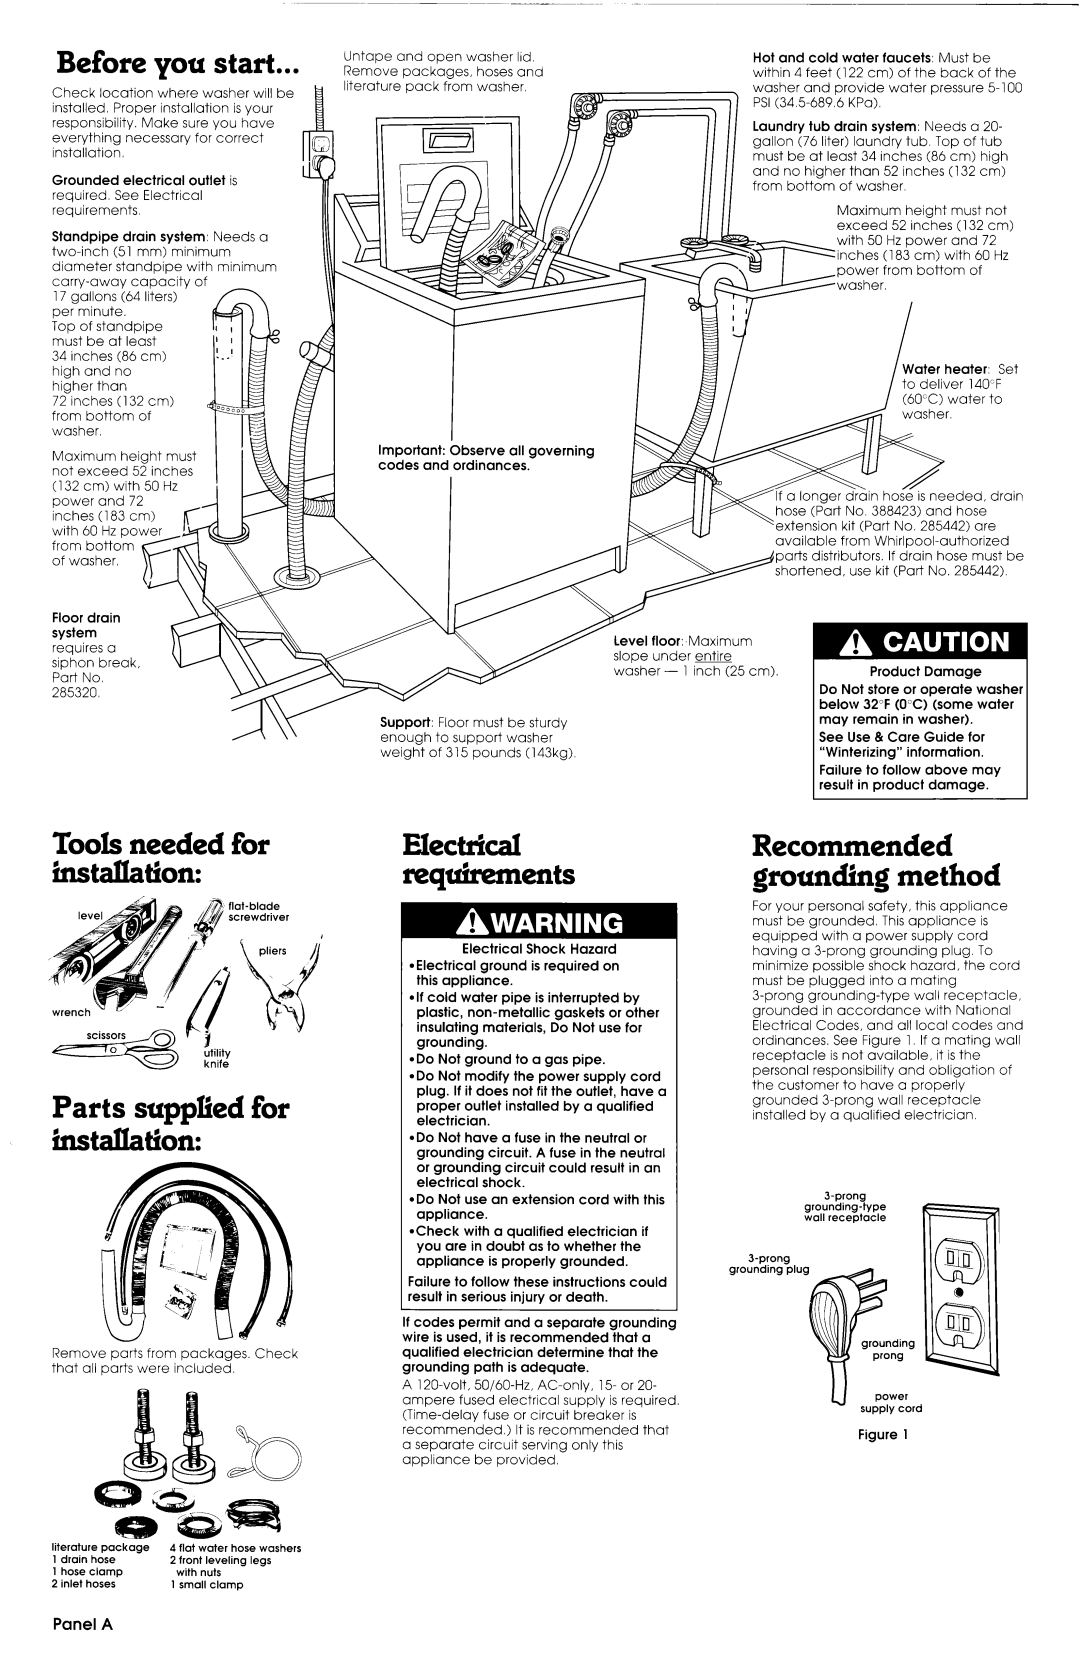
Check location where washer will be installed. Proper installation is your responsibility. Make sure you have everything necessary for correct installation.
Grounded electrical outlet is required See Electrical requirements.
Standpipe drain system: Needs a
17 gallons (64 liters) per minute.
Top of standpipe must be at least
Untape and open washer lid, Remove packages, hoses and literature pack from washer,
| Hot and cold water faucets: Must be | |
| within 4 feet (122 cm) of the back of the | |
| washer and provide water pressure | |
PSI | KPa). | |
| Laundrv tub drain svstem: Needs a 20- | |
| gallon ?76 liter) laundry tub. Top of tub | |
| must be at least 34 inches (86 cm) high | |
| and no hrgher than 52 Inches (132 cm) | |
11 11 | from bottom | of washer. |
Maximum height must not exceed 52 inches (132 cm)
higher than
72 inches (132 cm) from bottom of washer.
Maximum height must not exceed 52 inches (132 cm) with 50 Hz
Important: Observe all governing codes and ordinances.
Water heater: Set to deliver 140°F (60°C) water to
Ad washer
power and 72
from bottom
Floor drain
siphon break, Part No. 285320
Support: Floor must be sturdy enough to support washer weight of 315 pounds (143kg).
Level
c a longer &in ho<& is needed, drain hose (Part No. 388423) and hose extension kit (Part No. 285442) are available from
Product Damage
Do Not store or operate washer below 32°F (OC) (some water may remain in washer).
See Use & Care Guide for “Winterizing” information.
Failure to follow above may result in product damage.
Tools needed for ifkstallation:
screwdriver
Parts supplied for installation:
Remove parts from packages, Check that all parts were included,
literature | package | 4 flat | water hose washers |
1 drain | hose | 2 front | leveling legs |
1 hose | clamp | with | nuts |
2 inlet hoses | 1 small clamp | ||
Electrical requirements
Electrical Shock Hazard l Electrical ground is required on
this appliance.
*If cold water pipe is interrupted by plastic,
.Do Not ground to a gas pipe.
.Do Not modify the power supply cord plug. If it does not fit the outlet, have a proper outlet installed by a qualified electrician.
*Do Not have a fuse in the neutral or grounding circuit. A fuse in the neutral or grounding circuit could result in an electrical shock.
*Do Not use an extension cord with this appliance.
aCheck with a qualified electrician if you are in doubt as to whether the appliance is properly grounded.
Failure to follow these instructions could result in serious injury or death.
If codes permit and a separate grounding
wire is used, it is recommended that a qualified electrician determine that the grounding path is adequate.
A
recommended.) It is recommended that a separate circuit serving only this appliance be provided.
Recommended grounding method
For your personal safety, this appliance must be grounded. This appliance is equipped with a power supply cord having a
grounded in accordance with National Electrical Codes, and all local codes and ordinances. See Figure 1, If a mating wall receptacle is not available, it is the personal responsibility and obligation of the customer to have a properly grounded
power supply cord
Figure 1
Panel A