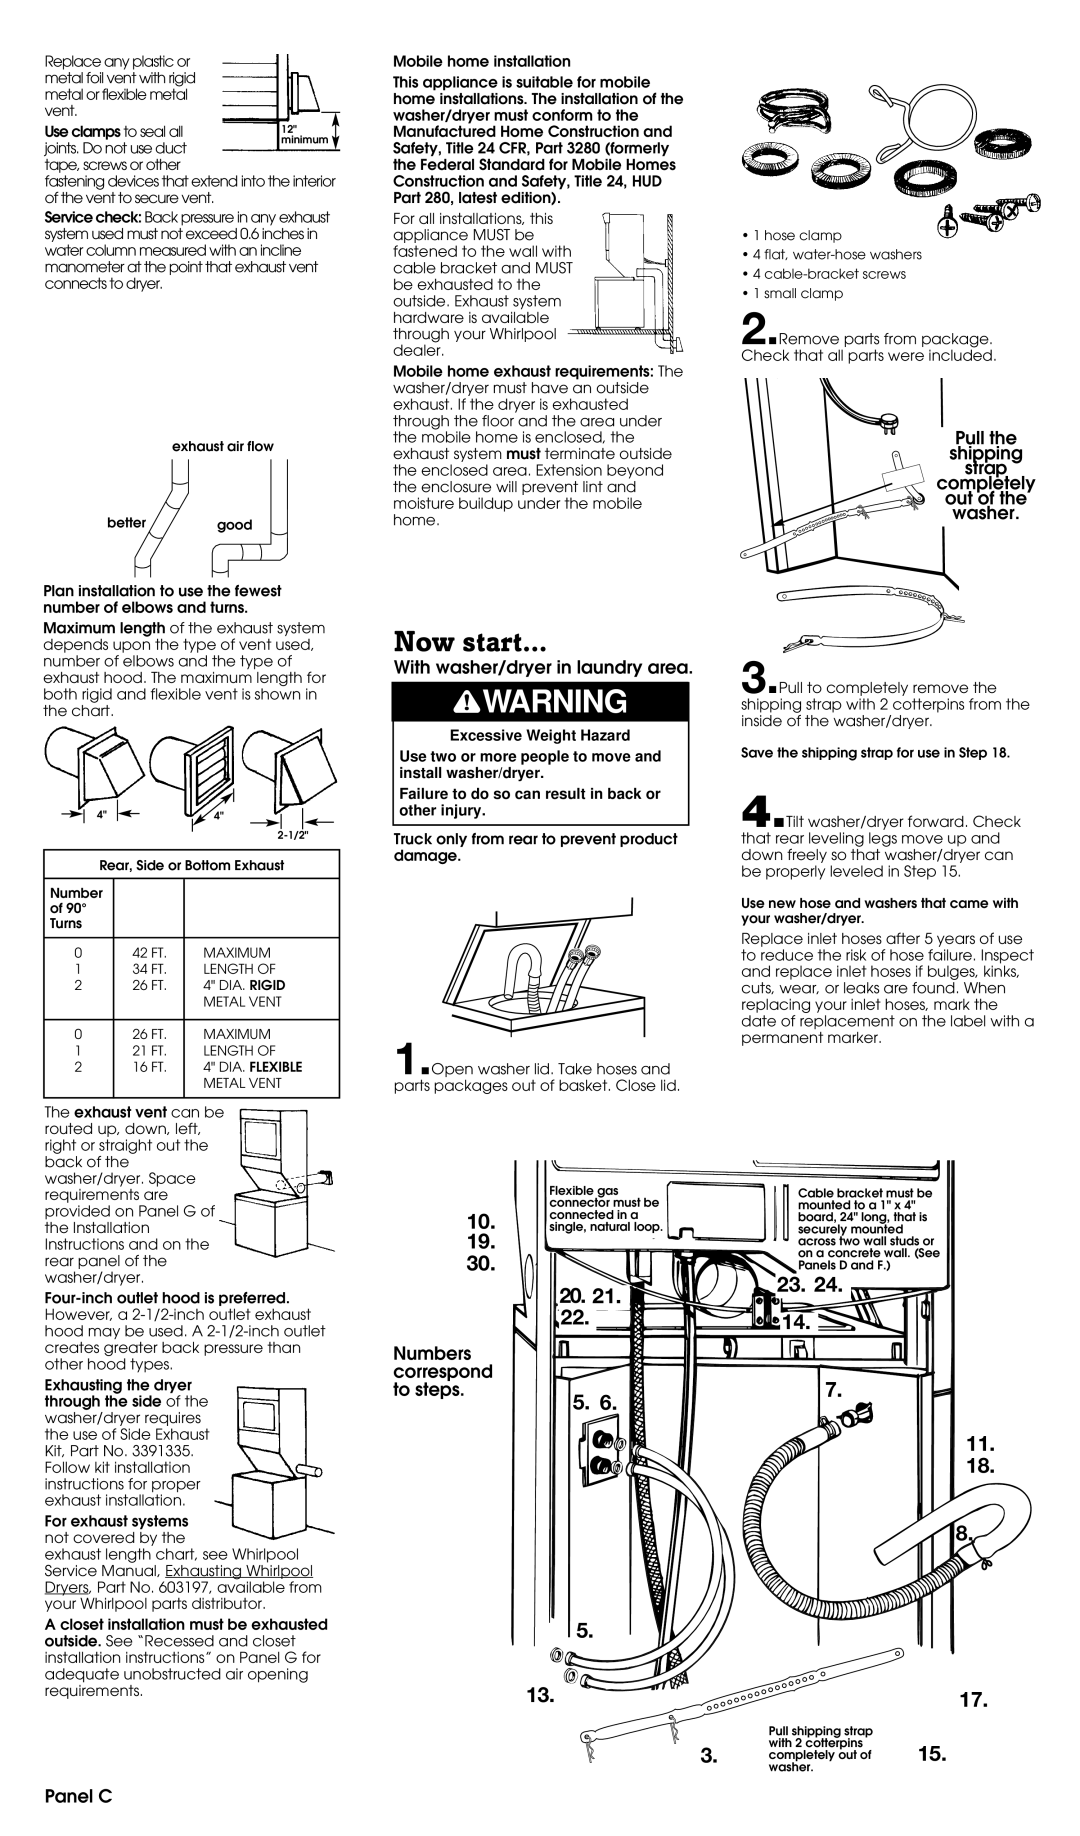
Replace any plastic or metal foil vent with rigid metal or flexible metal vent.
Use clamps to seal all | 12" |
joints. Do not use duct | minimum |
| |
tape, screws or other |
|
fastening devices that extend into the interior of the vent to secure vent.
Service check: Back pressure in any exhaust system used must not exceed 0.6 inches in water column measured with an incline manometer at the point that exhaust vent connects to dryer.
exhaust air flow
better good
Plan installation to use the fewest number of elbows and turns.
Maximum length of the exhaust system depends upon the type of vent used, number of elbows and the type of exhaust hood. The maximum length for both rigid and flexible vent is shown in the chart.
4" | 4" |
Rear, Side or Bottom Exhaust
Number |
|
|
of 90° |
|
|
Turns |
|
|
|
|
|
0 | 42 FT. | MAXIMUM |
1 | 34 FT. | LENGTH OF |
2 | 26 FT. | 4" DIA. RIGID |
|
| METAL VENT |
|
|
|
0 | 26 FT. | MAXIMUM |
1 | 21 FT. | LENGTH OF |
2 | 16 FT. | 4" DIA. FLEXIBLE |
|
| METAL VENT |
|
|
|
Mobile home installation
This appliance is suitable for mobile home installations. The installation of the washer/dryer must conform to the Manufactured Home Construction and Safety, Title 24 CFR, Part 3280 (formerly the Federal Standard for Mobile Homes Construction and Safety, Title 24, HUD Part 280, latest edition).
For all installations, this appliance MUST be fastened to the wall with cable bracket and MUST be exhausted to the outside. Exhaust system hardware is available through your Whirlpool dealer.
Mobile home exhaust requirements: The washer/dryer must have an outside exhaust. If the dryer is exhausted through the floor and the area under the mobile home is enclosed, the exhaust system must terminate outside the enclosed area. Extension beyond the enclosure will prevent lint and moisture buildup under the mobile home.
Now start...
With washer/dryer in laundry area.
![]() WARNING
WARNING
Excessive Weight Hazard
Use two or more people to move and install washer/dryer.
Failure to do so can result in back or other injury.
Truck only from rear to prevent product damage.
1.Open washer lid. Take hoses and parts packages out of basket. Close lid.
•1 hose clamp
•4 flat,
•4
•1 small clamp
2.Remove parts from package. Check that all parts were included.
Pull the shipping
strap
completely 
 out of the
washer.
3.Pull to completely remove the shipping strap with 2 cotterpins from the inside of the washer/dryer.
Save the shipping strap for use in Step 18.
4.Tilt washer/dryer forward. Check that rear leveling legs move up and down freely so that washer/dryer can be properly leveled in Step 15.
Use new hose and washers that came with your washer/dryer.
Replace inlet hoses after 5 years of use to reduce the risk of hose failure. Inspect and replace inlet hoses if bulges, kinks, cuts, wear, or leaks are found. When replacing your inlet hoses, mark the date of replacement on the label with a permanent marker.
The exhaust vent can be routed up, down, left, right or straight out the back of the washer/dryer. Space requirements are provided on Panel G of the Installation Instructions and on the rear panel of the washer/dryer.
Exhausting the dryer through the side of the washer/dryer requires the use of Side Exhaust Kit, Part No. 3391335. Follow kit installation instructions for proper exhaust installation.
For exhaust systems not covered by the
exhaust length chart, see Whirlpool Service Manual, Exhausting Whirlpool Dryers, Part No. 603197, available from your Whirlpool parts distributor.
A closet installation must be exhausted outside. See “Recessed and closet installation instructions” on Panel G for adequate unobstructed air opening requirements.
| Flexible gas | Cable bracket must be | |
| connector must be | mounted to a 1" x 4" | |
10. | connected in a | board, 24" long, that is | |
single, natural loop. | securely mounted | ||
19. |
|
| across two wall studs or |
30. |
|
| on a concrete wall. (See |
|
| Panels D and F.) | |
| 20. 21. | 23. 24. | |
|
| ||
| 22. |
| 14. |
Numbers |
|
|
|
correspond |
|
| 7. |
to steps. | 5. | 6. | |
|
| ||
11.
18.
8.
5.
13.17.
Pull shipping strap with 2 cotterpins
3. completely out of 15. washer.