Alternate exhaust methods

The washer/dryer installed in a mobile home must be exhausted outside. When the dryer is exhausted through the floor, the exhaust system must terminate outside the enclosed area under the mobile home. Extension beyond the mobile home will prevent lint and moisture buildup under the mobile home. See Figure 4.

Toconnect a separate grounding wire -

Use grounding wire and clamp assembly (Part No. 685463) or No. 10 gauge minimum copper grounding wire. Connect grounding wire to a grounded cold water pipe* with the clamp and then to the external grounding connector on the washer/

dryer. Do not ground to a gas supply pipe or hot water pipe. Do

not connect the power supply cord to electrical supply until the appliance is permanently grounded.

No.4

To convert to a three- wire electrical supply system.

When local codes...

A.

Permit use of a flexible-type power supply cord (pigtail] plugged into a matching, 30-amp receptacle

[See “Electrical requirements,” Panel A] and

Permit connection of the internal grounding conductor to the neutral wire of the power supply cord:

Alternate electrical connection

Electrical ground is required on this appliance.

DANGER- Improper connection of the equipment-grounding conductor can result in risk of electric shock. Check with a qualified electrician or service technician if you are in doubt as to whether the appliance is properly grounded.

Do not modify the plug with the appliance - if it will not fit the outlet, have a proper outlet installed

by a qualified electrician.

Four-wire electrical supply system

This appliance is manufactured with a 30-amp-rated, four-wire, flexible type power supply cord with the green, grounding wire connected to the internal, grounding connector, (See Figure 7.)

To remove the power supply cord -

Disconnect power supply.

1.Remove the terminal block cover from the dryer,

2.Disconnect the power supply cord from the terminal block.

3.Disconnect the green grounding wire of the power supply cord from the internal grounding connector.

4.Loosen the two screws in the strain relief.

5.Pull downward on the power

supply cord until it is removed from the dryer.

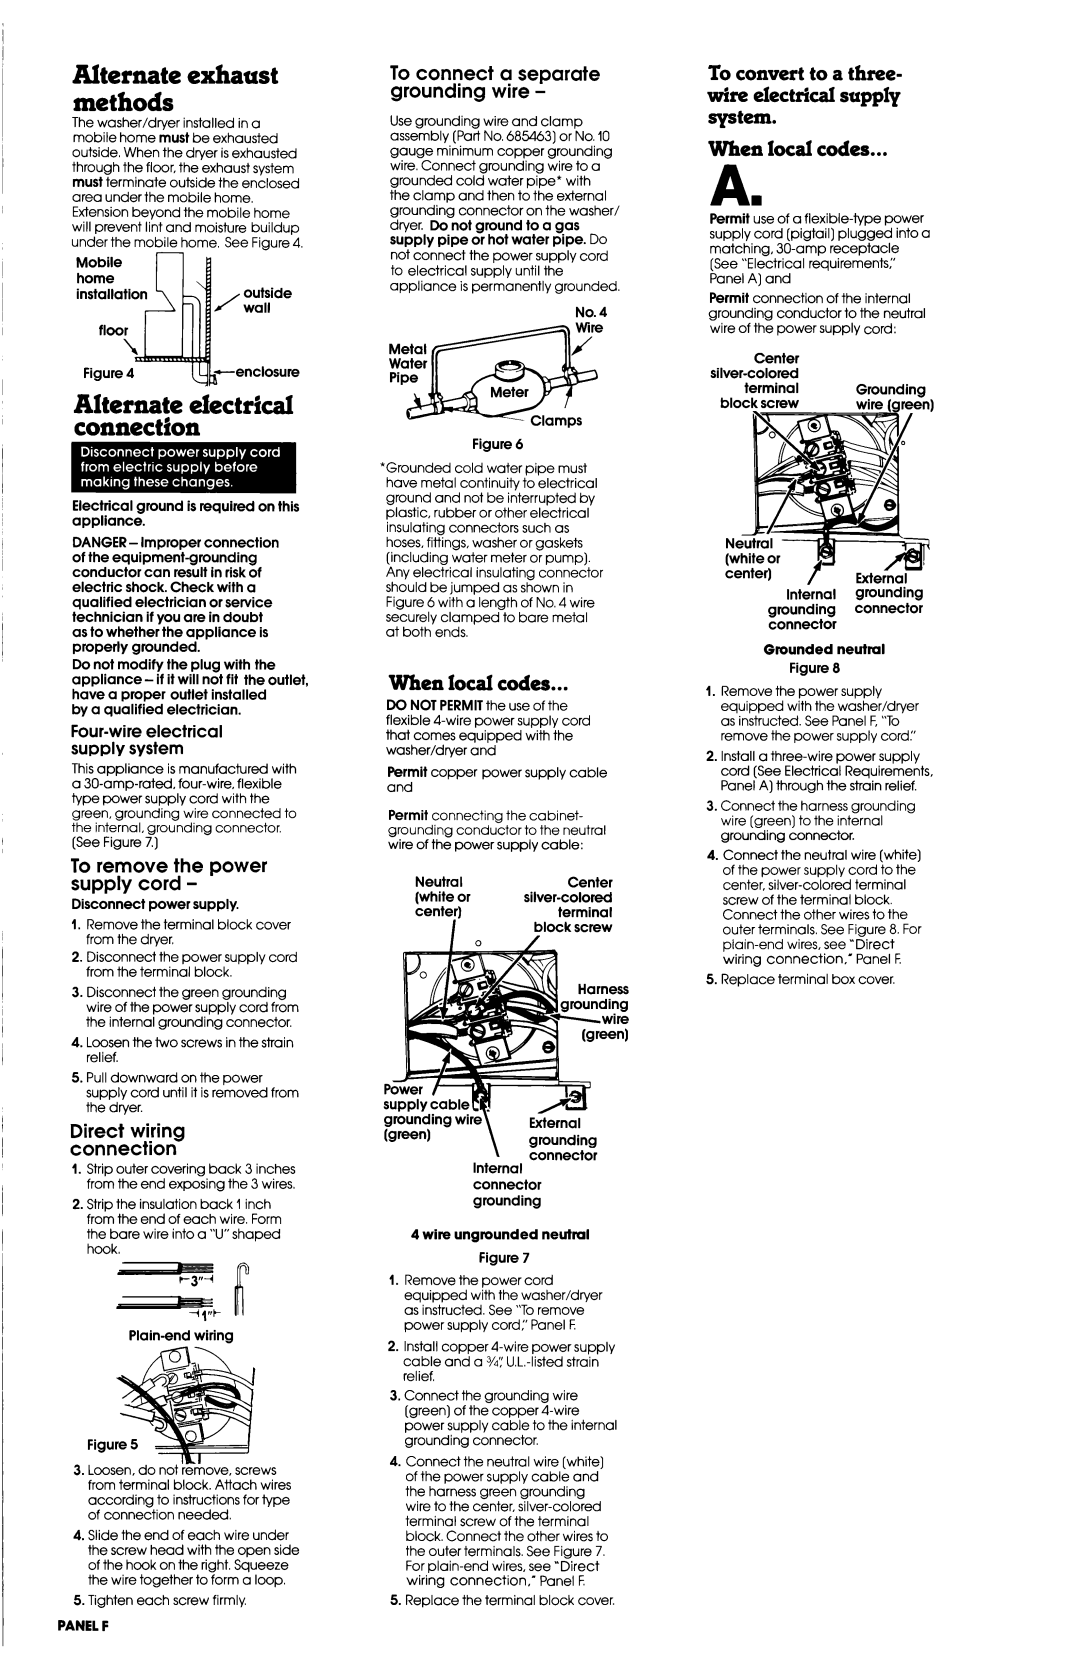
Direct wiring connection

1.Strip outer covering back 3 inches from the end exposing the 3 wires,

2.Strip the insulation back 1 inch from the end of each wire. Form the bare wire into a “U”shaped hook.

Plain-end wiring

3.Loosen, do not remove. screws from terminal block. Attach wires according to instructions for type of connection needed.

4.Slide the end of each wire under the screw head with the open side of the hook on the right. Squeeze the wire together to form a loop.

5.Tighten each screw firmly.

Figure 6

*Grounded cold water pipe must have metal continuity to electrical ground and not be interrupted by plastic, rubber or other electrical insulating connectors such as hoses, fittings, washer or gaskets (including water meter or pump). Any electrical insulating connector should be jumped as shown in Figure 6 with a length of No. 4 wire securely clamped to bare metal at both ends.

When local codes...

DO NOT PERMITthe use of the flexible 4-wire power supply cord that comes equipped with the washer/dryer and

Permit copper power supply cable and

Permit connecting the cabinet- grounding conductor to the neutral wire of the power supply cable:

NeutralCenter

(white or silver-colored

center)terminal

Internal connector grounding

4 wire ungrounded neutral

Figure 7

1.Remove the power cord equipped with the washer/dryer as instructed. See “Toremove power supply cord:’ Panel F

2.Install copper 4-wire power supply cable and a V4:’U.L.-listed strain relief.

3.Connect the grounding wire (green) of the copper 4-wire power supply cable to the internal grounding connector.

4.Connect the neutral wire (white] of the power supply cable and the harness green grounding wire to the center, silver-colored terminal screw of the terminal block. Connect the other wires to the outer terminals. See Figure 7. For plain-end wires, see “Direct

wiring connection,’ Panel F

5.Replace the terminal block cover.

Center


silver-colored


terminal

Grounding

block screw

wire lareenl

Neutral (white or?-3

center)External Internal grounding

grounding connector connector

Grounded neutral

Figure 8

1.Remove the power supply equipped with the washer/dryer as instructed. See Panel F,“To remove the power supply cord:’

2.Install a three-wire power supply cord (See Electrical Requirements, Panel A) through the strain relief.

3.Connect the harness grounding wire (green] to the internal grounding connector.

4.Connect the neutral wire (white) of the power supply cord to the center, silver-colored terminal screw of the terminal block. Connect the other wires to the outer terminals. See Figure 8. For plain-end wires, see “Direct

wiring connection.’ Panel F

5.Replace terminal box cover.

PANELF

Page 7
Image 7
Whirlpool 3397512 installation instructions To remove the power supply cord, Direct wiring connection, Panelf

3397512 specifications

The Whirlpool 3397512 is a highly regarded replacement dryer heating element designed to restore your appliance's heating capabilities effectively. It is particularly popular among homeowners looking to replace a faulty heating element in their Whirlpool dryers. This part is compatible with a wide range of dryer models, ensuring that users can benefit from the heating solution it provides.

A standout feature of the Whirlpool 3397512 is its robust construction, designed to withstand the rigors of frequent use. Made from high-quality materials, it ensures longevity and durability, minimizing the need for frequent replacements. This feature is crucial for maintaining the efficiency of your dryer over time.

One of the key technologies incorporated in the Whirlpool 3397512 is its advanced heating design, which promotes even heat distribution. This ensures that clothes are dried uniformly, preventing instances of damp spots that can occur with inferior heating elements. This technology not only enhances the drying process but also contributes to fabric care, reducing wear and tear on clothes.

The Whirlpool 3397512 is engineered for easy installation, making it accessible for DIY enthusiasts as well as casual users. The design features straightforward connections that can be made with minimal tools, allowing users to quickly restore their dryer’s functionality without the need for professional assistance.

Moreover, the efficiency of the Whirlpool 3397512 aligns with modern energy-saving standards. It operates effectively at optimal temperatures, reducing energy consumption while providing powerful drying capabilities. This efficiency can lead to lower utility bills and a smaller carbon footprint, making it an environmentally conscientious choice.

In addition, compatibility is another essential characteristic of the Whirlpool 3397512. It fits various Whirlpool dryer models, making it a versatile solution for many households. This wide compatibility ensures that when the heating element needs replacing, homeowners can easily find a suitable option without facing the hassle of extensive searches or waiting on special orders.

In conclusion, the Whirlpool 3397512 heating element is an essential component that enhances the performance of compatible Whirlpool dryers. Its robust construction, advanced heating design, ease of installation, and energy efficiency make it a preferred choice among consumers looking to maintain their dryers in optimal working condition. By choosing the Whirlpool 3397512, users can enjoy a reliable and efficient drying experience.