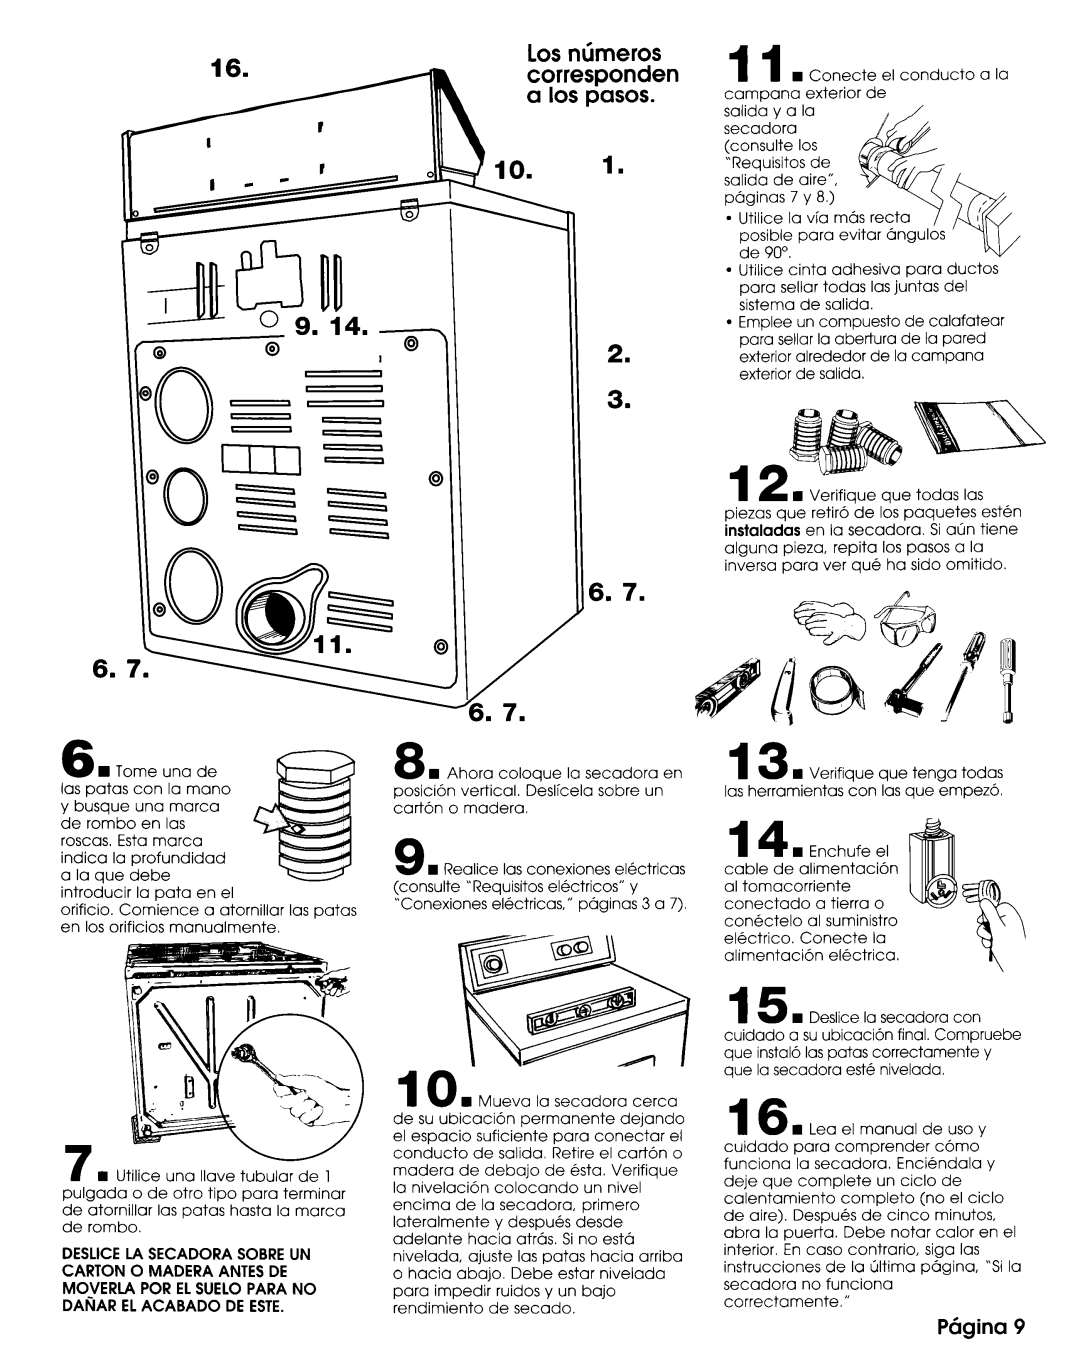
6 n Tome una de las patas con la man0 y busque una marca be rombo en las roscas. Esta marca indica la profundidad a la que debe introducir la pata en el

orificio. Comience a atornillar las patas en 10s orificios manualmente.

n Utilice una llave tubular de 1 pulgada o de otro tipo para terminar de atornillar IQS patas hasta la marca de rombo.

DESLICE LA SECADORA SOBRE UN CARTON 0 MADERA ANTES DE MOVERLA POR EL SUELO PARA NO DAtiAR EL ACABADO DE ESTE.

Los ntimeros corresponden

2.

3.

6. 7.

8 w Ahora coloaue la secadora en position vertical. Deslicela sobre un carton o madera.

9 w Realice las conexiones electricas (consulte “Requisitos electricos” y “Conexiones electricas,” paginas 3 a 7).

10 n Mueva la secadora cerca de su ubicacion permanente dejando el espacio suficiente para conectar el conduct0 de salida. Retire el carton o madera de debajo de esta. Verifique la nivelacion colocando un nivel encima de la secadora, primer0 lateralmente y despues desde adelante hacia atras. Si no esta nivelada, ajuste las patas hacia arriba o hacia abajo. Debe estar nivelada para impedir ruidos y un bajo rendimiento de secado.

11 w Conecte

el

conduct0

a la

campana


exterior

de


salida

y

a la


secadora


(consulte


10s


“Requisitos de


salida

de

aire”,


paginas


7 y 8.)


/

l Utilice


la via

mas

recta

/

I

posible


para

evitar angulos


de

90”.


%


l Utilice

cinta

adhesiva

para ductos

para sellar todas las juntas del


sistema


de

salida.


l Emplee un compuesto de calafatear

para sellar la abertura de la pared


exterior alrededor de la campana


exterior


de salida.


12 w Verifiaue aue todas las piezas que retiro de 10s paquetes ester- instaladas en la secadora. Si aun tiene alguna pieza, repita 10s pasos a la inversa para ver que ha sido omitido.

13 w Verifique que tenga todas las herramientas con las que empezo,.

14 w Enchufe

el


cable de

alimentacion


al tomacorriente


conectado

a

tierra

o


conectelo

al

suministro

k\

electrico.

Conecte

la

alimentacion


electrica.

B

15 n Deslice la secadora con cuidado a su ubicacion final. Compruebe que instalo las patas correctamente y que la secadora este nivelada.

16 w Lea el manual de uso y cuidado para comprender coma’ funciona la secadora. Enciendala y deje que complete un ciclo de

calentamiento complete (no el ciclo de aire). Despues de cinco minutos, abra la puerta. Debe notar calor en el interior. En case contrario, siga las instrucciones de la ljltima pagina, ‘Si la secadora no funciona

correctamente.”

PClgina 9

Page 20
Image 20
Whirlpool 3397617 Aire Paginas Utilice La via Mas, Emplee un compuesto de calafatear, Exterior alrededor de la campana

3397617 specifications

The Whirlpool 3397617 is a highly regarded dryer heating element known for its efficiency and reliability in enhancing laundry performance. This essential appliance component is specifically designed for various models of Whirlpool dryers, ensuring optimal drying capabilities for a wide range of fabrics and loads.

One of the standout features of the Whirlpool 3397617 is its durable construction. Made from high-quality materials, this heating element is built to withstand the rigors of regular use and deliver consistent performance over time. Its robust design minimizes the risk of burns or malfunctions, thereby providing peace of mind to users.

In terms of specifications, the Whirlpool 3397617 operates at a voltage of 240 volts and a wattage of 5,000 watts. This powerful heating element swiftly generates heat, allowing clothes to dry efficiently without prolonged exposure to heat, which can potentially damage delicate fabrics. The rapid heating ability also contributes to shorter drying cycles, making it a practical choice for households with busy schedules.

Another important characteristic of the Whirlpool 3397617 is its compatibility with a variety of Whirlpool dryer models. This versatility makes it an ideal replacement part, as it can easily be substituted in many different units. This compatibility ensures that users can continue to enjoy the reliability and functionality of their dryers without needing to invest in a whole new appliance.

Incorporating advanced coil technology, the Whirlpool 3397617 provides uniform heat distribution throughout the dryer. This feature significantly enhances drying efficiency, ensuring that every piece of clothing is treated evenly, thereby preventing the risk of over-drying or under-drying.

Installing the Whirlpool 3397617 is straightforward, and most users can complete the replacement with basic tools and minimal time. With its combination of quality, performance, and user-friendliness, this heating element stands out as a top choice for anyone looking to maintain their dryer’s effectiveness and prolong its lifespan.

Overall, the Whirlpool 3397617 is emblematic of Whirlpool’s commitment to producing high-quality home appliances. This heating element not only meets but often exceeds consumer expectations, making it an essential component for efficient laundry care.