Venting requirements

f’ fI Aib

Fire Hazard

Venting system must terminate to the outside.

Do Not vent exhaust air into spaces within walls or ceilings or into attics, crawl spaces or garages.

Use metal duct only.

Do Not use four-inch laundry-type wall caps.

Do Not use plastic ductwork.

Flexible metal duct is Not recommended. If it is used, calculate each foot of flexible metal duct as two feet of straight duct. Flexible metal elbows count twice as much as standard elbows.

Do Not use to exhaust hazardous or explosive materials and vapors.

Failure to follow these instructions could result in a fire.

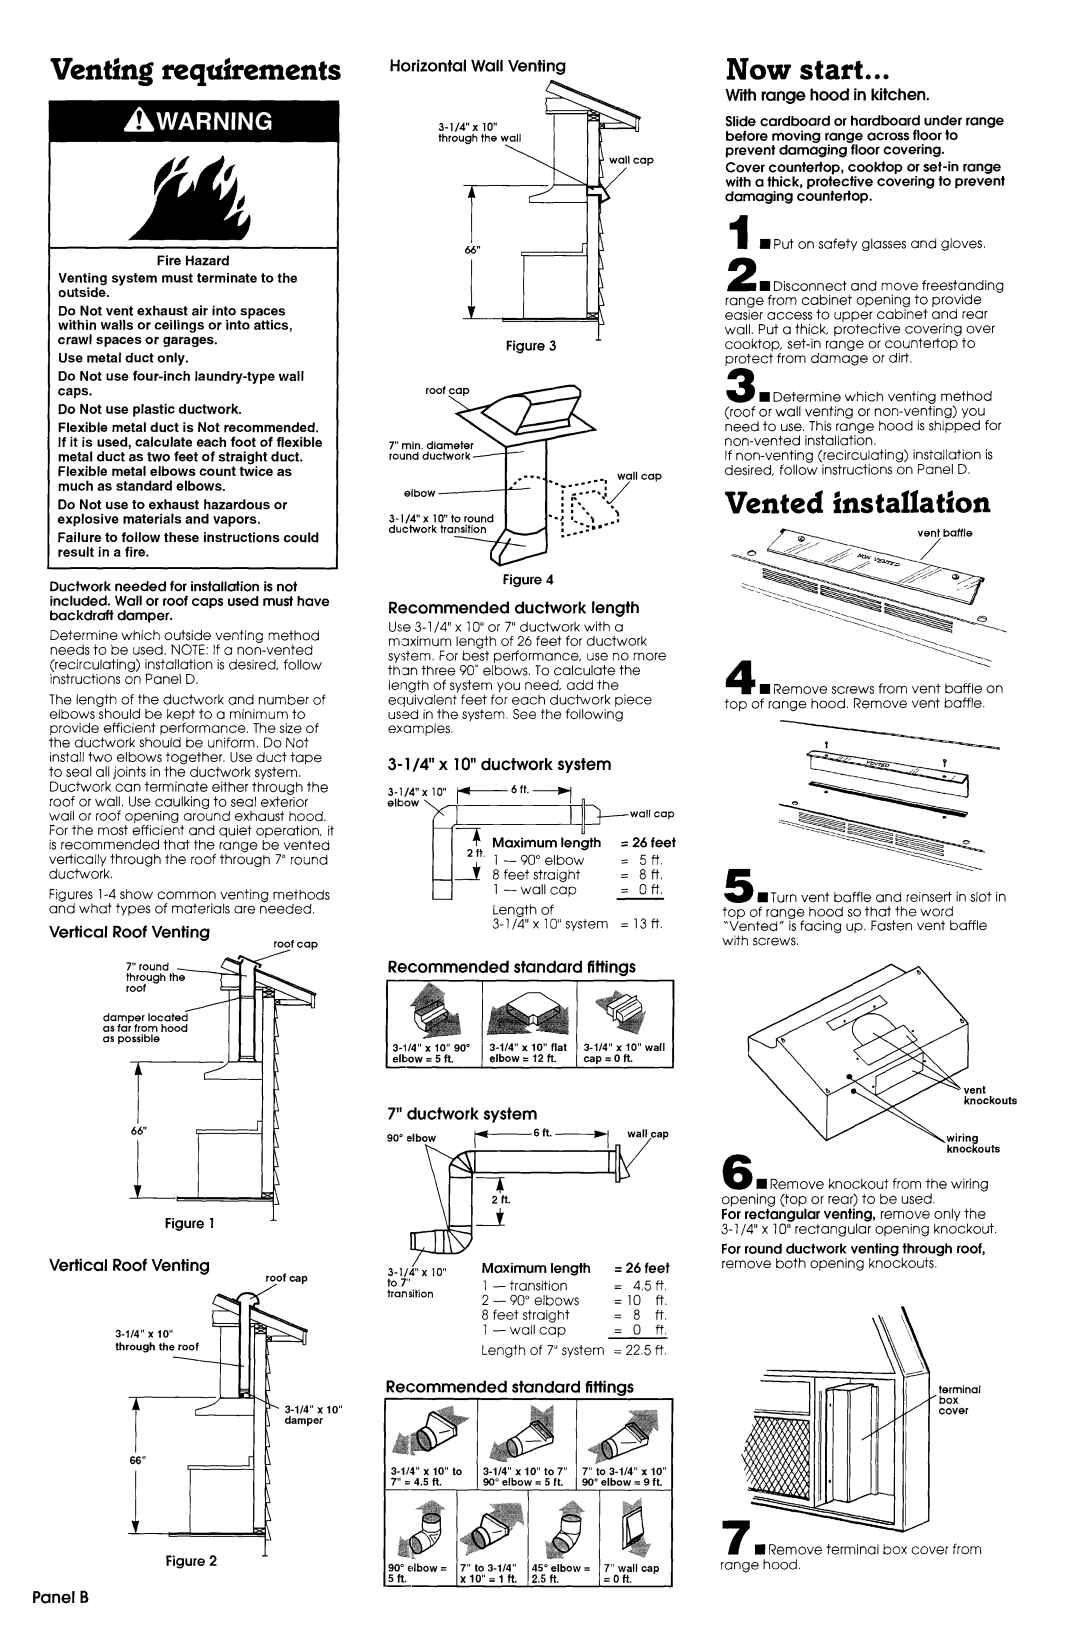
Ductwork needed for insfallofion is not included. Wall or roof caps used must have backdrafl damper.

Determine which outside venting method needs to be used NOTE: If a non-vented

(recirculating) installation is desired, follow instructions on Panel D.

The length of the ductwork and number of elbows should be kept to a minimum to provide efficient performance. The size of the ductwork should be uniform. Do Not install two elbows together. Use duct tape to seal all joints in the ductwork system. Ductwork can terminate either through the roof or wall. Use caulking to seal exterior wall or roof opening around exhaust hood. For the most efficient and quiet operation, it

is recommended that the range be vented vertically through the roof through 7” round ductwork.

Figures l-4 show common venting methods and what types of materials are needed.

Vertical Roof Venting

roof cap

7” round through t roof

damper locatec?- as far from hood as possible

Horizontal Wall Venting

3-l/&x 10” throuah the wall

I cap

Figure 3 A

7” min.

diameter


round ductwork


. *I...

-.-m..---l


wall cap

elbow


:

:‘I-’


.:


I

I*\


J

3-1/4”x

10” to round

‘.{

I

I

l t

l\


a.


ductwork

transition


-:,,--’


:.--


Figure 4

Recommended ductwork length

Use 3-l /4” x 10” or 7” ductwork with a m’aximum length of 26 feet for ductwork system. For best performance, use no more Wan three 90” elbows. To calculate the length of system you need, add the equivalent feet for each ductwork piece used in the system. See the following examples.

3- l/4” x 10” ductwork system

3 - 114” x 10” H-


6 ft.


elbow


03-*7ft’ Maximum1- 90” elbowIenLth


wall cap

= 265ftfeet

u

8 feet

straight

=

8ft.

1 -

wall

cap

=

Oft.


Length


of

=

13 ft.


3- l/4”

x

10” system

Recommended standard fittings

3-114” x 10” 90”

3-114” x 10” flat

3-l/4” x 10” wail

elbow = 5 ft.

elbow = 12 ft.

cap=oft.

Now start...

With range hood in kitchen.

Slide cardboard or hardboard under range before moving range across floor to prevent damaging floor covering.

Cover countertop, cooktop or set-in range with a thick, protective covering to prevent damaging countertop.

I 1 Put on safety glasses and gloves.

2 n Disconnect and move freestanding range from cabinet opening to provide easier access to upper cabinet and rear wall. Put a thick, protective covering over cooktop, set-in range or countertop to protect from damage or dirt

3 H Determine which venting method (roof or wall venting or non-venting) you need to use. This range hood is shipped for non-vented installation.

If non-venting (recirculating) installation is desired, follow instructions on Panel D.

Vented installation

vent baffle

.‘Q:,

F

4 W Remove screws from vent baffle on top of range hood. Remove vent baffle.

in

top of range hood so that the word “Vented” is facing up. Fasten vent baffle with screws.

7” ductwork system

knockouts

6 n Remove knockout from the wiring opening (top or rear) to be used.

Figure 1

Vertical Roof Venting

ro/f cap

3-114” x 10” through the roof

3-114” x 10” damper

Figure 2

/

Maximum

length

= 26 feel

3-1/4”x 10”

to 7”

1

-

transition

=

4,5

ft

transition


2

-

90”

elbows

=lO


ft.


8

feet straight

=

8

ft.


1 -

wall

cap

=

0

ft.

Length of 7” system = 22.5 ft

Recommended standard fittings

3-114” x IO” to

3-114” x 10” to 7”

7” to 3-114” x 10”

7” = 4.5 ft.

90” elbow = 5 ft.

90” elbow = 9 ft.

90” elbow =

7” to 3-114”

;“,“;lbow = I’;wtizll cap

5 ft.

xlO”=lft.

.

.

For rectangular venting, remove only the 3-l/4” x 10” rectangular opening knockout.

For round ductwork venting through roof, remove both opening knockouts.

terminal box

n Remove terminal box cover from range hood

Panel B

Page 3
Image 3
Whirlpool 761883306 manual Venting requirements, Now start, Vented installation

761883306 specifications

The Whirlpool 761883306 is a premium kitchen appliance that epitomizes the perfect blend of style, functionality, and advanced technology. Designed for modern homes, this model stands out with its elegant finish and robust features that cater to the demands of today’s culinary enthusiasts.

One of the main features of the Whirlpool 761883306 is its spacious design, providing ample cooking capacity. This appliance can accommodate large dishes, making it ideal for families or individuals who enjoy entertaining guests. The interior is thoughtfully designed to ensure even cooking and optimal heat distribution, thus enhancing the overall cooking experience.

The appliance is equipped with advanced cooking technologies that simplify meal preparation. One notable feature is its smart sensing technology, which adjusts cooking times and temperatures automatically based on the food being prepared. This ensures perfectly cooked meals every time, reducing the guesswork often associated with traditional cooking methods.

Energy efficiency is another critical characteristic of the Whirlpool 761883306. It has been engineered with eco-conscious consumers in mind, consuming less energy without compromising performance. This not only contributes to lower utility bills but also aligns with environmentally friendly practices, making it a great choice for sustainable living.

User-friendliness is a hallmark of this appliance. The control panel is intuitive, featuring clear and accessible settings that allow users to navigate various cooking modes with ease. Additionally, the appliance includes multiple preset options for common tasks, such as defrosting and reheating, which saves time and effort.

Safety is prioritized in the design of the Whirlpool 761883306. It comes equipped with features such as automatic shut-off and child lock, ensuring peace of mind for users, especially in households with children.

Overall, the Whirlpool 761883306 combines form and functionality, making it an outstanding addition to any kitchen. With its advanced features, energy efficiency, and user-friendly design, it is a noteworthy appliance that meets the diverse needs of modern cooking. Whether you are a novice cook or an experienced chef, this model promises to enhance your culinary endeavors with precision and ease.