Dl. Find a ?&inch to l-inch vertical COLD water pipe near the refrigerator. (Horizontal pipe will work

but extra precautions must be taken.)

D2. Measure from inlet on rear of refrigerator to water pipe. Add 7 feet to allow for moving re- frigerator for cleaning. This is the length of X- inch O.D. copper tubing you will need for the job (length from inlet tube to water pipe PLUS 7 feet). Be sure both ends of copper tubing are cut square.

03.Turn OFF main water supply. Turn ON nearest faucet long enough to clear line of water.

D4. Using a grounded drill, drill a X-inch hole in the vertical cold water pipe you have selected. Some water almost always remains in pipes. If it enters the drill, it can cause lethal shock. BE SURE YOUR DRILL IS GROUNDED.

Fasten a separate ground wire from drill to a good ground that complies to local electrical codes. (If in doubt, consult a licensed electri- cian.) UNLESS PROPER GROUNDING IS FOL-

LOWED, YOU ARE NOT PROTECTED AGAINST SEVERE OR LETHAL SHOCK.

If you must use a horizontal pipe, take extra precautions:

Drill on the top or side of the pipe, not bottom. This helps keep water away from the drill. Also, it keeps normal sediment from collecting in the valve.

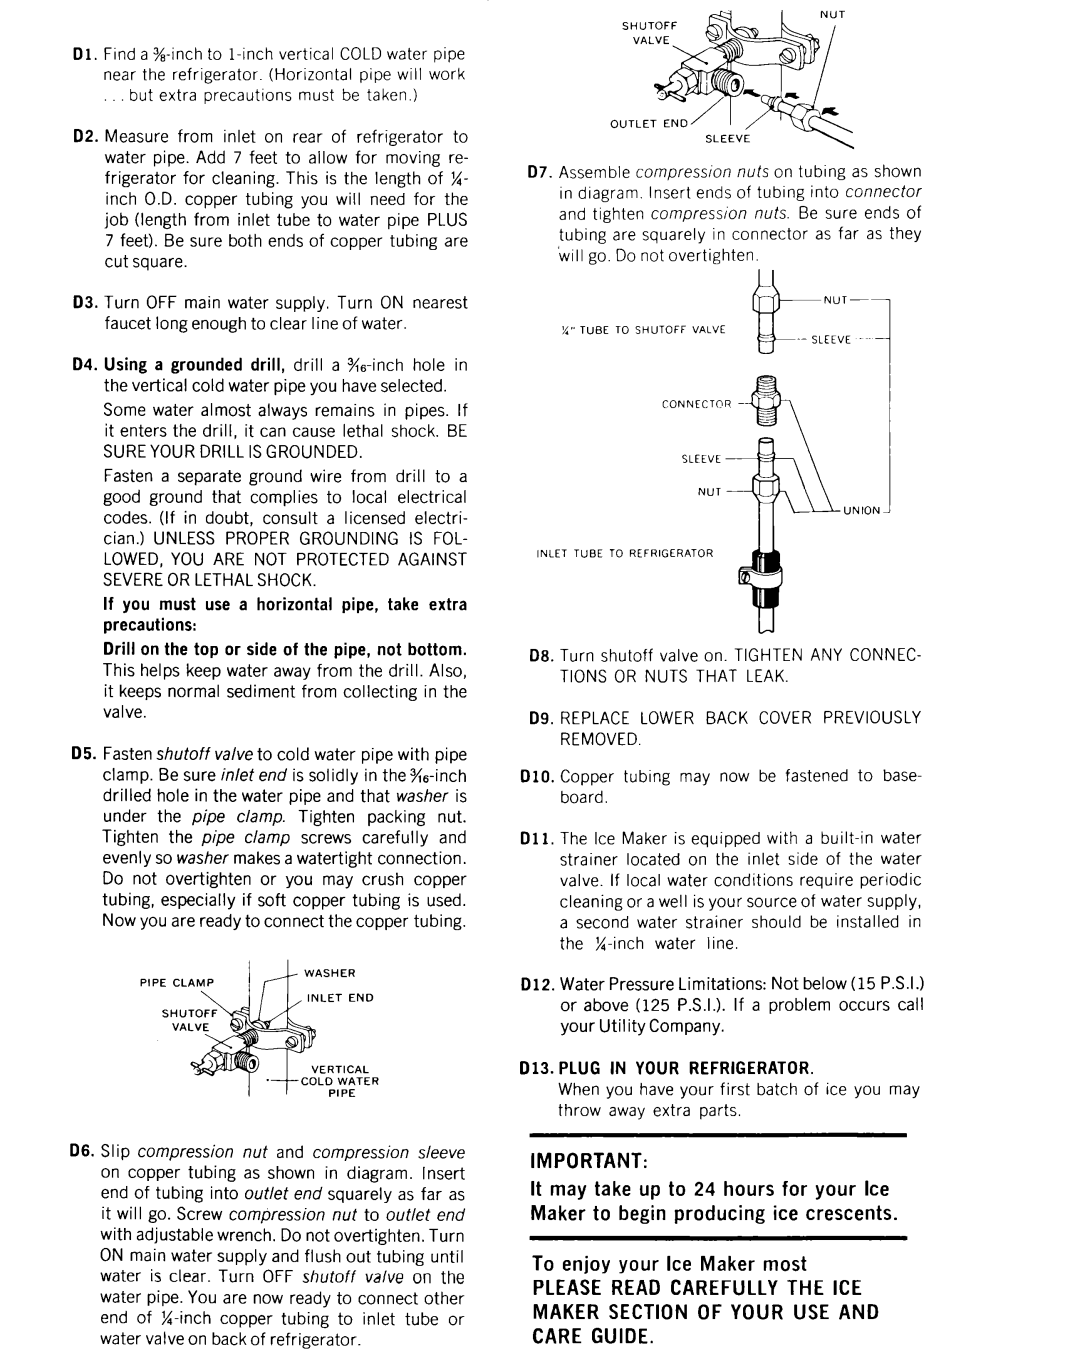
D5. Fasten shutoff valve to cold water pipe with pipe clamp. Be sure inlet end is solidly in the %-inch drilled hole in the water pipe and that washer is under the pipe clamp. Tighten packing nut. Tighten the pipe clamp screws carefully and evenly so washer makes a watertight connection. Do not over-tighten or you may crush copper tubing, especially if soft copper tubing is used. Now you are ready to connect the copper tubing.

PIPE CLAMP

l--t

WASHER


LET END

SHU


VA


ERTICAL


I

1

COLD

WATER


PIPE

D6. Slip compression nut and compression sleeve on copper tubing as shown in diagram. Insert end of tubing into outlet end squarely as far as it will go. Screw compression nut to outlet end with adjustable wrench. Do not over-tighten. Turn ON main water supply and flush out tubing until water is clear. Turn OFF shutoff valve on the water pipe. You are now ready to connect other end of X-inch copper tubing to inlet tube or water valve on back of refrigerator.

SHUTOFF+INUT

OUTLET END

SLEEVE

D7. Assemble compression nuts on tubing as shown in diagram. Insert ends of tubing into connector and tighten compression nuts. Be sure ends of tubing are squarely in connector as far as they ‘will go. Do not overtighten.

NUT-p

%” TUBE TO SHUTOFF VALVE

-- SLEEVE ~. -

CONNECTOR --

SLEEVE

NUT

.UN IION~

INLET TUBE TO REFRIGERATOR

08.Turn shutoff valve on. TIGHTEN ANY CONNEC-

TIONS OR NUTS THAT LEAK.

D9. REPLACE LOWER BACK COVER PREVIOUSLY REMOVED.

DlO. Copper tubing may now be fastened to base- board.

Dll. The Ice Maker is equipped with a built-in water strainer located on the inlet side of the water valve. If local water conditions require periodic cleaning or a well is your source of water supply, a second water strainer should be installed in the %-inch water line.

D12. Water Pressure Limitations: Not below (15 P.S.I.) or above (125 P.S.I.). If a problem occurs call your Utility Company.

013.PLUG IN YOUR REFRIGERATOR.

When you have your first batch of ice you may throw away extra parts.

IMPORTANT:

It may take up to 24 hours for your Ice Maker to begin producing ice crescents.

To enjoy your Ice Maker most

PLEASE READ CAREFULLY THE ICE MAKER SECTION OF YOUR USE AND CARE GUIDE.

Page 6
Image 6
Whirlpool ECKMF-6 manual LOWED, YOU are not Protected Against Severe or Lethal Shock, Plug in Your Refrigerator

ECKMF-6 specifications

The Whirlpool ECKMF-6 is a versatile, state-of-the-art kitchen appliance designed for individuals and families who cherish the experience of homemade ice cream and desserts. This multi-functional machine is part of Whirlpool's commitment to providing user-friendly kitchen products that enhance culinary creativity and convenience.

At the core of the ECKMF-6 is its powerful motor that ensures smooth and efficient ice cream production. The machine features a built-in compressor, allowing it to churn ice cream mixtures seamlessly without the need for pre-freezing bowls. Users can prepare delicious frozen treats on demand, making it perfect for spontaneous gatherings or family dessert nights. Additionally, the compressor technology ensures that consistent temperatures are maintained throughout the churning process, resulting in a creamy and delightful texture.

One of the standout features of the Whirlpool ECKMF-6 is its capacity. With a generous bowl size, it can produce up to 1.6 quarts of ice cream or sorbet in a single batch, making it ideal for serving multiple people or for those who love to create large quantities of frozen treats. The transparent lid allows users to monitor the mixture as it churns, ensuring that every batch is made to perfection.

The machine is designed with user-friendliness in mind. It has simple, intuitive controls that allow users to adjust settings easily and start the machine with minimal effort. The digital display is a helpful feature that shows the time remaining in the churning process, so users know exactly when their frozen dessert will be ready.

Cleaning the ECKMF-6 is also a breeze, thanks to its removable mixing bowl and paddle, which are dishwasher-safe. This makes post-dessert cleanup simpler, encouraging regular use of the machine.

Beyond just ice cream, the ECKMF-6 can whip up a variety of frozen delicacies, including yogurt, gelato, and slushies, giving users the creativity to experiment with different flavors and ingredients. With its robust performance, user-friendly design, and impressive capacity, the Whirlpool ECKMF-6 is a fantastic addition to any kitchen, allowing everyone from novice cooks to experienced chefs to indulge in homemade frozen treats.