Connect Ice-Maker
To Water (Contd.)
1.Find a
2.Measure from inlet on rear of refrigerator to water pipe. Add 7 feet to allow for moving refrigerator for cleaning. This is the length of
3.Turn OFF main water supply. Turn ON nearest faucet long enough to clear line of water.
4.Using a grounded drill, drill a
BE SURE YOUR DRILL IS GROUNDED.
Fasten a separate ground wire from drill to a good ground that complies to local electrical codes. (If in doubt, consult a licensed electrician.) UNLESS PROPER GROUNDING IS FOLLOWED, YOU ARE NOT PROTECTED AGAINST SEVERE OR LETHAL SHOCK.
*If you must use a horizontal pipe, take extra precautions:
Drill on the top or side of the pipe, not bottom. This helps keep water away from the drill. Also, it keeps normal sediment from collecting in the valve.
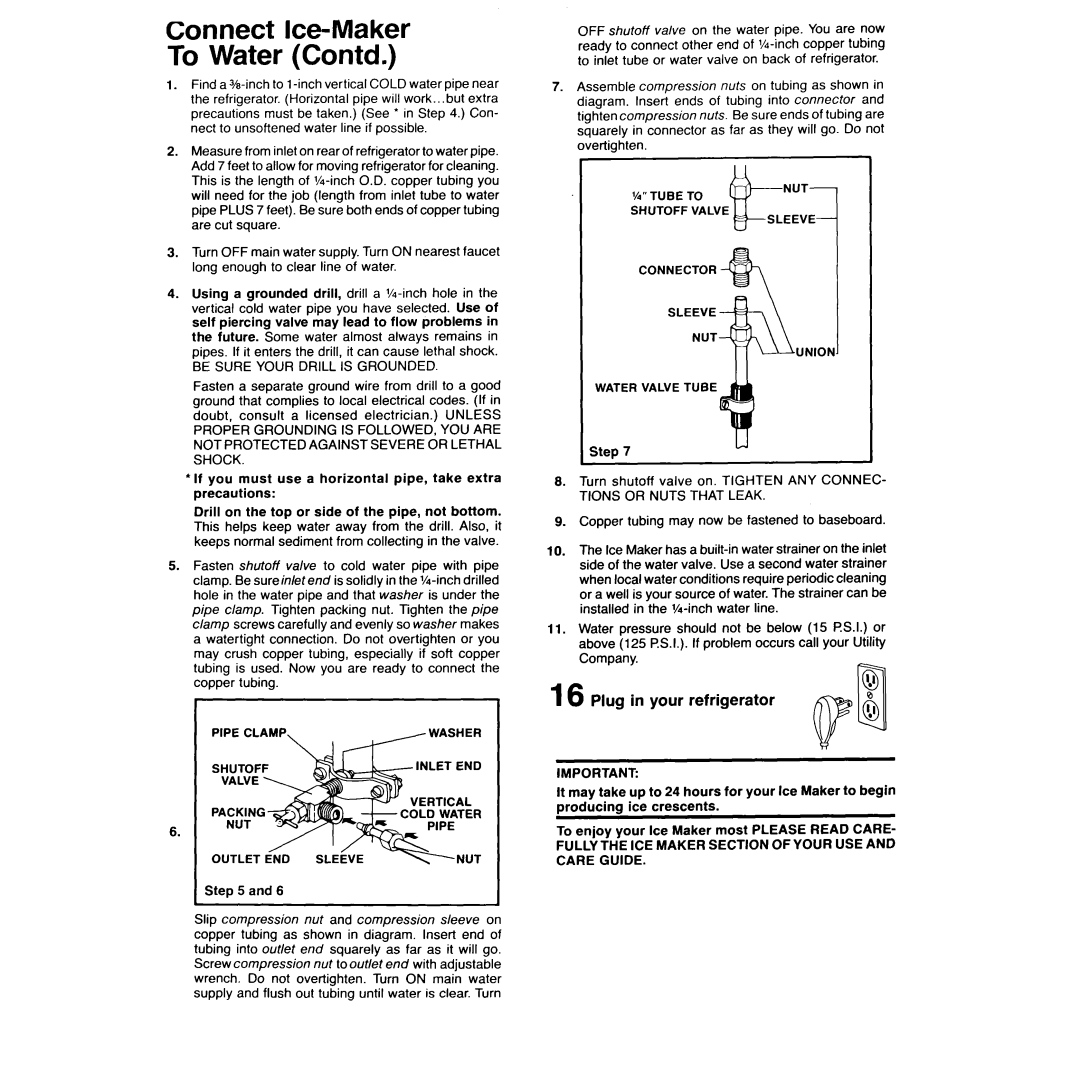
5.Fasten shutoff valve to cold water pipe with pipe clamp. Be sureinletend is solidly in the
Step 5 and 6
I
Slip compression nut and compression sleeve on copper tubing as shown in diagram. Insert end of tubing into out/et end squarely as far as it will go. Screw compression nut to out/et end with adjustable wrench. Do not overtighten. Turn ON main water supply and flush out tubing until water is clear. Turn
OFF shutoff valve on the water pipe. You are now ready to connect other end of
7.Assemble compression nuts on tubing as shown in diagram. Insert ends of tubing into connector and tighten compression nuts. Be sure ends of tubing are squarely in connector as far as they will go. Do not
‘h” TUBE TO SHUTOFF VALVE
CONNECTOR
SLEEVE
NUT
WATER VALVE TUBE
Steo 7
8.Turn shutoff valve on. TIGHTEN ANY CONNEC-
TIONS OR NUTS THAT LEAK.
9.Copper tubing may now be fastened to baseboard.
10.The Ice Maker has a
11.Water pressure should not be below (15 PS.1.) or above (125 P.S.I.). If problem occurs call your Utility Company.
16 Plug in your refrigerator
IMPORTANT:
It may take up to 24 hours for your Ice Maker to begin oroducina ice crescents.
To enjoy your Ice Maker most PLEASE READ CARE-
