19 A

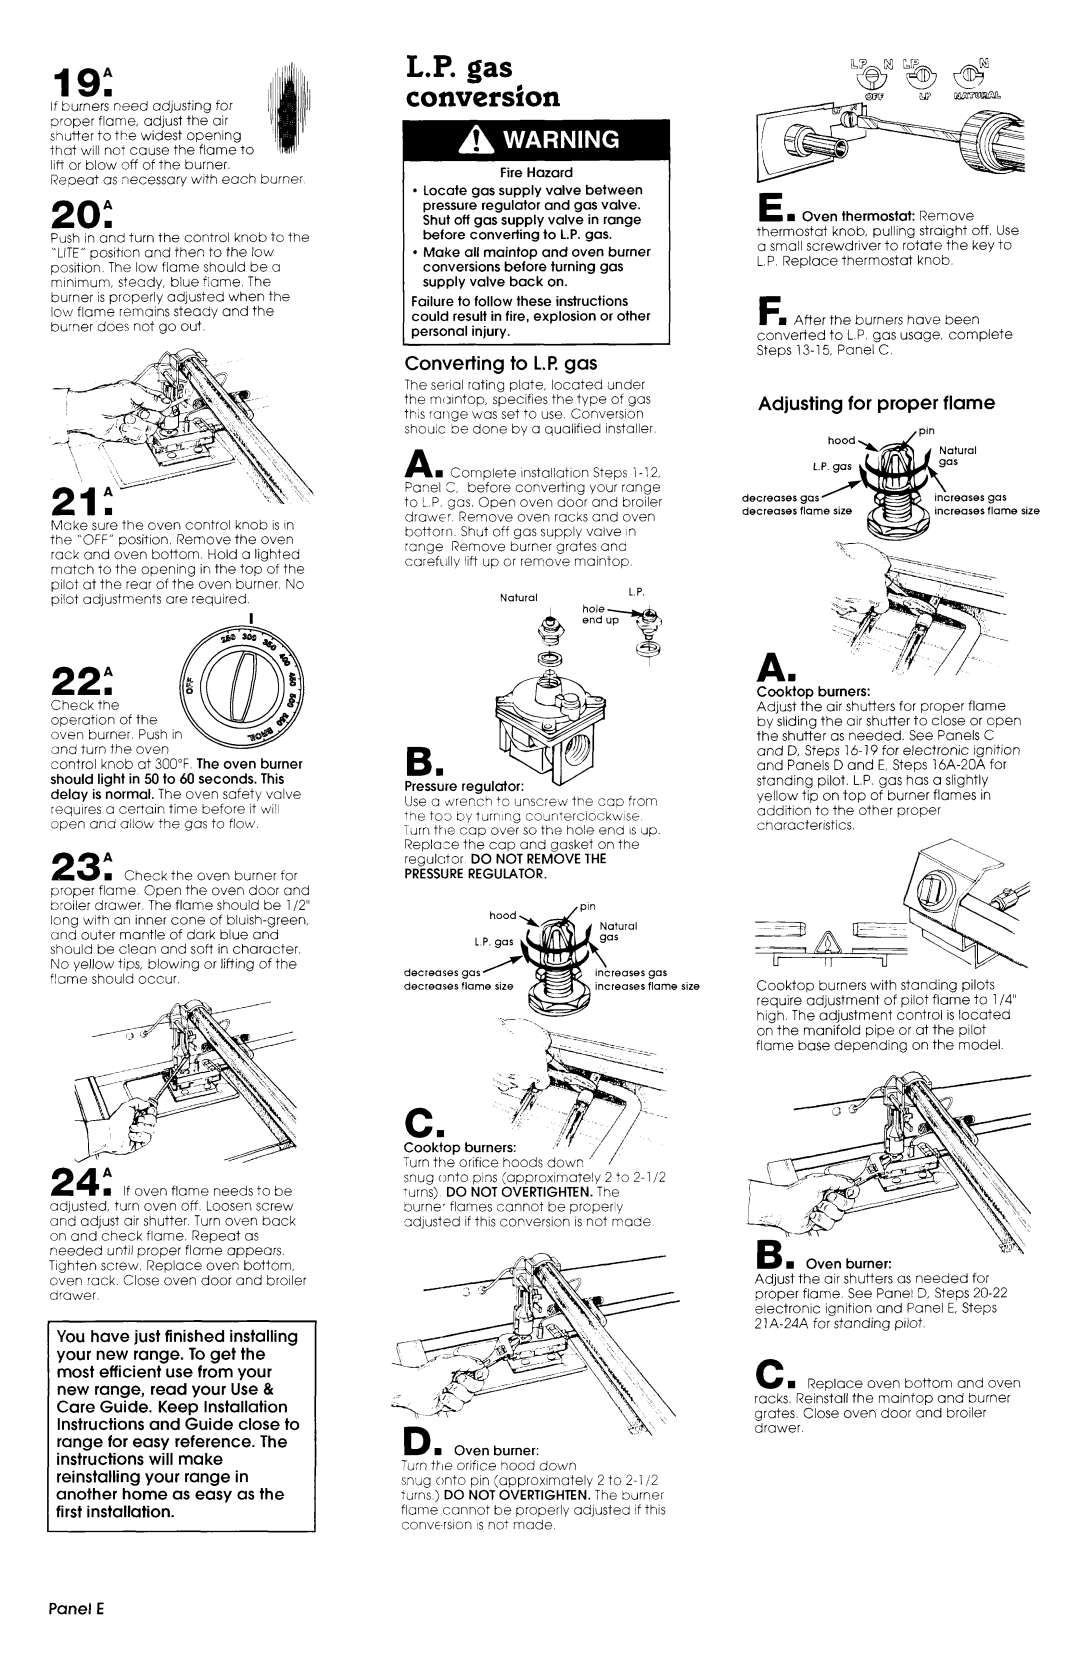
If burneryneed adjusting for proper flame, adjust the air shu’rler to the widest opening that will not cause the flame to lift or blow off of the burner.

Repeat as necessary with each burner

20. A

Push in and turn the control knob to the “LITE”positlon and then to the low position. The low flame should be a minimum, steady, blue frame. The burner is properly adjusted when the low flame remains steady and the burner does not go out.

Make sure the oven control knob is In the “OFF” position. Remove the oven rack and oven bottom. Hold a lighted match to the opening in the top of the pilot at the rear of the oven burner. No

L.P. gas conversion

Fire Hazard

l Locate gas supply valve between pressure regulator and gas valve. Shut off gas supply valve in range before converting to L.P. gas.

l Make all maintop and oven burner conversions before turning gas supply valve back on.

Failure to follow these instructions could result in fire, explosion or other personal injury.

Converting to L.P.gas

The serial rating plate, located under the mcjlntop, specifies the type of gas this range was set to use. Conversion shoulc be done by a qualified installer.

A w Complete Installation Steps l-l 2, Panel C, before converting your range to L.P. gas. Open oven door and broiler drawer. Remove oven racks and oven bottorn. Shut off gas supply valve in range Remove burner grates and carefully lift up or remove maintop.

E n Oven thermostat: Remove thermostat knob, pulling straight off. Use a small screwdriver to rotate the key to L.P. Replace thermostat knob.

FH After the burners have been converted to L.P. gas usage, complete Steps 13-15, Panel C.

Adjusting for proper flame

hood

/’,

oin


L.P. gas


decreases


Increases gas

decreases


flame size

pilot adjustments are required.

22 A

Check t:e operation of the oven burner Push il and turn the oven

control knob at 300°F. The oven burner should light in 50 to 60 seconds. This delay is normal. The oven safety valve

Natural

B n

Pressure regulator:

L.P.

A n

Cooktop burners:

Adjust the air shutters for proper flame by sliding the air shutter to close or open the shutter as needed. See Panels C and D, Steps 16- 19 for electronic ignition and Panels D and E, Steps 16A-20A for standing pilot. L.P. gas has a slightly yellow tip on top of burner flames in

requires a certain time before it will open and allow the gas to flow.

23 A Check the oven burner for n

Use a drench to unscrew the cap from the tar, by turning counterclockwise

Turn the cap over so the hole end ISup Replace the cap and gasket on the regulator DO NOT REMOVE THE PRESSUREREGULATOR.

addition to the other proper characteristics.

proper flame. Open the oven door and broiler drawer. The flame should be l/2” long with an inner cone of bluish-green, and outer mantle of dark blue and should be clean and soft in character. No yellow tips, blowing or lifting of the flame should occur.

gas

decreases flame size

flame size

Cooktop

burners

with

standing

pilots


require

adjustment

of pilot

flame to l/4”


high. The

adjustment

control

is located


on the

manifold

pipe or at

the

pilot


flame

base depending

on

the

model.

24 A

w If oven flame needs to be adjusted, turn oven off, Loosen screw and adjust air shutter. Turn oven back on and check flame. Repeat as needed until proper flame appears. Tighten screw. Replace oven bottom, oven rack. Close oven door and broiler drawer.

You have just finished installing your new range. To get the most efficient use from your new range, read your Use & Care Guide. Keep Installation Instructions and Guide close to range for easy reference. The instructions will make reinstalling your range in another home as easy as the first installation.

C

Cook:op

Turn the orifice hoods down ’

snug onto pins (approximately 2 to 2-l /2 turns) DO NOT OVERTIGHTEN. The burner flames cannot be properly adjusted if this conversion is not made

D n Oven burner:

Turn the orifice hood down

snug onto pin (approximately 2 to 2-l /2 turns.) DO NOT OVERTIGHTEN. The burner flame cannot be properly adjusted if this convc-rsion ISnot made.

B n Oven burner:

Adjust the air shutters as needed for proper flame. See Panel D, Steps 20-22 electronic ignition and Panel E, Steps 2 1A-24A for standing pilot.

C n Replace oven bottom and oven racks, Reinstall the maintop and burner grates. Close oven door and broiler drawer.

Panel E

Page 6
Image 6
Whirlpool FGP300BL0 manual 19 a, Gas conversion

FGP300BL0 specifications

The Whirlpool FGP300BL0 is a powerful and versatile gas range designed to meet the demands of any modern kitchen. With its sleek black finish and professional-looking appearance, this range not only enhances the aesthetic of your cooking space but also offers a range of features that cater to your culinary needs.

One of the standout features of the FGP300BL0 is its powerful cooktop, which includes four sealed burners. These burners provide precise control, allowing you to simmer sauces or boil water rapidly with the high-output burner. The burners are designed to contain spills and drips effectively, making cleanup a breeze. A dedicated center burner offers added flexibility, perfect for accommodating large pots or pans.

The oven of the FGP300BL0 employs a standard baking system, providing even heat distribution for consistent and reliable baking results. With a generous capacity of 5.1 cubic feet, this oven can handle multiple dishes at once, making it ideal for family gatherings or entertaining guests. The oven features a broil function, which enables users to achieve a nice browning effect on meats and vegetables, enhancing flavor and presentation.

Another notable technology incorporated into the Whirlpool FGP300BL0 is its AccuBake temperature management system. This feature monitors oven temperature and adjusts cooking elements accordingly to maintain consistent heat, ensuring that baked goods rise perfectly every time. This innovation helps guarantee that your meals are cooked to perfection, reducing the chances of undercooking or overcooking.

Additionally, the range comes with a removable oven door, which simplifies the cleaning process. This feature allows easy access to the interior, making it simpler to maintain your range's performance and longevity. For ease of use, the FGP300BL0 is equipped with intuitive control knobs that provide straightforward adjustments for burner heat levels and oven settings.

Safety is also a priority with the Whirlpool FGP300BL0, as it includes features like an oven lock and spill guard to prevent accidents. With its efficient combination of style, technology, and functionality, the Whirlpool FGP300BL0 gas range is a reliable choice for home cooks looking to elevate their culinary experience. Whether you're a novice or an experienced chef, this range provides the tools required to create delicious meals with ease and confidence.