4.Turn on the washer by selecting POWER. Select one of the cycles by turning the cycle selector. The indicator light for the selected cycle will glow green. When selecting a wash cycle, the preset options and modifiers (such as Water Temp, Spin Speed, and Soil Level) for the selected cycle will glow green. Selectable options will glow amber. If an option or modifier is unavailable with a selected cycle, the light will not illuminate. The display shows the estimated time remaining. The preset settings provide the recommended fabric care for the selected cycle. See “Cycles.”
5.Select the desired Options. Not all options are available with all cycles. See “Options.”
6.Select the desired modifiers such as Water Temp, Spin Speed and Soil Level. Not all modifiers are available with all cycles and options. See “Modifiers.”
7.If desired, select the CYCLE SIGNAL. The signal is helpful when you are washing items that should be removed from the washer as soon as it stops. Select Loud, Soft or Off.
8.If desired, select the BUTTON SOUND. This feature makes a sound each time a button is pressed. Select Loud, Soft or Off.
9.Select and hold START for approximately 1 second.
■If you do not select START within 5 minutes of choosing a cycle, the washer automatically shuts off.
■When the wash cycle is complete, the DONE status light glows, the door unlocks, and the wash load can be removed from the washer. The washer powers down automatically 60 minutes after the cycle is complete and the DONE light goes off. To power down the washer manually after the wash cycle is complete, select PAUSE/ CANCEL once.
10.To use the same cycle again, press POWER first, then select
START.
11.To begin the wash cycle later
Select DELAY WASH until the desired delay time (in hours) shows in the Estimated Time Remaining display. Select START. The countdown to the wash cycle will show in the display window.
IMPORTANT: When delaying a cycle, use only powdered detergents in the main wash compartment since liquid detergents may seep out of the compartment during Delay Wash, before the wash cycle begins.
Choosing the Right Detergent
Use only High Efficiency detergents. The package for this type of detergent will be marked “HE” or “High Efficiency.” This wash system, along with less water, will create too much sudsing with a regular
Use only HE High Efficiency detergent.
To fill dispenser compartments
1.Pull out the dispenser drawer.
2.Add the desired laundry product to the proper compartment.
3.Push in the dispenser drawer slowly and completely (to avoid a spill).
C
![]() D
D
A ![]()
B
![]() E
E
Using the Dispenser
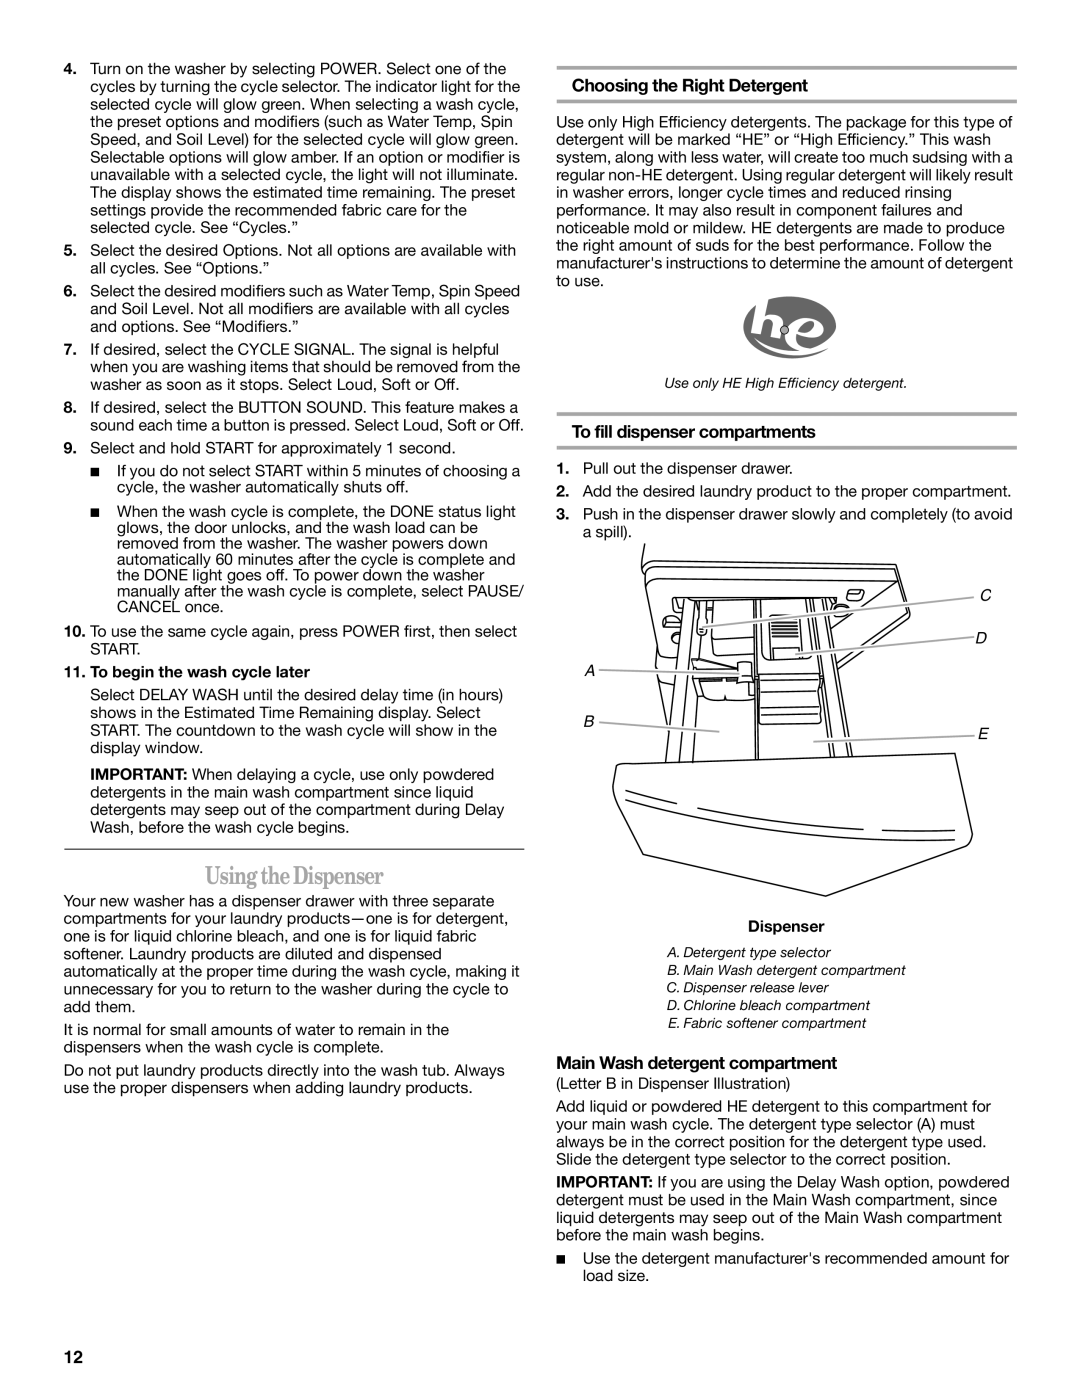
Your new washer has a dispenser drawer with three separate compartments for your laundry
It is normal for small amounts of water to remain in the dispensers when the wash cycle is complete.
Do not put laundry products directly into the wash tub. Always use the proper dispensers when adding laundry products.
Dispenser
A. Detergent type selector
B. Main Wash detergent compartment
C. Dispenser release lever
D. Chlorine bleach compartment
E. Fabric softener compartment
Main Wash detergent compartment
(Letter B in Dispenser Illustration)
Add liquid or powdered HE detergent to this compartment for your main wash cycle. The detergent type selector (A) must always be in the correct position for the detergent type used. Slide the detergent type selector to the correct position.
IMPORTANT: If you are using the Delay Wash option, powdered detergent must be used in the Main Wash compartment, since liquid detergents may seep out of the Main Wash compartment before the main wash begins.
■Use the detergent manufacturer's recommended amount for load size.
12
