ECheck operation
(cont.)
Check operation of oven broil burner
22.Follow the instructions for your type of oven controls.
Note: A faint ticking sound will be heard while the oven burner lights. The oven burner should light within 8 seconds.
If your range has an oven temperature control knob:
| OFF | PUSH TO |
|
| TURN |
|
| WARM |
OVEN ON | CLEAN | 200 |
(TURN OFF OVEN WHEN FLASHING) |
| |
OVEN HEATING | PUSH TO | 250 |
TURN | ||
DOOR LOCKED/CLEANING | BROIL |
|
| 300 | |
(CLOSE DOOR WHEN FLASHING) |
|
500 ![]()
![]() 350
350
450 400
If your oven has this type of electronic control pad:
|
|
| 888°F | ON 88:88 |
|
|
|
| ||
|
|
| HEAT BAKE BROIL |
| CLEAN | TIMER |
|
|
|
|
|
|
|
|
| TIMER |
|
|
| START | OFF |
BAKE | CUSTOM | AUTO | TEMP | CLOCK | SET | LIGHT | HR | MIN | ||
TIMER | ENTER | CANCEL | ||||||||
| BROIL | CLEAN |
|
|
|
|
|
| ||
|
|
|
|
| OFF |
|
|
| 5 SEC |
|
C
1.Press the “CUSTOM BROIL” pad.
•“HI” will appear in the display.
•The “BROIL” indicator will light.
2.Press the “START/ENTER” pad.
•“HEAT”and “ON” indicators will light.
•If the burner fails to light due to air remaining in the gas line, reset the oven control by pressing the “OFF/CANCEL” pad and then pressing the “CUSTOM BROIL” and “START/ENTER” pads again to reactivate the bake operation.
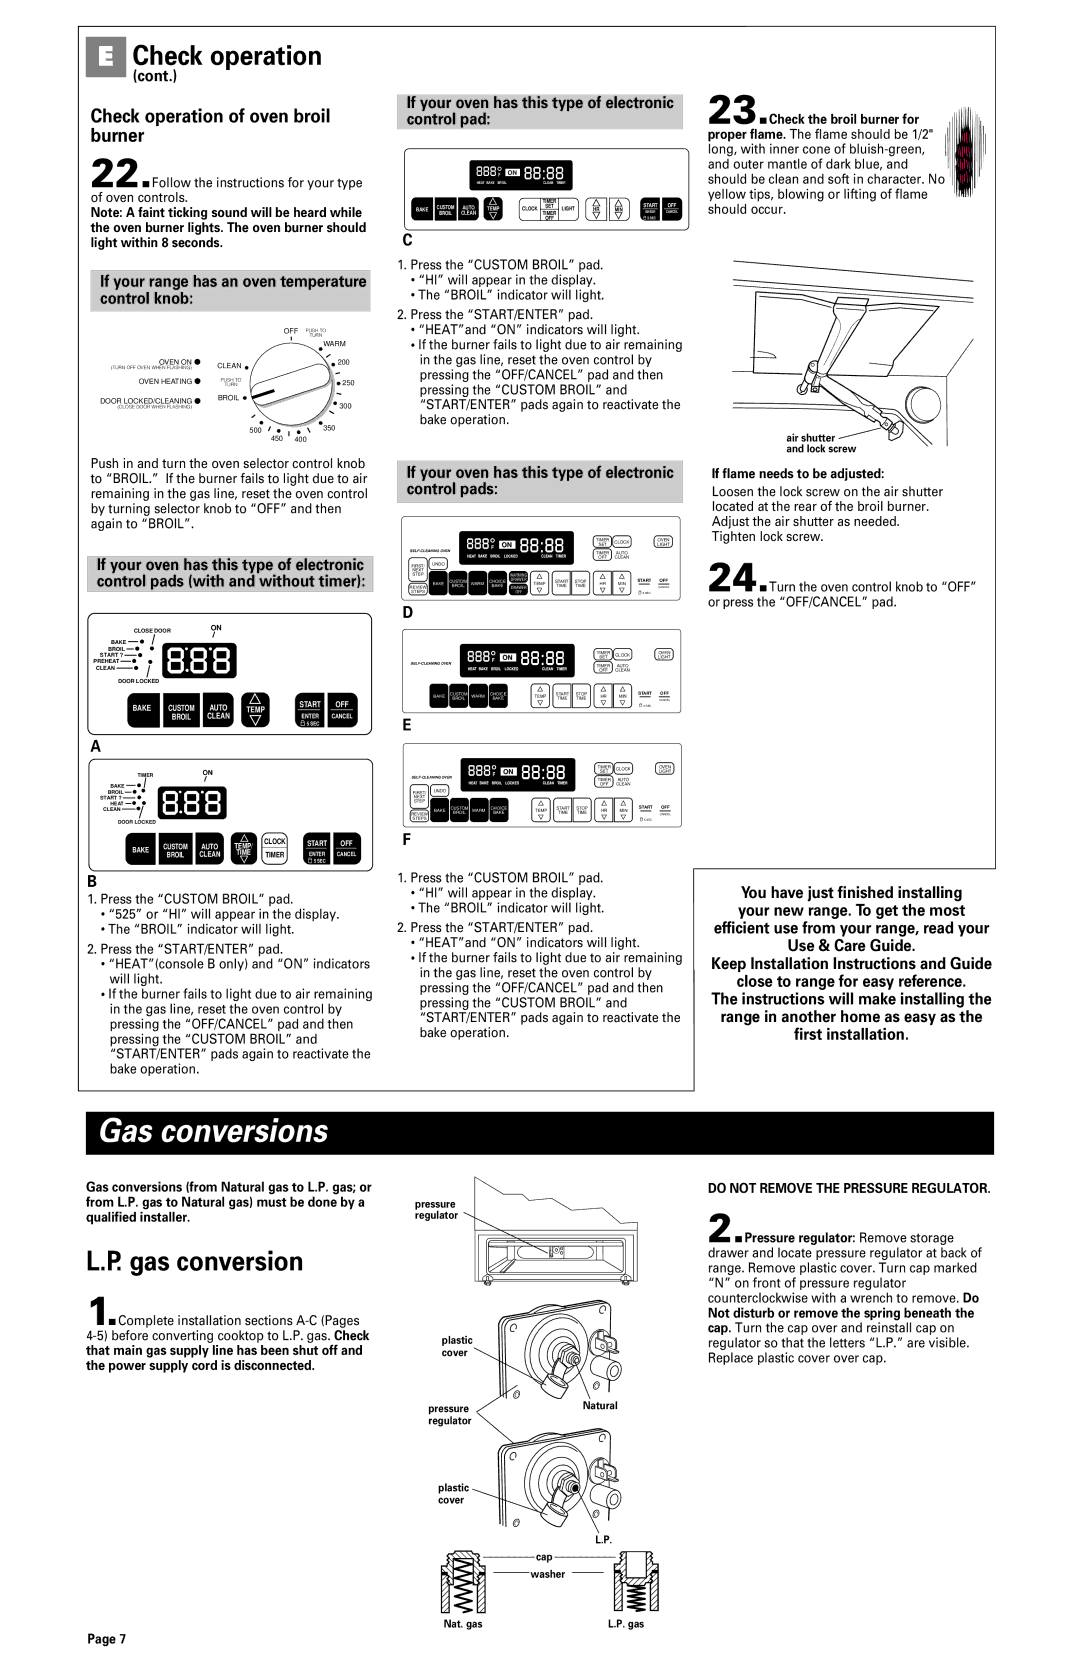
23.Check the broil burner for proper flame. The flame should be 1/2" long, with inner cone of
air shutter ![]() and lock screw
and lock screw
Push in and turn the oven selector control knob to “BROIL.” If the burner fails to light due to air remaining in the gas line, reset the oven control by turning selector knob to “OFF” and then again to “BROIL”.
If your oven has this type of electronic control pads (with and without timer):
CLOSE DOOR | ON |
BAKE
BROIL
PREHEAT
CLEAN
START ? ![]()
![]()
![]() 888
888
DOOR LOCKED
BAKE | CUSTOM | AUTO | TEMP | START | OFF |
|
| ||||
| BROIL | CLEAN |
| ENTER | CANCEL |
|
|
|
| 5 SEC |
|
A
TIMERON
BAKE
BROIL
START ? ![]()
![]() 888
888
HEAT
CLEAN
DOOR LOCKED
| CUSTOM | AUTO | TEMP/ | CLOCK | START | OFF |
BAKE | TEMP |
|
| |||
| BROIL | CLEAN | TIME | TIMER | ENTER | CANCEL |
|
|
|
|
| 5 SEC |
|
B
1.Press the “CUSTOM BROIL” pad.
•“525” or “HI” will appear in the display.
•The “BROIL” indicator will light.
2.Press the “START/ENTER” pad.
•“HEAT”(console B only) and “ON” indicators will light.
•If the burner fails to light due to air remaining in the gas line, reset the oven control by pressing the “OFF/CANCEL” pad and then pressing the “CUSTOM BROIL” and “START/ENTER” pads again to reactivate the bake operation.
If your oven has this type of electronic control pads:
|
|
|
|
|
|
|
| TIMER | CLOCK | OVEN |
|
|
|
|
|
|
|
| SET | LIGHT | |
|
|
|
|
|
|
|
|
| ||
|
|
|
|
|
| TIMER | AUTO |
| ||
|
|
|
|
|
|
|
|
| ||
|
|
|
|
|
|
|
| OFF | CLEAN |
|
FIRST/ | UNDO |
|
|
|
|
|
|
|
|
|
NEXT |
|
|
|
|
|
|
|
|
|
|
STEP |
|
|
|
| WARMING |
|
|
|
|
|
| BAKE | CUSTOM | WARM | CHOICE | DRAWER | START | STOP |
|
| START OFF |
| TEMP | HR | MIN | |||||||
REVIEW |
| BROIL |
| BAKE | DRAWER | TIME | TIME |
|
| CANCEL |
STEPS |
|
|
|
| OFF |
|
|
|
| 5 SEC |
D
|
|
|
|
|
|
| TIMER | CLOCK | OVEN |
|
|
|
|
|
|
| SET | LIGHT | |
|
|
|
|
|
|
|
| ||
|
|
|
|
| TIMER | AUTO |
| ||
|
|
|
|
|
|
|
| ||
|
|
|
|
|
|
| OFF | CLEAN |
|
BAKE | CUSTOM | WARM | CHOICE | TEMP | START | STOP | HR | MIN | START OFF |
| BROIL |
| BAKE |
| TIME | TIME |
|
| CANCEL |
![]()
![]() 5 SEC
5 SEC
E
|
|
|
|
|
|
|
| TIMER | CLOCK | OVEN |
|
|
|
|
|
|
|
| SET | LIGHT | |
|
|
|
|
|
|
|
|
| ||
|
|
|
|
| TIMER | AUTO |
| |||
|
|
|
|
|
|
|
|
| ||
|
|
|
|
|
|
|
| OFF | CLEAN |
|
FIRST/ | UNDO |
|
|
|
|
|
|
|
|
|
NEXT |
|
|
|
|
|
|
|
|
|
|
STEP |
|
|
|
|
|
|
|
|
|
|
| BAKE | CUSTOM | WARM | CHOICE | TEMP | START | STOP | HR | MIN | START OFF |
REVIEW |
| BROIL |
| BAKE |
| TIME | TIME |
|
| CANCEL |
STEPS |
|
|
|
|
|
|
|
|
| 5 SEC |
F
1.Press the “CUSTOM BROIL” pad.
•“HI” will appear in the display.
•The “BROIL” indicator will light.
2.Press the “START/ENTER” pad.
•“HEAT”and “ON” indicators will light.
•If the burner fails to light due to air remaining in the gas line, reset the oven control by pressing the “OFF/CANCEL” pad and then pressing the “CUSTOM BROIL” and “START/ENTER” pads again to reactivate the bake operation.
If flame needs to be adjusted:
Loosen the lock screw on the air shutter located at the rear of the broil burner. Adjust the air shutter as needed. Tighten lock screw.
24.Turn the oven control knob to “OFF” or press the “OFF/CANCEL” pad.
You have just finished installing your new range. To get the most efficient use from your range, read your Use & Care Guide.
Keep Installation Instructions and Guide
close to range for easy reference.
The instructions will make installing the range in another home as easy as the first installation.
Gas conversions
Gas conversions (from Natural gas to L.P. gas; or from L.P. gas to Natural gas) must be done by a qualified installer.
L.P. gas conversion
1.Complete installation sections A-C (Pages
pressure regulator
plastic cover
pressureNatural regulator
plastic cover
L.P.
cap
washer
Nat. gas | L.P. gas |
DO NOT REMOVE THE PRESSURE REGULATOR.
2.Pressure regulator: Remove storage drawer and locate pressure regulator at back of range. Remove plastic cover. Turn cap marked “N” on front of pressure regulator counterclockwise with a wrench to remove. Do
Not disturb or remove the spring beneath the cap. Turn the cap over and reinstall cap on regulator so that the letters “L.P.” are visible. Replace plastic cover over cap.
Page 7