9 n Install duct throuah the vent opening in upper cabinet or wall. Complete venting system according to method needed. See “Venting requirements.” Use caulking to seal exterior wall or roof opening.

10VW If roof or wall cap does not have a damper, attach rectangular damper supplied with hood to selected rectangular vent opening. If damper is attached to back of range hood, be sure damper hinge is toward the top.

If roof or wall cap does not have a damper and round duct is used, install damper (supplied with hood) in duct to prevent air from flowing back into duct.

If roof or wall cap has a damper, Do not use damper blade supplied with range hood.

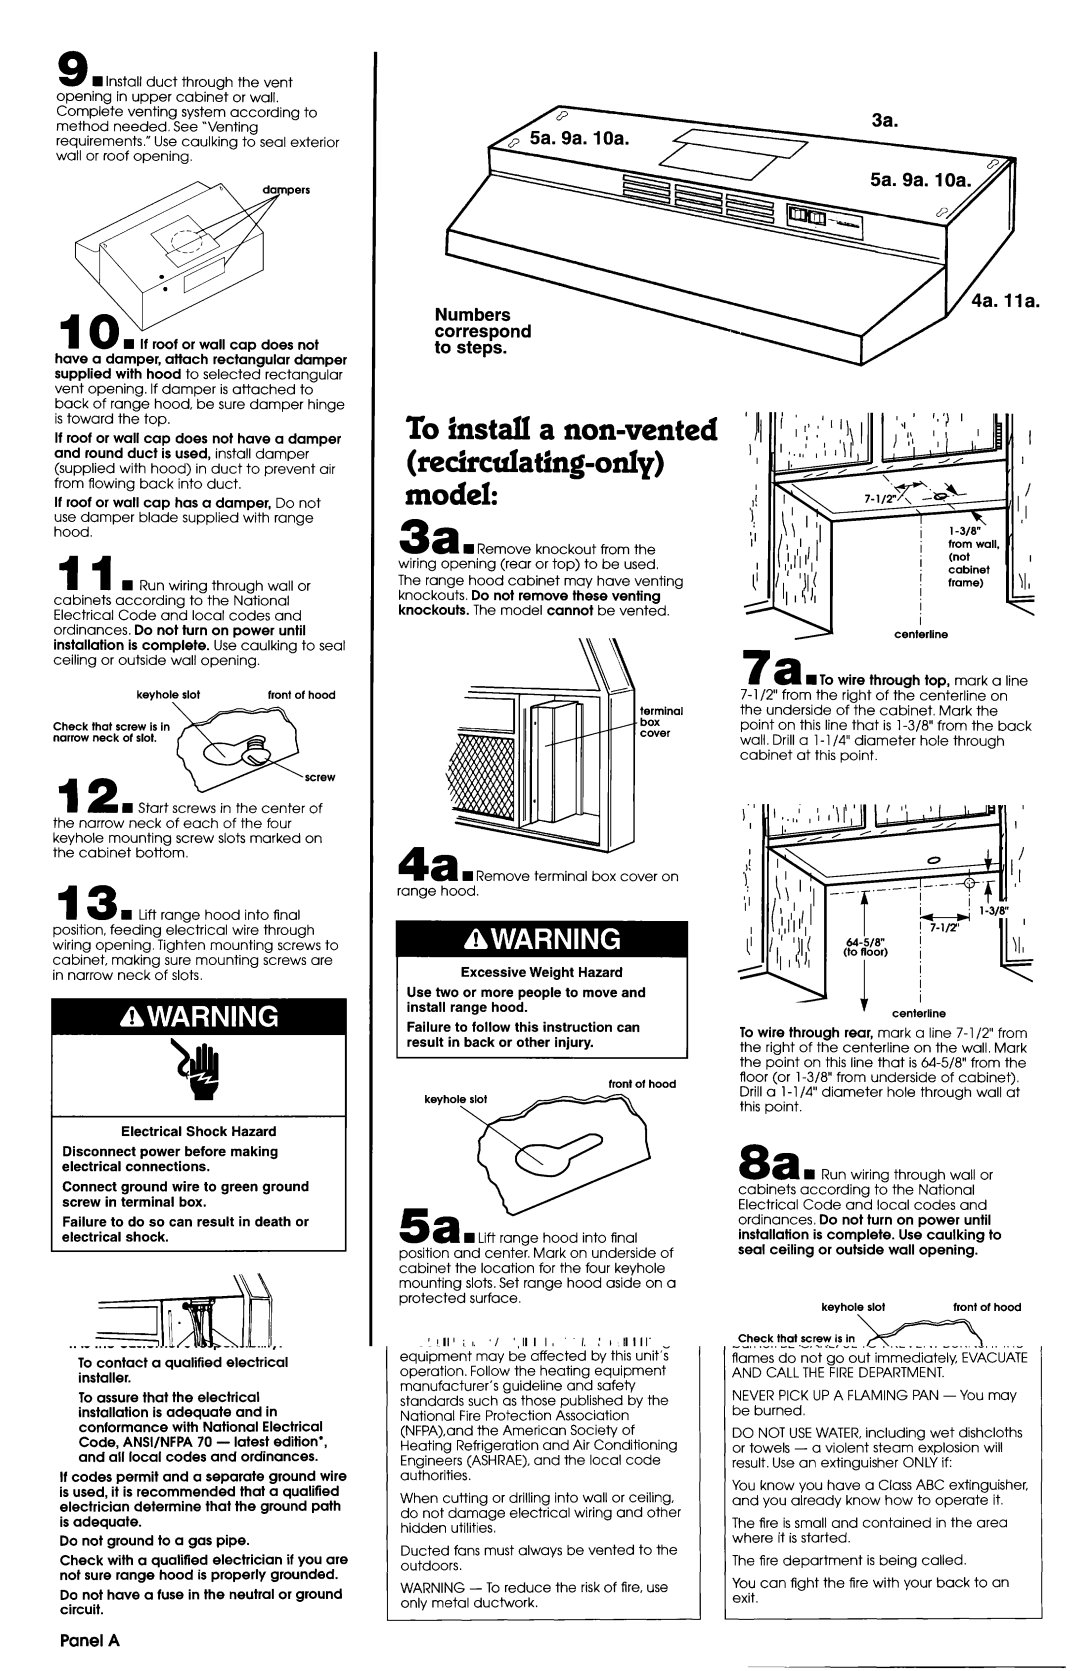
Numbers corresoond to steyjs.

To install a non-vented (recirculating-only)-model:

3a H Remove knockout from the

I

I from wall,

wiring opening (rear or top) to be used.

I

(not

The range hood cabinet may have venting knockouts. Do not remove these venting knockouts. The model cannot be vented.

terminal box

cabinet

I frame)

I

centerline

7a ~TO wire through top, mark a line

7-l /2” from the riaht of the centerline on the underside ofThe cabinet. Mark the point on this line that is l-3/8” from the back wall. Drill a l-l /4” diameter hole through cabinet at this point.

I

I

H Remove terminal box cover on range hood.

Excessive Weight Hazard

Use two or more people to move and install range hood.

di.___.-,-.-0.


I,


! 7-lfl’

&I-5/8”

I

00 floor)

i


I


I

+

I


centerline

J

“r 5

1-W

\I,

4

11 n Run wirina throuah wall or cabinets according t&-the N%ional Electrical Code and local codes and ordinances. Do not turn on power until installation is complete. Use caulking to seal ceiling or outside wall opening.

keyhole slot

front of hood

Check that screw is in narrow neck of slot.

m screw

12 H Start screws in the center of the narrow neck of each of the four keyhole mounting screw slots marked on the cabinet bottom.

13 W Lift range hood into final position, feeding electrical wire through wiring opening. Tighten mounting screws to cabinet, making sure mounting screws are in narrow neck of slots.

Electrical Shock Hazard

Failure to follow this instruction can result in back or other injury.

front oi hood

keyhole slot

To wire through rear, mark a line 7-l /2” from the right of the centerline on the wall. Mark the point on this line that is &l-5/8” from the floor (or l-3/8” from underside of cabinet).

Drill a l-l /4” diameter hole through wall at this point.

Disconnect power before making electrical connections.

Connect ground wire to green ground screw in terminal box.

Failure to do so can result in death or electrical shock.

1 I Connect the white and black wires of the power supply cable to the white and black leads in the range hood with twist-on connectors.

Connect the power supply ground wire to the green ground screw inside the range hood terminal box.

Use caulking to seal wire opening. Replace terminal box cover.

Sa W Lift range hood into final position and center. Mark on underside of cabinet the location for the four keyhole mounting slots. Set range hood aside on a protected surface.

centerline

6a n Determine and clearly mark a vertical centerline in the cabinet opening.

8a n Run wirina throuah wall or cabinets according to’ the N$ional Electrical Code and local codes and ordinances. Do not turn on power until installation is complete. Use caulking to seal ceiling or outside wall opening.

keyhole slot

front of hood

Check that screw is in narrow neck of slot.

m screw

9a H Start screws in the center of the narrow neck of each of the four keyhole mounting screw slots marked on the cabinet bottom.

IOa W Lift range hood into final position, feeding electric%1 wire through wiring opening. Tighten mounting screws to cabinet, making sure mounting screws are in narrow neck of slots.

Panel D

Page 5
Image 5
Whirlpool RH2000, RH2 300 To install a non-vented recirculating-only-model, Di..-,-.-0, Panel D, Electrical Shock Hazard

RH2000, RH2600, RH2 300 specifications

Whirlpool has been a trusted name in home appliances for decades, and its line of hybrid refrigerators, including the RH2600, RH2300, and RH2000, exemplifies the brand's commitment to innovation, efficiency, and consumer needs. These models showcase a blend of advanced technologies and practical features that set them apart in the competitive market.

The Whirlpool RH2600 is a standout model that combines style and functionality. It features a spacious interior, optimized for organization and ease of access. The refrigerator boasts adjustable shelving and door bins, allowing users to customize their space according to their needs. One of the key technologies integrated into the RH2600 is the Adaptive Defrost system, which smartly determines when defrosting is needed, helping to save energy and maintain optimal coolness. Additionally, it is equipped with an energy-efficient compressor that operates quietly, ensuring a serene kitchen environment.

Moving on to the RH2300, this model shines with its focus on freshness and preservation. It incorporates Whirlpool’s FreshFlow technology, which includes an advanced air filtration system that helps to reduce odors and maintain the quality and longevity of stored food. The IntelliSense cooling system is another highlight, automatically adjusting temperatures based on the conditions inside and outside the refrigerator. This ensures that food stays fresh longer while optimizing energy consumption.

Lastly, the Whirlpool RH2000 brings reliability and convenience to the forefront. Known for its user-friendly interface, the RH2000 features easy-to-use temperature controls and a clear display that allows users to monitor and adjust settings effortlessly. Its humidity-controlled crisper drawers are designed to keep fruits and vegetables fresh for an extended period. This model also excels in energy efficiency, meeting stringent standards that help consumers save on utility bills while supporting environmental sustainability.

In conclusion, the Whirlpool RH2600, RH2300, and RH2000 refrigerators encompass a blend of innovative technologies, functional features, and energy efficiency. Each model caters to different consumer needs, making the choice easier for those looking for a reliable and intelligent refrigerator that complements modern living. Whether the priority is organization, food preservation, or energy savings, Whirlpool has crafted solutions that enhance the home environment.