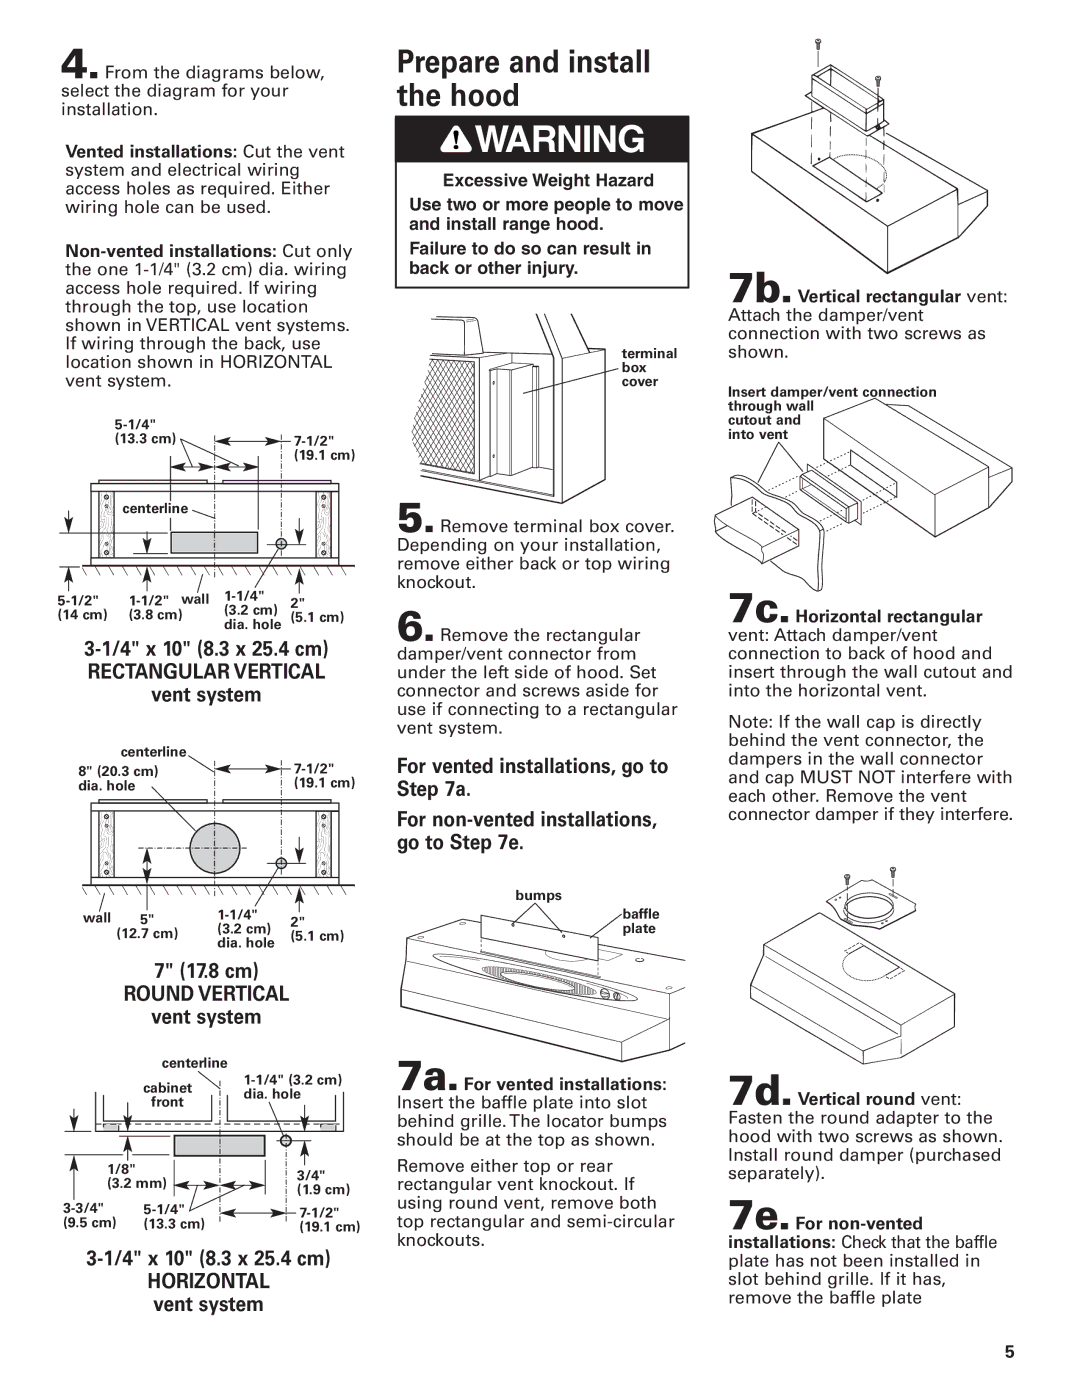
4. From the diagrams below, select the diagram for your installation.

Vented installations: Cut the vent system and electrical wiring access holes as required. Either wiring hole can be used.

Non-vented installations: Cut only the one 1-1/4" (3.2 cm) dia. wiring access hole required. If wiring through the top, use location shown in VERTICAL vent systems. If wiring through the back, use location shown in HORIZONTAL vent system.

5-1/4"


(13.3 cm)

7-1/2"


(19.1 cm)

centerline


wall 1-1/4"


5-1/2"

1-1/2"

2"

(14 cm)

(3.8 cm)

(3.2 cm)

dia. hole

(5.1 cm)


3-1/4" x 10" (8.3 x 25.4 cm)

RECTANGULAR VERTICAL

vent system

centerline


8" (20.3 cm)


7-1/2"


dia. hole


(19.1 cm)


wall


1-1/4"


5"

2"


(12.7 cm)

(3.2 cm)

(5.1 cm)


dia. hole


7" (17.8 cm)

ROUND VERTICAL

vent system

centerline


cabinet

1-1/4" (3.2 cm)

dia. hole

front


1/8"


3/4"


(3.2 mm)


(1.9 cm)


3-3/4"

5-1/4"


7-1/2"


(9.5 cm)

(13.3 cm)


(19.1 cm)


3-1/4" x 10" (8.3 x 25.4 cm)

HORIZONTAL vent system

Prepare and install the hood

WARNING

Excessive Weight Hazard

Use two or more people to move and install range hood.

Failure to do so can result in back or other injury.

terminal box cover

5. Remove terminal box cover. Depending on your installation, remove either back or top wiring knockout.

6. Remove the rectangular damper/vent connector from under the left side of hood. Set connector and screws aside for use if connecting to a rectangular vent system.

For vented installations, go to Step 7a.

For non-vented installations, go to Step 7e.

bumps

baffle plate

7a. For vented installations: Insert the baffle plate into slot behind grille. The locator bumps should be at the top as shown.

Remove either top or rear rectangular vent knockout. If using round vent, remove both top rectangular and semi-circular knockouts.

7b. Vertical rectangular vent: Attach the damper/vent connection with two screws as shown.

Insert damper/vent connection through wall

cutout and into vent

7c. Horizontal rectangular vent: Attach damper/vent connection to back of hood and insert through the wall cutout and into the horizontal vent.

Note: If the wall cap is directly behind the vent connector, the dampers in the wall connector and cap MUST NOT interfere with each other. Remove the vent connector damper if they interfere.

7d. Vertical round vent: Fasten the round adapter to the hood with two screws as shown. Install round damper (purchased separately).

7e. For non-vented

installations: Check that the baffle plate has not been installed in slot behind grille. If it has, remove the baffle plate

5

Page 5
Image 5
Whirlpool RH4836, RH4830 installation instructions Prepare and install the hood, 4 x 10 8.3 x 25.4 cm, Vent system, 17.8 cm

RH4830, RH4836 specifications

The Whirlpool RH4836 and RH4830 are innovative range hoods designed to elevate the cooking experience by combining sleek aesthetics with advanced technology. Both models are part of Whirlpool's commitment to quality and performance, featuring impressive engineering and user-friendly functionalities tailored for modern kitchens.

The Whirlpool RH4836 is a 36-inch wall-mounted range hood that stands out with its contemporary design and powerful performance. It is equipped with a powerful blower that effectively eliminates smoke, grease, and odors from the kitchen. The high airflow rate ensures that the cooking area remains fresh and clean, making it an essential addition for avid cooks. With multiple fan speeds, users can easily adjust the ventilation according to their cooking needs, ranging from a gentle breeze to robust suction when dealing with more intense cooking processes.

In contrast, the Whirlpool RH4830 is a 30-inch version that delivers similar features in a more compact size. This model is perfect for smaller kitchens or where space is at a premium. Both hoods include bright LED lighting that illuminates the cooktop area, enhancing visibility and aiding in the cooking process. The energy-efficient LED lights consume less power compared to traditional incandescent bulbs, contributing to overall energy savings.

A notable feature shared by both models is their easy-to-clean filters. The aluminum mesh filters efficiently trap grease and can be removed for quick cleaning, ensuring the hoods maintain optimal performance and hygiene. The range hoods also have a modern, stainless steel finish that not only adds a touch of elegance to any kitchen but also ensures durability and resistance to staining and scratching.

Whirlpool has equipped both the RH4836 and RH4830 with the convenient auto shut-off feature, which automatically turns off the ventilation after a specified time, ensuring energy efficiency and minimizing waste. Additionally, both models operate quietly, allowing for an unobtrusive cooking environment even on higher settings.

In summary, the Whirlpool RH4836 and RH4830 range hoods present an impressive blend of functionality, style, and modern technology, making them ideal choices for homeowners looking to enhance their kitchen's efficiency while maintaining a clean and fresh atmosphere. Whether you opt for the larger RH4836 or the more compact RH4830, both models promise reliability and performance, reaffirming Whirlpool's reputation as a leader in kitchen innovation.