keyhole slot

front of hood

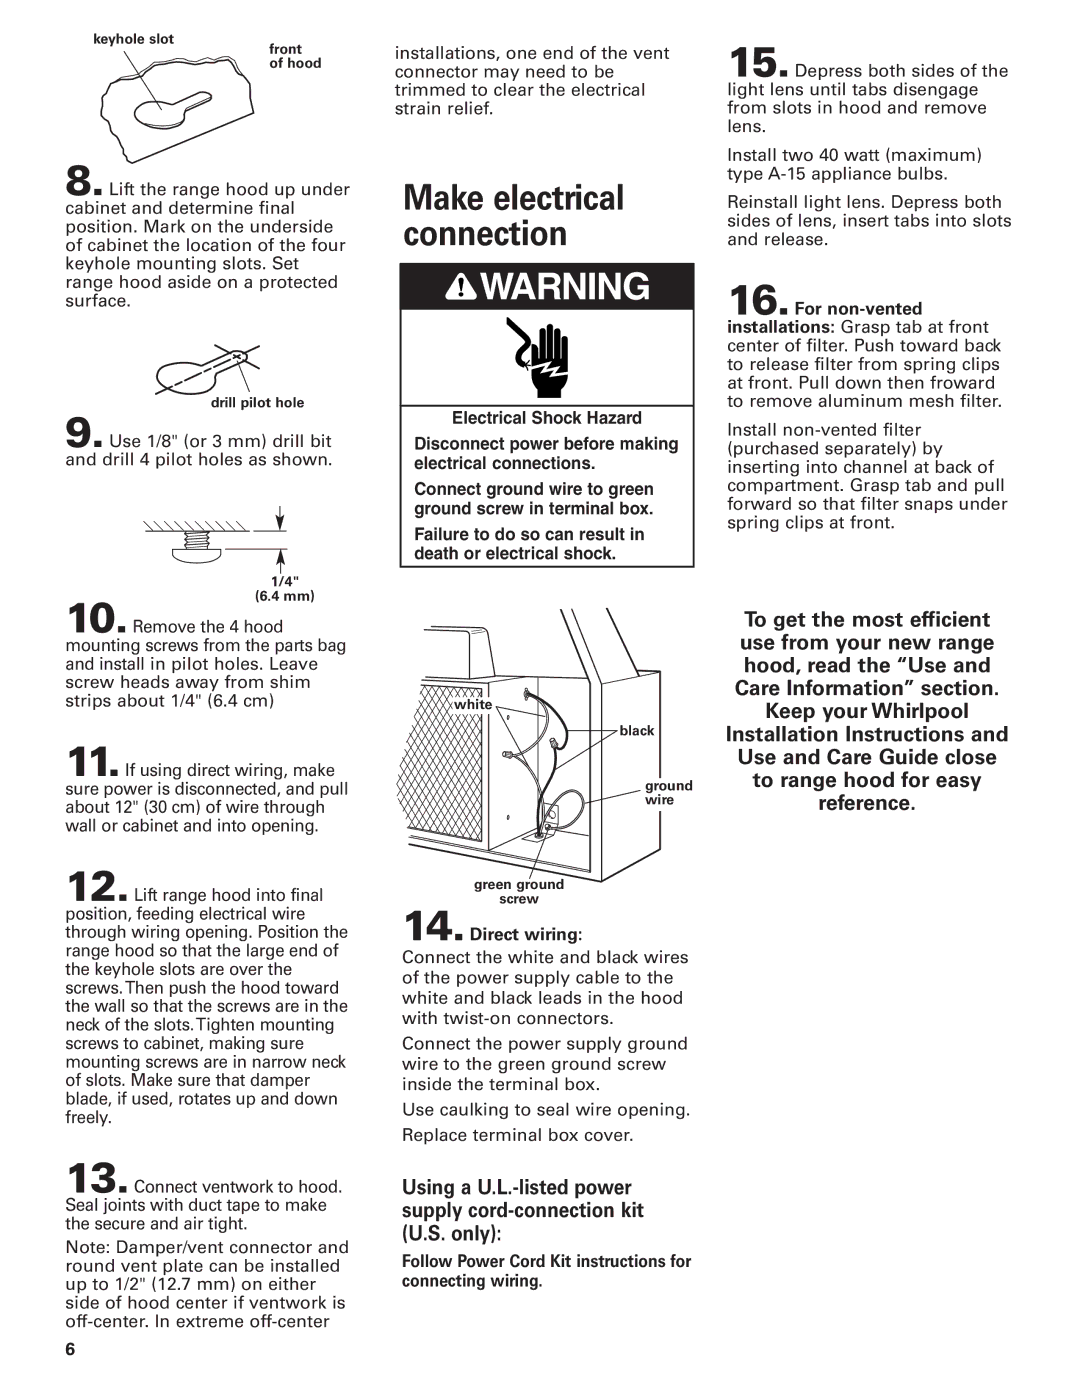
8. Lift the range hood up under cabinet and determine final position. Mark on the underside of cabinet the location of the four keyhole mounting slots. Set range hood aside on a protected surface.

drill pilot hole

9. Use 1/8" (or 3 mm) drill bit and drill 4 pilot holes as shown.

1/4"

(6.4 mm)

installations, one end of the vent connector may need to be trimmed to clear the electrical strain relief.

Make electrical connection

WARNING

Electrical Shock Hazard

Disconnect power before making electrical connections.

Connect ground wire to green ground screw in terminal box.

Failure to do so can result in death or electrical shock.

15. Depress both sides of the light lens until tabs disengage from slots in hood and remove lens.

Install two 40 watt (maximum) type A-15 appliance bulbs.

Reinstall light lens. Depress both sides of lens, insert tabs into slots and release.

16. For non-vented

installations: Grasp tab at front center of filter. Push toward back to release filter from spring clips at front. Pull down then froward to remove aluminum mesh filter.

Install non-vented filter (purchased separately) by inserting into channel at back of compartment. Grasp tab and pull forward so that filter snaps under spring clips at front.

10. Remove the 4 hood mounting screws from the parts bag and install in pilot holes. Leave screw heads away from shim strips about 1/4" (6.4 cm)

11. If using direct wiring, make sure power is disconnected, and pull about 12" (30 cm) of wire through wall or cabinet and into opening.

12. Lift range hood into final position, feeding electrical wire through wiring opening. Position the range hood so that the large end of the keyhole slots are over the screws. Then push the hood toward the wall so that the screws are in the neck of the slots. Tighten mounting screws to cabinet, making sure mounting screws are in narrow neck of slots. Make sure that damper blade, if used, rotates up and down freely.

13. Connect ventwork to hood. Seal joints with duct tape to make the secure and air tight.

Note: Damper/vent connector and round vent plate can be installed up to 1/2" (12.7 mm) on either side of hood center if ventwork is off-center. In extreme off-center

white

black

ground wire

green ground

screw

14. Direct wiring:

Connect the white and black wires of the power supply cable to the white and black leads in the hood with twist-on connectors.

Connect the power supply ground wire to the green ground screw inside the terminal box.

Use caulking to seal wire opening. Replace terminal box cover.

Using a U.L.-listed power supply cord-connection kit (U.S. only):

Follow Power Cord Kit instructions for connecting wiring.

To get the most efficient use from your new range hood, read the “Use and Care Information” section.

Keep your Whirlpool

Installation Instructions and Use and Care Guide close to range hood for easy reference.

6

Page 6
Image 6
Whirlpool RH4830, RH4836 installation instructions Make electrical connection, For non-vented, Direct wiring

RH4830, RH4836 specifications

The Whirlpool RH4836 and RH4830 are innovative range hoods designed to elevate the cooking experience by combining sleek aesthetics with advanced technology. Both models are part of Whirlpool's commitment to quality and performance, featuring impressive engineering and user-friendly functionalities tailored for modern kitchens.

The Whirlpool RH4836 is a 36-inch wall-mounted range hood that stands out with its contemporary design and powerful performance. It is equipped with a powerful blower that effectively eliminates smoke, grease, and odors from the kitchen. The high airflow rate ensures that the cooking area remains fresh and clean, making it an essential addition for avid cooks. With multiple fan speeds, users can easily adjust the ventilation according to their cooking needs, ranging from a gentle breeze to robust suction when dealing with more intense cooking processes.

In contrast, the Whirlpool RH4830 is a 30-inch version that delivers similar features in a more compact size. This model is perfect for smaller kitchens or where space is at a premium. Both hoods include bright LED lighting that illuminates the cooktop area, enhancing visibility and aiding in the cooking process. The energy-efficient LED lights consume less power compared to traditional incandescent bulbs, contributing to overall energy savings.

A notable feature shared by both models is their easy-to-clean filters. The aluminum mesh filters efficiently trap grease and can be removed for quick cleaning, ensuring the hoods maintain optimal performance and hygiene. The range hoods also have a modern, stainless steel finish that not only adds a touch of elegance to any kitchen but also ensures durability and resistance to staining and scratching.

Whirlpool has equipped both the RH4836 and RH4830 with the convenient auto shut-off feature, which automatically turns off the ventilation after a specified time, ensuring energy efficiency and minimizing waste. Additionally, both models operate quietly, allowing for an unobtrusive cooking environment even on higher settings.

In summary, the Whirlpool RH4836 and RH4830 range hoods present an impressive blend of functionality, style, and modern technology, making them ideal choices for homeowners looking to enhance their kitchen's efficiency while maintaining a clean and fresh atmosphere. Whether you opt for the larger RH4836 or the more compact RH4830, both models promise reliability and performance, reaffirming Whirlpool's reputation as a leader in kitchen innovation.