To Adjust Oven Temperature Calibration (on models with electronic clock/timer):

1.Press and hold CLOCK until the oven display shows the current calibration, for example, “00”, if not yet adjusted or about 5 seconds.

2.Press the “up” or “down” arrow pads to increase or to decrease the temperature in 5°F amounts. The adjustment can be set between 35°F and -35°F.

3.Press CLOCK to enter the new temperature.

To Adjust Oven Temperature Calibration (on models with manual oven control):

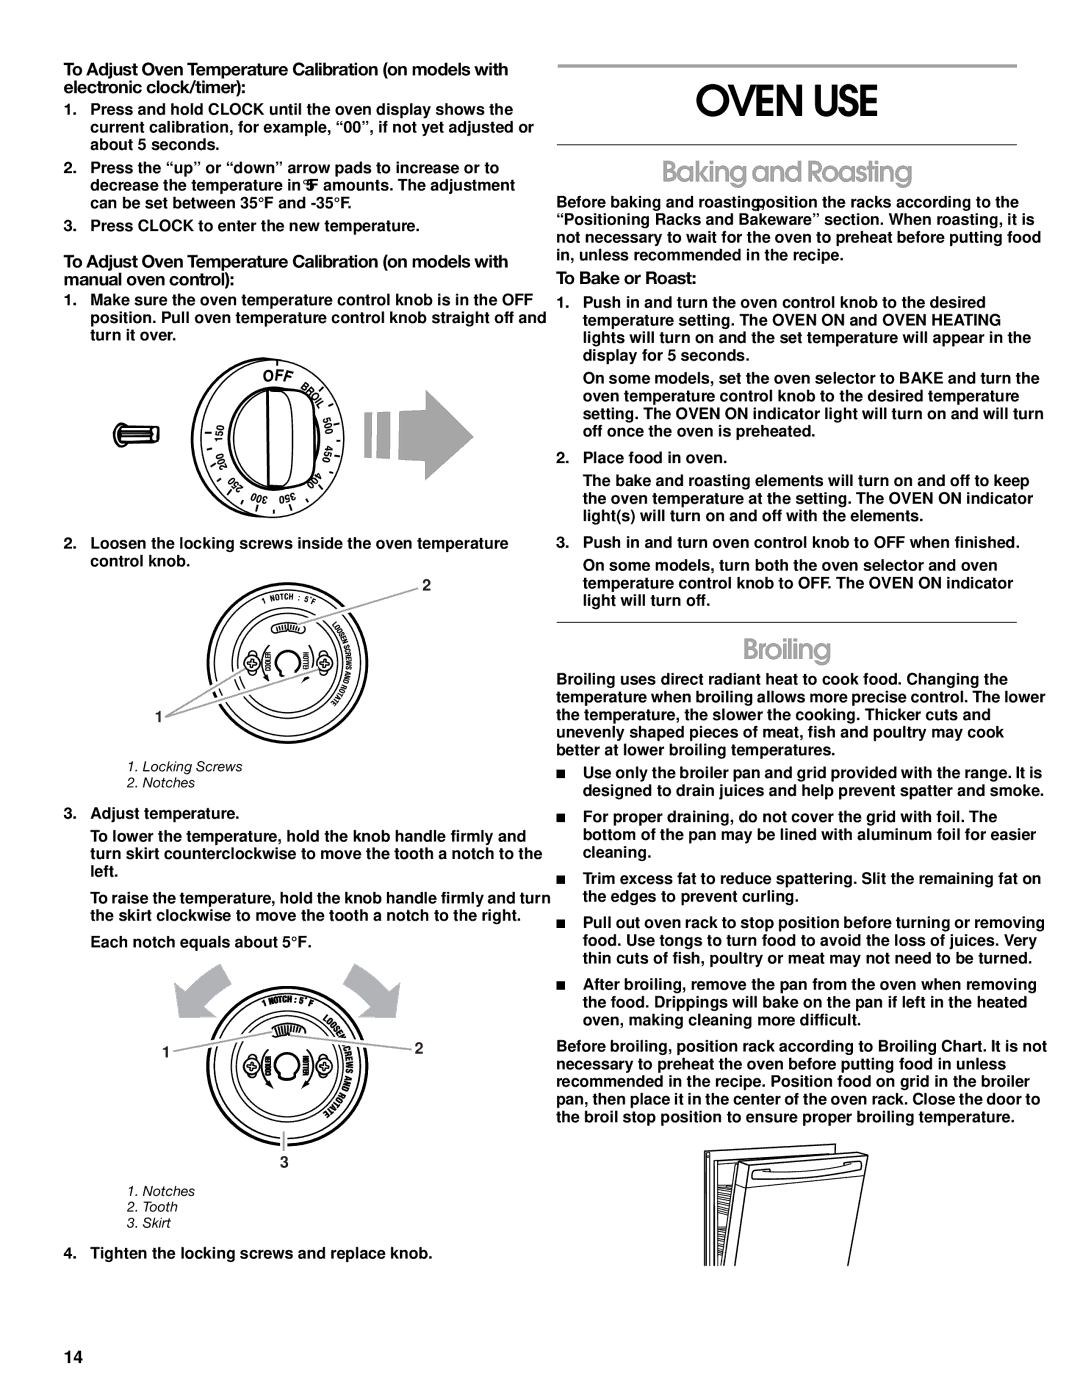
1.Make sure the oven temperature control knob is in the OFF position. Pull oven temperature control knob straight off and turn it over.

2.Loosen the locking screws inside the oven temperature control knob.

2

1

1.Locking Screws

2.Notches

3.Adjust temperature.

To lower the temperature, hold the knob handle firmly and turn skirt counterclockwise to move the tooth a notch to the left.

To raise the temperature, hold the knob handle firmly and turn the skirt clockwise to move the tooth a notch to the right.

Each notch equals about 5°F.

1

2

3

1.Notches

2.Tooth

3.Skirt

4.Tighten the locking screws and replace knob.

OVEN USE

Baking and Roasting

Before baking and roasting, position the racks according to the “Positioning Racks and Bakeware” section. When roasting, it is not necessary to wait for the oven to preheat before putting food in, unless recommended in the recipe.

To Bake or Roast:

1.Push in and turn the oven control knob to the desired temperature setting. The OVEN ON and OVEN HEATING lights will turn on and the set temperature will appear in the display for 5 seconds.

On some models, set the oven selector to BAKE and turn the oven temperature control knob to the desired temperature setting. The OVEN ON indicator light will turn on and will turn off once the oven is preheated.

2.Place food in oven.

The bake and roasting elements will turn on and off to keep the oven temperature at the setting. The OVEN ON indicator light(s) will turn on and off with the elements.

3.Push in and turn oven control knob to OFF when finished.

On some models, turn both the oven selector and oven temperature control knob to OFF. The OVEN ON indicator light will turn off.

Broiling

Broiling uses direct radiant heat to cook food. Changing the temperature when broiling allows more precise control. The lower the temperature, the slower the cooking. Thicker cuts and unevenly shaped pieces of meat, fish and poultry may cook better at lower broiling temperatures.

Use only the broiler pan and grid provided with the range. It is designed to drain juices and help prevent spatter and smoke.

For proper draining, do not cover the grid with foil. The bottom of the pan may be lined with aluminum foil for easier cleaning.

Trim excess fat to reduce spattering. Slit the remaining fat on the edges to prevent curling.

Pull out oven rack to stop position before turning or removing food. Use tongs to turn food to avoid the loss of juices. Very thin cuts of fish, poultry or meat may not need to be turned.

After broiling, remove the pan from the oven when removing the food. Drippings will bake on the pan if left in the heated oven, making cleaning more difficult.

Before broiling, position rack according to Broiling Chart. It is not necessary to preheat the oven before putting food in unless recommended in the recipe. Position food on grid in the broiler pan, then place it in the center of the oven rack. Close the door to the broil stop position to ensure proper broiling temperature.

14

Page 14
Image 14
Whirlpool TEP325, TES325, TEP315, TES355 manual Broiling, To Bake or Roast

TES355, TEP325, TEP315, TES325 specifications

Whirlpool's TES325, TEP315, TEP325, and TES355 models redefine the landscape of modern kitchen appliances, combining efficiency, innovation, and user-friendly design. These products are particularly known for their advanced microwave technology, catering to diverse culinary needs while maintaining energy efficiency.

The TES325 stands out with its sleek design and user-oriented features. It offers a sizable capacity, making it suitable for families and those who frequently host gatherings. This model includes the company's patented 3D microwave technology, ensuring even cooking and reheating by distributing microwaves uniformly. Users appreciate the simple interface, which includes intuitive controls for selecting cooking modes effortlessly.

Moving on to the TEP315, this model takes versatility to the next level. It not only functions as a microwave but also combines the capabilities of a grill and convection oven. This three-in-one functionality provides a range of cooking options, enabling users to prepare a wide variety of dishes. The TEP315 also features a dedicated defrost function, allowing for quick and safe preparation of frozen foods.

The TEP325 showcases more advanced features, focusing on enhanced cooking precision. It incorporates smart sensor technology that automatically adjusts cooking time and power based on the food being prepared, ensuring optimal results without the guesswork. Additionally, this model boasts a cleaning function that simplifies maintenance, allowing users to spend more time enjoying their meals rather than cleaning up afterward.

Lastly, the TES355 represents the pinnacle of Whirlpool's microwave offerings. Equipped with smart technology, this model can connect to Wi-Fi, granting users the ability to control the appliance remotely via a mobile app. It includes voice control compatibility, allowing for hands-free operation. The TES355 also features an extra-large turntable for accommodating larger dishes and ensuring thorough cooking.

In summary, Whirlpool's TES325, TEP315, TEP325, and TES355 models are exceptional kitchen companions, each catering to various cooking preferences and lifestyles. With their innovative technologies, user-friendly features, and stylish designs, these microwaves are not just appliances but integral parts of a modern culinary experience, elevating meal preparation to a new standard.