Washer with 6TH Sense Technology
Índice
Table of Contents
Your safety and the safety of others are very important
Washer Safety
Alternate Parts
Installation Requirements
Tools andParts
Parts supplied
DrainSystem
LocationRequirements
Grounding Instructions
ElectricalRequirements
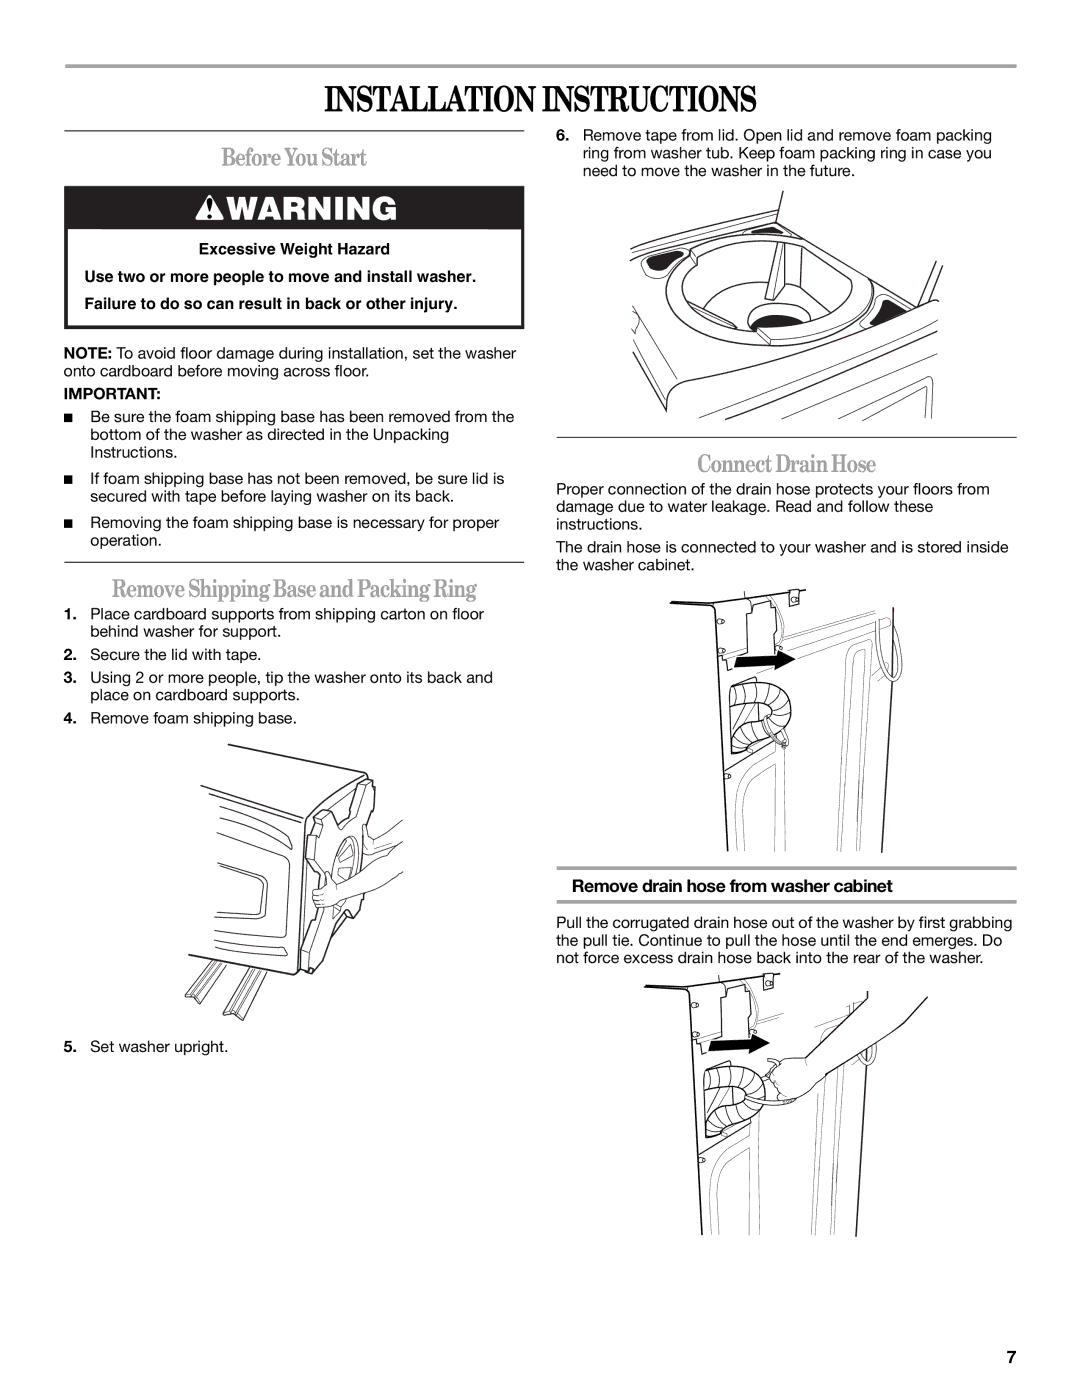
ConnectDrainHose
Installation Instructions
BeforeYouStart
RemoveShippingBaseandPackingRing
ConnecttheInletHoses
SecuretheDrainHose
Level theWasher
Check for leaks
CompleteInstallation
Features
Benefits and Features
Benefits
Washer USE
UsingtheProperDetergent
StartingYourWasher
StoppingtheWasher
PausingorRestartingtheWasher
ChangingCycles,Modifiers andOptions
Cycles
StatusLights
Modifiers
Options
Temperature Guide
To change the Delay Wash time
To cancel Delay Wash
NormalSounds
OperatingControls
Laundry Tips
CleaningYourWasher
Washer Care
Vacation,StorageandMovingCare
WaterInletHoses
Noisy, vibrating, off-balance
Troubleshooting
WasherandComponents
Washer displaying code messages
Washer won’t fill, rinse or agitate washer stops
WasherOperation
Washer leaks
Dispenser operation
ClothingCare
Stains, gray whites, dingy colors
Load is wrinkled, twisted or tangled
Garments damaged
InCanada
Assistance or Service
If you need replacement parts
IntheU.S.A
Call
Whirlpool Corporation Major Appliance Warranty
Su seguridad y la seguridad de los demás es muy importante
Seguridad DE LA Lavadora
Piezas alternativas
Requisitos DE Instalación
Piezasy herramientas
Piezas suministradas
Sistema de desagüe por el lavadero vista C
Requisitos deubicación
Sistemadedesagüe
Usted necesitará
Instrucciones Para LA Conexión Tierra
Requisitos eléctricos
Quitela baseyel anillo deembalaje
Instrucciones DE Instalación
Antes decomenzar
Conectelamangueradedesagüe
Conexióndelasmanguerasdeentrada
Nivelacióndelalavadora
Fijacióndelamangueradedesagüe
Revise si hay fugas
Nivele la parte frontal Nivele la parte lateral
Completelainstalación
Beneficios
Beneficios Y Características
Características
Puestaenmarchadelalavadora
USO DE LA Lavadora
Usodel detergenteadecuado
Agregado de prendas
Pausaoreanudacióndelamarchadelalavadora
Para reanudar la marcha de la lavadora
Ciclos
Cómo detenerlalavadora
Lucesdeestado
Cambiodeciclos,modificadores yopciones
Sábanas/Toallas Sheets/Towels
Blancos blanquísimos Whitest Whites
Intenso Heavy Duty
Artículos voluminosos Bulky Items
Modificadores
Guía de la temperatura
Limpieza intensa Deep Clean
Opciones
Temperatura de lavado/enjuague
Sonidosnormales
Controlesdefuncionamiento
Cuidado DE LA Lavadora
Consejos DE Lavandería
Cómolimpiarsulavadora
Ylasmudanzas
Mangueras deentradadeagua
Ruidosos, vibrantes, desequilibrados
Solución DE Problemas
Lavadoraycomponentes
La lavadora muestra mensajes codificados
¿Está obstruido el lavadero o el desagüe?
Funcionamientodelalavadora
La lavadora pierde agua
Funcionamiento del depósito
El ciclo no puso en marcha la opción de Limpieza intensa
Exceso de espuma
La ropa está arrugada, enroscada o enredada
Cuidadodelaropa
Ropa demasiado mojada
Residuos o pelusa en la ropa
EnlosEE.UU
Ayuda O Servicio Técnico
EnCanadá
Garantía Limitada DE UN AÑO
Whirlpool Corporation
Votre sécurité et celle des autres est très importante
Sécurité DE LA Laveuse
Autres pièces
Exigences D’INSTALLATION
Outillageetpièces
Pièces fournies
Systèmedevidange
Exigences demplacement
Il vous faudra
Système de vidange avec évier de buanderie vue C
Spécificationsélectriques
Système de vidange au plancher vue D
Raccordementdutuyaudevidange
Instructions Dinstallation
Avantdecommencer
Retraitdelabasedexpéditionetdelanneau Demballage
Raccordementdes tuyauxdalimentation
Réglagedelaplombdelalaveuse
Immobilisationdutuyaudevidange
Vérifier sil y a des fuites
Acheverlinstallation
Avantages
Avantages ET Caractéristiques
Caractéristiques
Miseenmarchedelalaveuse
Utilisation DE LA Laveuse
Utilisationdudétergentapproprié
Add a Garment ajouter un vêtement
Pauseouremiseenmarchedelalaveuse
Pour remettre la laveuse en marche
Témoinslumineux
Arrêtdelalaveuse
Programmes
Sheets/Towels draps/serviettes
Heavy Duty service intense
Whitest Whites blancs les plus blancs
Bulky Items articles encombrants
Modificateurs
Pour modifier lheure de lavage différé
Deep Clean nettoyage en profondeur
Wash/Rinse Temp température de lavage/rinçage
Guide de température
Sonsnormaux
Fonctionnementdescommandes
Déchargement
Conseils DE Lessivage
Préparation des vêtements pour le lavage
Tri
Nettoyagedelalaveuse
Entretien DE LA Laveuse
Tuyauxdarrivéedeau
Lalaveuseetses composants
Dépannage
La laveuse fuit
Bruit, vibrations, déséquilibre
De leau gicle-t-elle de lanneau de la cuve ou de la charge?
La laveuse est-elle correctement installée?
Fonctionnementdelalaveuse
Fonctionnement du distributeur
Le couvercle est-il ouvert?
Température de lavage/rinçage
La laveuse est-elle surchargée?
T-il un excès de mousse?
Résidus ou charpie sur le linge
Soindesvêtements
Excès de mousse
Charge trop mouillée
La température de lavage était-elle trop basse?
Taches, blancs grisâtres, couleurs défraîchies
Endommagement des vêtements
Avez-vous bien trié la charge?
Si vous avez besoin de pièces de rechange
Assistance OU Service
AuxÉtats-Unis
AuCanada
Garantie Limitée DE UN AN
Garantie DES Gros Appareils Ménagers Whirlpool Corporation
M0608