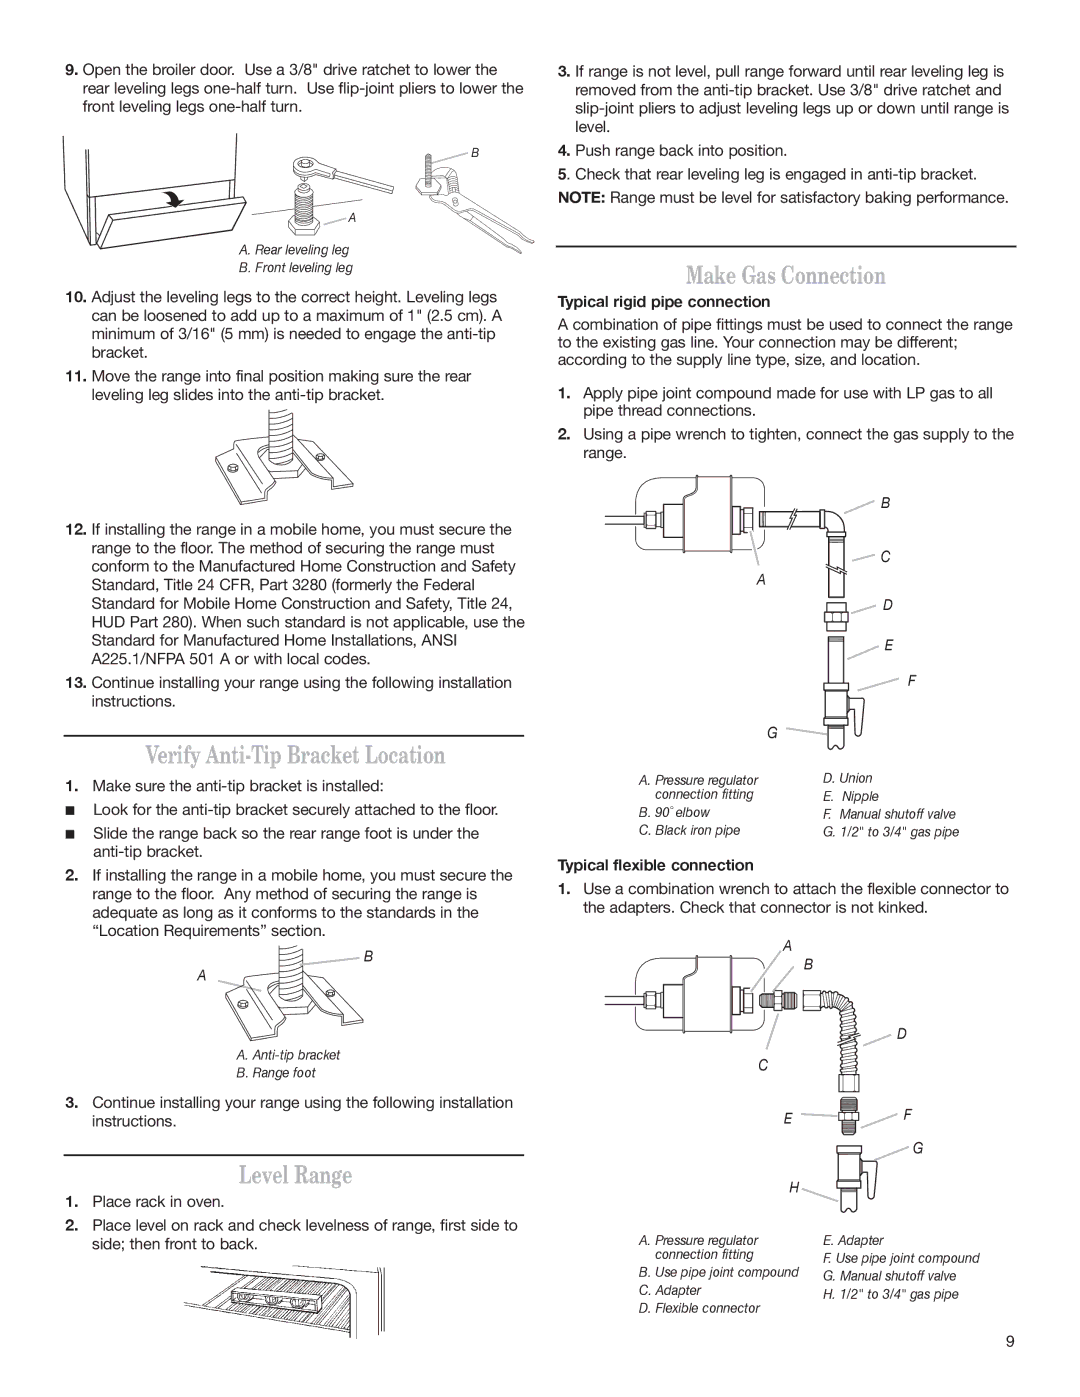
9.Open the broiler door. Use a 3/8" drive ratchet to lower the rear leveling legs one-half turn. Use flip-joint pliers to lower the front leveling legs one-half turn.

B

A

A. Rear leveling leg

B. FrontAleveling. R ar levelingleg leg

BFront leveling leg

10.Adjust the leveling legs to the correct height. Leveling legs can be loosened to add up to a maximum of 1" (2.5 cm). A minimum of 3/16" (5 mm) is needed to engage the anti-tip bracket.

11.Move the range into final position making sure the rear leveling leg slides into the anti-tip bracket.

12.If installing the range in a mobile home, you must secure the range to the floor. The method of securing the range must conform to the Manufactured Home Construction and Safety Standard, Title 24 CFR, Part 3280 (formerly the Federal Standard for Mobile Home Construction and Safety, Title 24, HUD Part 280). When such standard is not applicable, use the Standard for Manufactured Home Installations, ANSI A225.1/NFPA 501 A or with local codes.

13.Continue installing your range using the following installation instructions.

Verify Anti-Tip Bracket Location

1.Make sure the anti-tip bracket is installed:

Look for the anti-tip bracket securely attached to the floor.

Slide the range back so the rear range foot is under the anti-tip bracket.

2.If installing the range in a mobile home, you must secure the range to the floor. Any method of securing the range is adequate as long as it conforms to the standards in the “Location Requirements” section.

B

A

A. Anti-tip bracket

B. Range foot

3.Continue installing your range using the following installation instructions.

Level Range

1.Place rack in oven.

2.Place level on rack and check levelness of range, first side to side; then front to back.

3.If range is not level, pull range forward until rear leveling leg is removed from the anti-tip bracket. Use 3/8" drive ratchet and slip-joint pliers to adjust leveling legs up or down until range is level.

4.Push range back into position.

5. Check that rear leveling leg is engaged in anti-tip bracket. NOTE: Range must be level for satisfactory baking performance.

Make Gas Connection

Typical rigid pipe connection

A combination of pipe fittings must be used to connect the range to the existing gas line. Your connection may be different; according to the supply line type, size, and location.

1.Apply pipe joint compound made for use with LP gas to all pipe thread connections.

2.Using a pipe wrench to tighten, connect the gas supply to the range.


B


C

A


D


E


F


G

A. Pressure regulator

D. Union

connection fitting

E. Nipple

B. 90˚ elbow

F. Manual shutoff valve

C. Black iron pipe

G. 1/2" to 3/4" gas pipe

Typical flexible connection

1.Use a combination wrench to attach the flexible connector to the adapters. Check that connector is not kinked.

A


B


D

C


E

F


G

H


A. Pressure regulator

E. Adapter

connection fitting

F. Use pipe joint compound

B. Use pipe joint compound

G. Manual shutoff valve

C. Adapter

H. 1/2" to 3/4" gas pipe

D. Flexible connector


9

Page 9
Image 9
Whirlpool W10153329A Verify Anti-Tip Bracket Location, Level Range, Make Gas Connection, Typical rigid pipe connection

W10153329A specifications

The Whirlpool W10153329A is an innovative and highly functional appliance designed to enhance kitchen efficiency and user convenience. This model stands out in the crowded market of kitchenware, particularly for its versatile features and cutting-edge technologies.

One of the defining characteristics of the W10153329A is its impressive capacity. With ample space for various kitchen tasks, it can accommodate a wide range of food items, making meal preparation faster and more convenient. This large capacity is perfect for families or individuals who regularly entertain guests, allowing for the preparation of larger quantities of food or multiple dishes simultaneously.

In terms of design, the Whirlpool W10153329A boasts a sleek and modern aesthetic that seamlessly blends with contemporary kitchen décor. The stainless steel finish not only enhances its visual appeal but also contributes to its durability, ensuring that it withstands the rigors of daily use while maintaining its polished look. The appliance features intuitive controls, making it easy for users to navigate settings and customize their cooking experience according to their needs.

Another significant aspect of the W10153329A is its incorporation of innovative cooking technologies. It utilizes advanced heating elements that promote even cooking and reduce cooking times, ensuring that meals are prepared quickly without sacrificing quality. The appliance is also equipped with smart technology that allows users to monitor and control cooking parameters remotely, making it possible to start or adjust settings from anywhere within the home through a smartphone app. This connectivity enhances the overall user experience, providing a level of convenience that is increasingly sought after in modern kitchen appliances.

Safety features are also paramount in the design of the Whirlpool W10153329A. It includes built-in sensors that automatically shut off the appliance if it detects an unsafe operating condition, reducing the risk of accidents in the kitchen. Moreover, the user-friendly interface clearly displays all necessary information, helping users to track cooking progress and settings easily.

In conclusion, the Whirlpool W10153329A is a multi-functional kitchen appliance that combines style, efficiency, and advanced technology. Its spacious capacity, sleek finish, innovative cooking capabilities, and safety features make it an excellent choice for anyone looking to elevate their culinary experience. Whether for everyday cooking or special culinary projects, this model stands as a reliable and efficient option for modern kitchens.