Water Pressure

A cold water supply with water pressure of between 30 and 120 psi (207 and 827 kPa) is required to operate the water dispenser and ice maker. If you have questions about your water pressure, call a licensed, qualified plumber.

Reverse Osmosis Water Supply

IMPORTANT: The pressure of the water supply coming out of a reverse osmosis system going to the water inlet valve of the refrigerator needs to be between 30 and 120 psi (207 and

827 kPa).

If a reverse osmosis water filtration system is connected to your cold water supply, the water pressure to the reverse osmosis system needs to be a minimum of 40 to 60 psi (276 to 414 kPa).

If the water pressure to the reverse osmosis system is less than

40 to 60 psi (276 to 414 kPa):

Check to see whether the sediment filter in the reverse osmosis system is blocked. Replace the filter if necessary.

Allow the storage tank on the reverse osmosis system to refill after heavy usage.

If your refrigerator has a water filter, it may further reduce the water pressure when used in conjunction with a reverse osmosis system. Remove the water filter. See “Water Filtration System.”

If you have questions about your water pressure, call a licensed, qualified plumber.

Connect Water Supply

Read all directions before you begin.

IMPORTANT: If you turn the refrigerator on before the water line is connected, turn the ice maker OFF.

Connect to Water Line

1.Unplug refrigerator or disconnect power.

2.Turn OFF main water supply. Turn ON nearest faucet long enough to clear line of water.

3.Locate a ¹⁄₂" (12.70 mm) to 1¹⁄₄" (3.18 cm) vertical cold water pipe near the refrigerator.

IMPORTANT:

Make sure it is a cold water pipe.

Horizontal pipe will work, but drill on the top side of the pipe, not the bottom. This will help keep water away from the drill and normal sediment from collecting in the valve.

4.Determine the length of copper tubing you need. Measure from the connection on the lower rear corner of refrigerator to the water pipe. Add 7 ft (2.1 m) to allow for cleaning. Use ¹⁄₄" (6.35 mm) O.D. (outside diameter) copper tubing. Be sure both ends of copper tubing are cut square.

5.Using a cordless drill, drill a ¹⁄₄" (6.35 mm) hole in the cold water pipe you have selected.

A

G

B


C

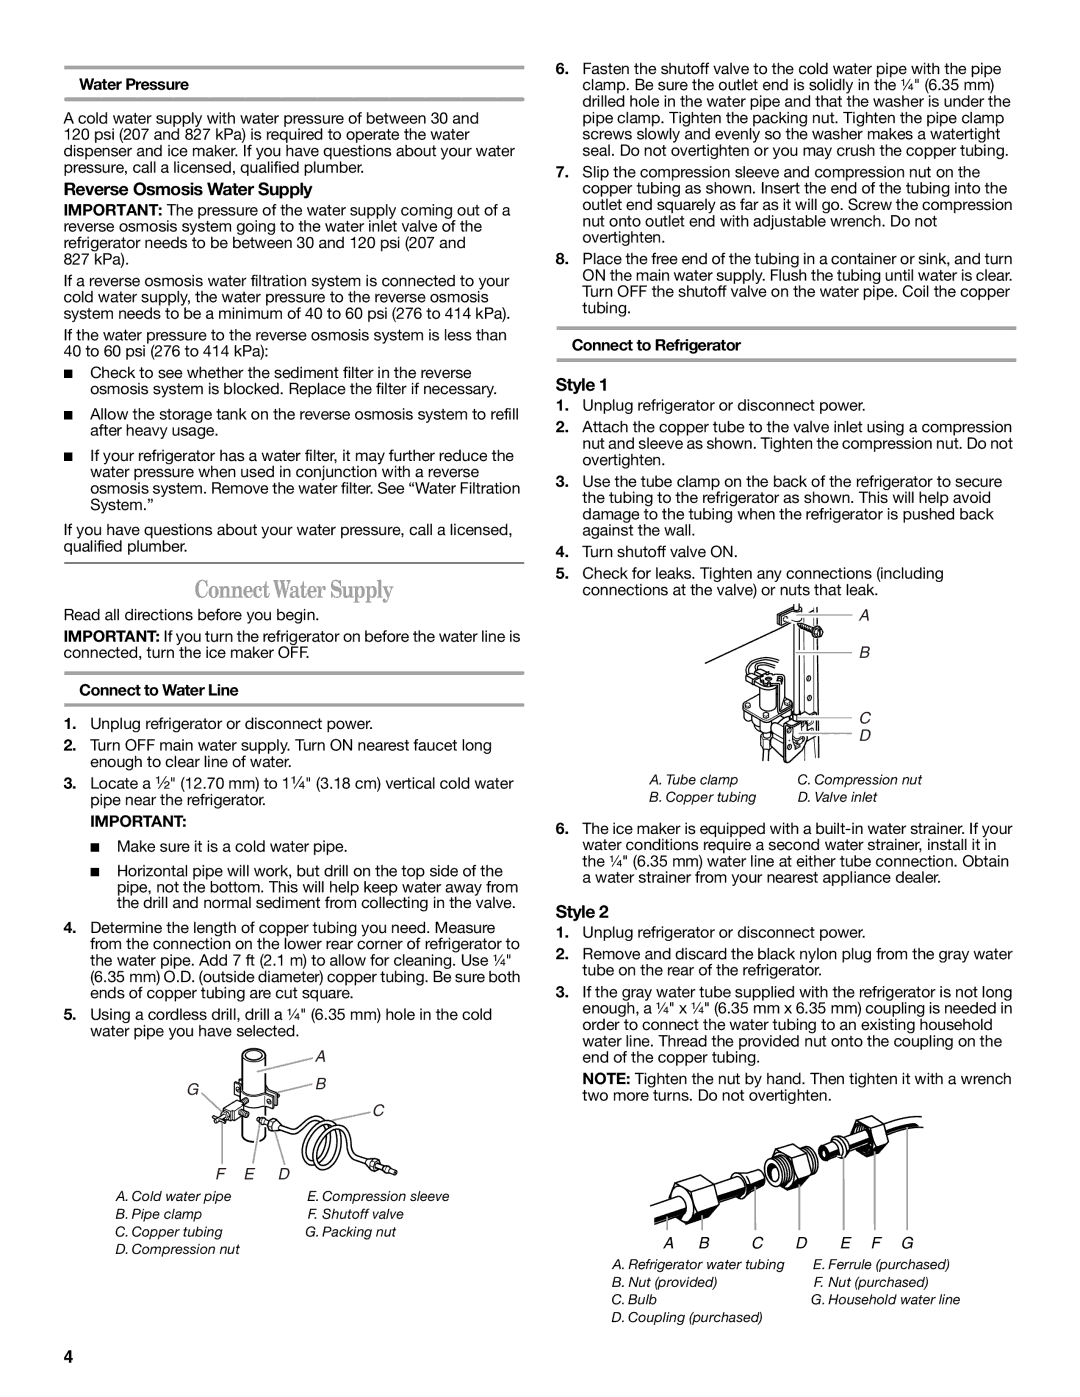
6.Fasten the shutoff valve to the cold water pipe with the pipe clamp. Be sure the outlet end is solidly in the ¹⁄₄" (6.35 mm) drilled hole in the water pipe and that the washer is under the pipe clamp. Tighten the packing nut. Tighten the pipe clamp screws slowly and evenly so the washer makes a watertight seal. Do not overtighten or you may crush the copper tubing.

7.Slip the compression sleeve and compression nut on the copper tubing as shown. Insert the end of the tubing into the outlet end squarely as far as it will go. Screw the compression nut onto outlet end with adjustable wrench. Do not overtighten.

8.Place the free end of the tubing in a container or sink, and turn ON the main water supply. Flush the tubing until water is clear. Turn OFF the shutoff valve on the water pipe. Coil the copper tubing.

Connect to Refrigerator

Style 1

1.Unplug refrigerator or disconnect power.

2.Attach the copper tube to the valve inlet using a compression nut and sleeve as shown. Tighten the compression nut. Do not overtighten.

3.Use the tube clamp on the back of the refrigerator to secure the tubing to the refrigerator as shown. This will help avoid damage to the tubing when the refrigerator is pushed back against the wall.

4.Turn shutoff valve ON.

5.Check for leaks. Tighten any connections (including connections at the valve) or nuts that leak.

A

B

C

D

A. Tube clamp

C. Compression nut

B. Copper tubing

D. Valve inlet

6.The ice maker is equipped with a built-in water strainer. If your water conditions require a second water strainer, install it in the ¹⁄₄" (6.35 mm) water line at either tube connection. Obtain a water strainer from your nearest appliance dealer.

Style 2

1.Unplug refrigerator or disconnect power.

2.Remove and discard the black nylon plug from the gray water tube on the rear of the refrigerator.

3.If the gray water tube supplied with the refrigerator is not long enough, a ¹⁄₄" x ¹⁄₄" (6.35 mm x 6.35 mm) coupling is needed in order to connect the water tubing to an existing household water line. Thread the provided nut onto the coupling on the end of the copper tubing.

NOTE: Tighten the nut by hand. Then tighten it with a wrench two more turns. Do not overtighten.

F E

D


A. Cold water pipe

E. Compression sleeve


B. Pipe clamp

F. Shutoff valve


C. Copper tubing

G. Packing nut

B

C

D

E F G

D. Compression nut

A

A. Refrigerator water tubing


E. Ferrule (purchased)


B. Nut (provided)


F. Nut (purchased)


C. Bulb


G. Household water line


D. Coupling (purchased)


4

Page 4
Image 4
Whirlpool W10162450A, W10162451A installation instructions Connect Water Supply, Reverse Osmosis Water Supply, Style

W10162451A, W10162450A specifications

The Whirlpool W10162450A and W10162451A are premium dishwasher models designed to deliver high performance, durability, and exceptional cleaning results. These dishwashers are equipped with advanced technologies that not only enhance the user experience but also ensure efficient water and energy consumption.

One of the standout features of these models is the Soil Sensor technology, which detects the level of soil on dishes and adjusts the wash cycle accordingly. This ensures that heavily soiled items receive a more intense wash, while lightly soiled dishes can undergo a quicker cycle. This smart feature optimizes cleaning efficiency while conserving water and energy.

Both the W10162450A and W10162451A come equipped with the Adaptive Wash System. This innovative system utilizes multiple wash arms that distribute water evenly throughout the dishwasher. As a result, users can expect a thorough clean, even in hard-to-reach areas. Ensuring that every dish, pot, and pan emerges spotless is a priority for Whirlpool, and these models achieve that effortlessly.

Another notable feature includes the Quiet Partner sound package. Operating at just 47 decibels, these dishwashers are designed to perform quietly in the background, making them ideal for open-plan living spaces or homes where noise is a concern. Users can initiate a wash cycle at any time without disturbing family members or guests.

The W10162450A and W10162451A are also equipped with a third rack, which maximizes loading flexibility. This additional space allows for the placement of small or odd-shaped items, helping to create more room in the lower racks for larger dishware. The adjustable tines and customizable loading options further enhance the versatility of these dishwashers.

Energy efficiency is another key characteristic of these Whirlpool models. They are ENERGY STAR certified, indicating that they meet strict energy efficiency guidelines set by the U.S. Environmental Protection Agency. This not only helps users save on energy bills but also contributes to environmental sustainability.

In summary, the Whirlpool W10162450A and W10162451A dishwashers are equipped with an array of features and technologies that combine to deliver an exceptional dish-cleaning experience. With innovations such as Soil Sensor technology, an Adaptive Wash System, quiet operation, and energy efficiency, these models represent a perfect choice for households seeking quality and performance in their kitchen appliances.