4.Wash stainless steel and painted metal exteriors with a clean sponge or soft cloth and a mild detergent in warm water. Do not use abrasive or harsh cleaners. Dry thoroughly with a soft cloth. For additional protection against damage to painted metal exteriors, apply appliance wax (or auto paste wax) with a clean, soft cloth. Do not wax plastic parts.

NOTE: To keep your Stainless Steel refrigerator looking like new and to remove minor scuffs or marks, it is suggested that you use the manufacturer’s approved Stainless Steel Cleaner & Polish.

IMPORTANT: This cleaner is for Stainless Steel parts only.

Do not allow the Stainless Steel Cleaner & Polish to come into contact with any plastic parts such as the trim pieces, dispenser covers or door gaskets. If accidental contact does occur, clean plastic part with a sponge and mild detergent in warm water. Dry thoroughly with a soft cloth. To order the cleaner, see the “Accessories” section.

5.There is no need for routine condenser cleaning in normal home operating environments. If the environment is particularly greasy or dusty, or there is significant pet traffic in the home, the condenser should be cleaned every 2 to 3 months to ensure maximum efficiency.

If you need to clean the condenser:

Remove the base grille. See “Base Grille” or “Door Removal” section.

Use a vacuum cleaner with a soft brush to clean the grille, the open areas behind the grille and the front surface area of the condenser.

Replace the base grille when finished.

6.Plug in refrigerator or reconnect power.

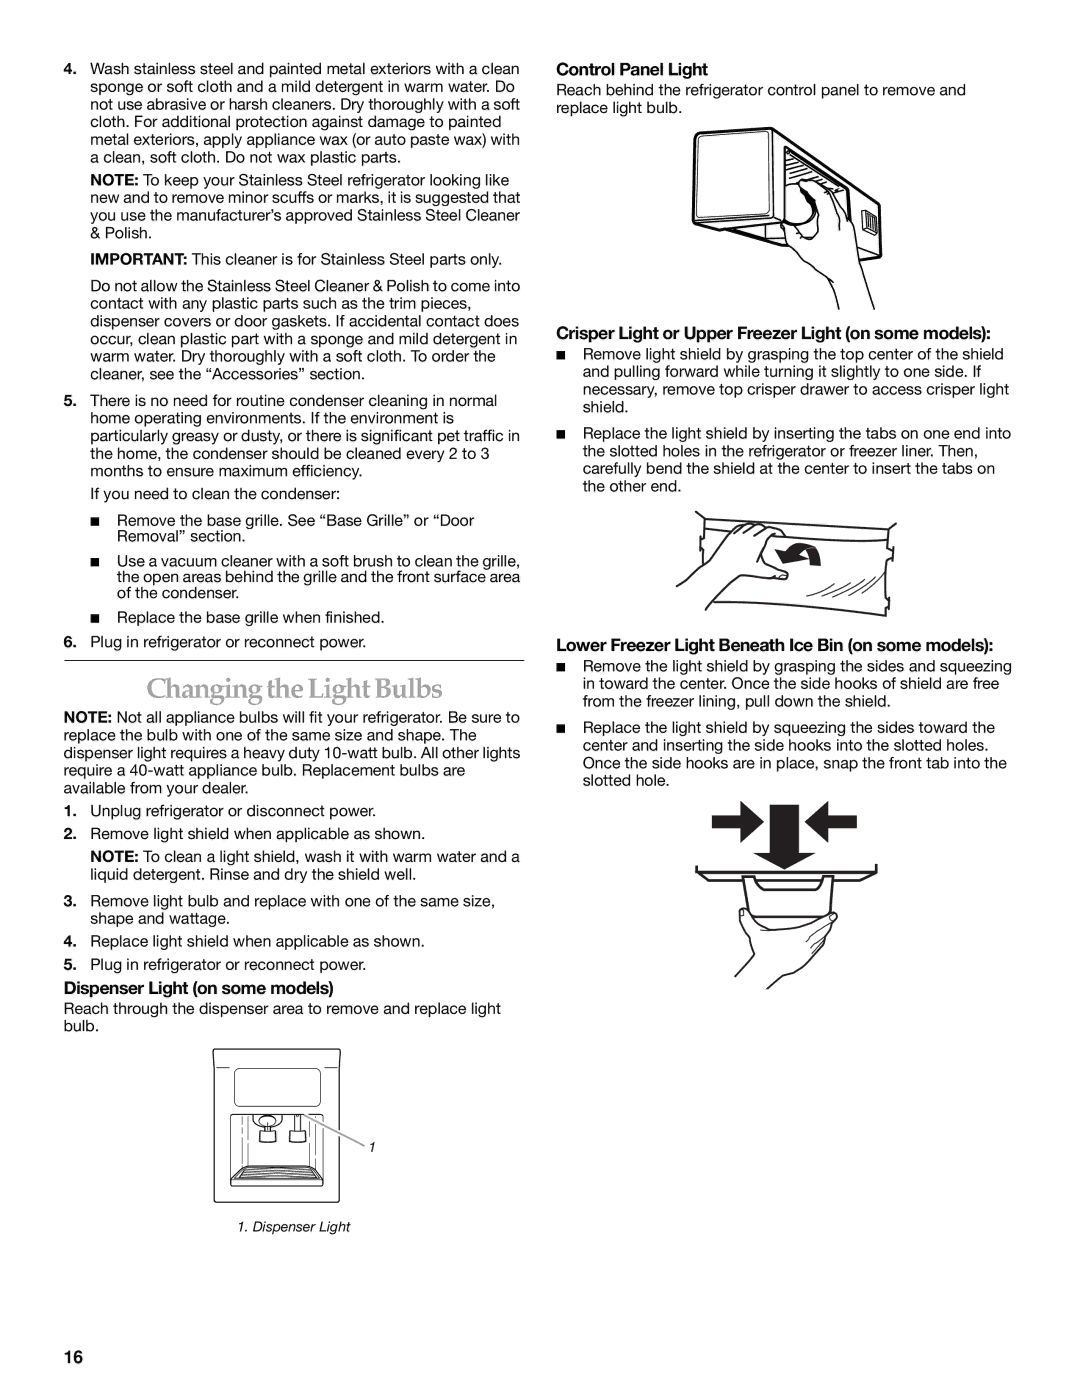
Changing the Light Bulbs

NOTE: Not all appliance bulbs will fit your refrigerator. Be sure to replace the bulb with one of the same size and shape. The dispenser light requires a heavy duty 10-watt bulb. All other lights require a 40-watt appliance bulb. Replacement bulbs are available from your dealer.

1.Unplug refrigerator or disconnect power.

2.Remove light shield when applicable as shown.

NOTE: To clean a light shield, wash it with warm water and a liquid detergent. Rinse and dry the shield well.

3.Remove light bulb and replace with one of the same size, shape and wattage.

4.Replace light shield when applicable as shown.

5.Plug in refrigerator or reconnect power.

Dispenser Light (on some models)

Reach through the dispenser area to remove and replace light bulb.

Control Panel Light

Reach behind the refrigerator control panel to remove and replace light bulb.

Crisper Light or Upper Freezer Light (on some models):

Remove light shield by grasping the top center of the shield and pulling forward while turning it slightly to one side. If necessary, remove top crisper drawer to access crisper light shield.

Replace the light shield by inserting the tabs on one end into the slotted holes in the refrigerator or freezer liner. Then, carefully bend the shield at the center to insert the tabs on the other end.

Lower Freezer Light Beneath Ice Bin (on some models):

Remove the light shield by grasping the sides and squeezing in toward the center. Once the side hooks of shield are free from the freezer lining, pull down the shield.

Replace the light shield by squeezing the sides toward the center and inserting the side hooks into the slotted holes. Once the side hooks are in place, snap the front tab into the slotted hole.

1. Dispenser Light

16

Page 16
Image 16
Whirlpool WF-NL300, WF-NL500 manual Changing the Light Bulbs, Dispenser Light on some models, Control Panel Light

WF-NL500, WF-NL300 specifications

The Whirlpool WF-NL300 and WF-NL500 are innovative washing machines that reflect the brand's commitment to combining performance with efficiency to meet modern laundry needs. These machines are designed with advanced technologies, focusing on user convenience while maintaining exceptional cleaning results.

One of the standout features of both models is their Adaptive Wash Technology. This innovative system automatically senses the size and soil level of the load, adjusting the wash cycle for optimal performance. By customizing water levels, wash action, and cycle duration, these machines not only ensure that clothes come out cleaner but also save on water and energy.

Moreover, the WF-NL300 and WF-NL500 boast a sleek and modern design that fits seamlessly into any laundry space. The intuitive control panel features a user-friendly interface, allowing users to easily select from multiple wash cycles and options. With settings for delicate fabrics, heavy-duty items, and everything in between, these machines can handle a diverse range of laundry tasks.

Another remarkable feature is the Quiet Wash System, which incorporates sound dampening technology to minimize noise during operation. This makes it ideal for households where laundry is done at night or in shared living spaces. Additionally, the Energy Star certification signifies that these models are highly energy-efficient, helping users save on utility bills while contributing to environmental sustainability.

Both washing machines also come equipped with a self-cleaning feature, ensuring the drum stays fresh and free of odors. This is an important aspect that many users appreciate, as it enhances the longevity of the machine and maintains the quality of the laundry.

In terms of capacity, the WF-NL500 offers a larger drum size compared to the WF-NL300, making it suitable for larger households or those with frequent laundry needs. The bigger size doesn’t compromise on washing efficiency; it still ensures powerful cleaning performance.

Overall, the Whirlpool WF-NL300 and WF-NL500 are excellent choices for consumers seeking effective and efficient laundry solutions. With their specialized technologies, thoughtful designs, and user-friendly features, these washing machines are poised to meet the evolving needs of today’s households. Whether you're tackling everyday loads or tackling tough stains, both models exemplify the durability and innovation that Whirlpool is known for in the appliance industry.