WATER DISPOSING OPTIONS
CARE AND MAINTENANCE
OPTION 1, EMPTYING MANUALLY
1.Pull out the bucket, grasping upper and lower handles.
2.Carry the bucket by grasping the inside handle of the bucket.
3.After emptying the bucket, replace the bucket in
the dehumidifier.
NOTE: Dehumidifier will not work when the BUCKET FULL light is on or without the bucket properly placed in the unit.
OPTION 2, GRAVITY DRAIN HOSE
(Garden Hose Not Provided)
1.Take off GRAVITY DRAIN CAP by turning the cap counterclockwise. (Fig.1)
2.Remove DRAIN CONNECTOR from the bucket. (Fig.2)
3.Next, screw the DRAIN CONNECTOR to a standard garden hose by turning clockwise. (Fig.3)
4.Reattach the DRAIN CONNECTOR end of garden hose to the dehumidifier (Fig.4) then check hose for kinks or obstructions. The position of the hose at the floor drain must be lower than
DRAIN CONNECTOR.
5.Keep the DRAIN CAP for future use when emptying bucket manually.
OPTION 3, PUMP DRAIN
1.Remove the PUMP DRAIN CAP by turning clockwise (Reverse thread). (Fig.1)
2.Remove the
Keep the DRAIN CAP and PLUG for future use.
3.Feed the
4.Insert the end of hose into the drain hole (Fig.4), then screw DRAIN CAP back onto the unit. Place the other end of the hose in the location you want the water to go: to a floor drain, a water container, or through a basement window to the outdoors.
(Pump can lift water up to 15 feet above the unit.)
Check hose for kinks or other obstruction. Make sure end of hose will not be submerged in water as this may cause a backflow into the unit and cause a leak.
Pressing
Fig.1Fig.2
Fig.3Fig.4
![]() WARNING
WARNING
•Disconnect power supply cord from receptacle before performing any maintenance.
Fig.1Fig.2
Fig.3Fig.4
CLEANING FRONT GRILLS AND AIR FILTER
1.Remove front grill by pulling out bottom towards you (Fig.1). Then hold the top of the grill and lift up gently to remove grill completely (Fig.2).
2.Pull the bottom of the filter out and lift the filter out (Fig.3).
CLEANING THE EXTERIOR
Clean the exterior using a soft brush or dry towel. But do not spray water directly on the exterior.
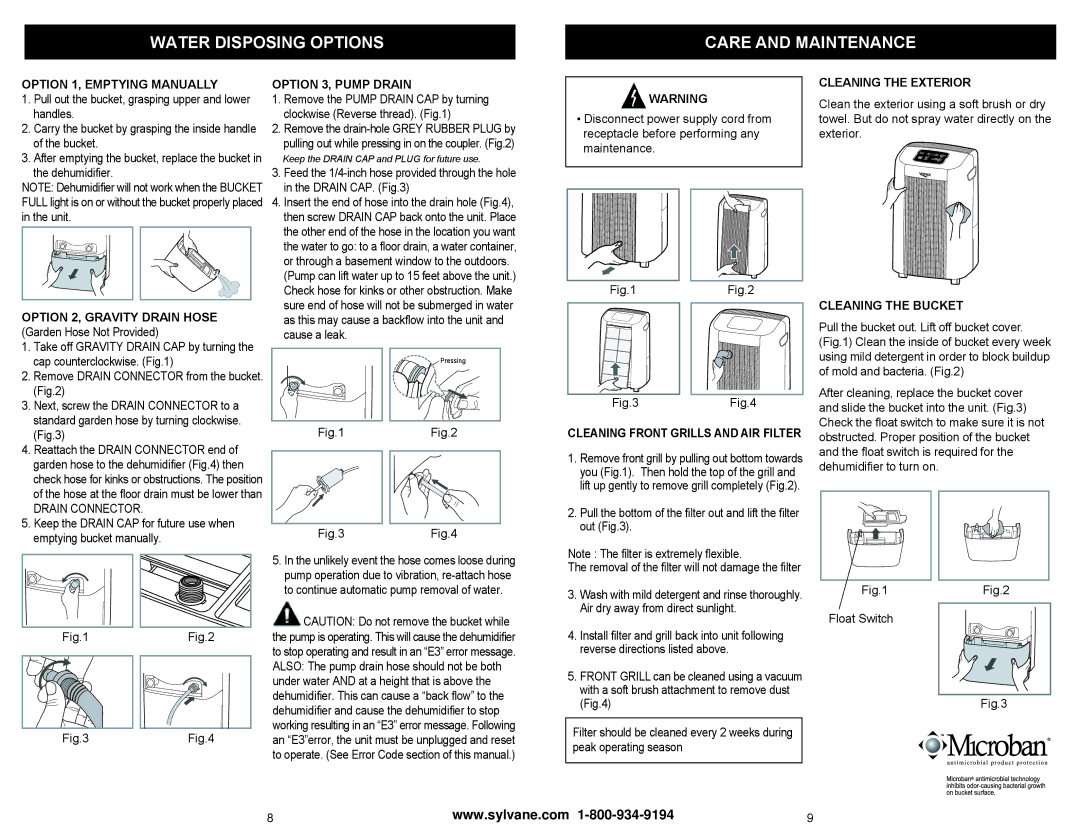
CLEANING THE BUCKET
Pull the bucket out. Lift off bucket cover. (Fig.1) Clean the inside of bucket every week using mild detergent in order to block buildup of mold and bacteria. (Fig.2)
After cleaning, replace the bucket cover and slide the bucket into the unit. (Fig.3) Check the float switch to make sure it is not obstructed. Proper position of the bucket and the float switch is required for the dehumidifier to turn on.
Fig.1Fig.2
Fig.3Fig.4
5.In the unlikely event the hose comes loose during pump operation due to vibration,
![]() CAUTION: Do not remove the bucket while the pump is operating. This will cause the dehumidifier to stop operating and result in an “E3” error message. ALSO: The pump drain hose should not be both under water AND at a height that is above the dehumidifier. This can cause a “back flow” to the dehumidifier and cause the dehumidifier to stop working resulting in an “E3” error message. Following an “E3”error, the unit must be unplugged and reset to operate. (See Error Code section of this manual.)
CAUTION: Do not remove the bucket while the pump is operating. This will cause the dehumidifier to stop operating and result in an “E3” error message. ALSO: The pump drain hose should not be both under water AND at a height that is above the dehumidifier. This can cause a “back flow” to the dehumidifier and cause the dehumidifier to stop working resulting in an “E3” error message. Following an “E3”error, the unit must be unplugged and reset to operate. (See Error Code section of this manual.)
Note : The filter is extremely flexible.
The removal of the filter will not damage the filter
3.Wash with mild detergent and rinse thoroughly. Air dry away from direct sunlight.
4.Install filter and grill back into unit following reverse directions listed above.
5.FRONT GRILL can be cleaned using a vacuum with a soft brush attachment to remove dust (Fig.4)
Filter should be cleaned every 2 weeks during peak operating season
Fig.1Fig.2
Float Switch
Fig.3
8 | www.sylvane.com | 9 |