Xantech installation instructions Connecting the PA1235, Stereo Mode Connections

Models: PA1235

1 16
Download 16 pages 23.11 Kb
Page 8
Image 8

2.If mounted in an equipment cabinet or other confining location, allow at least 2 inches of space above the top cover (see Fig. 4). Be sure there are large openings in the shelf below the unit and in the cabinet to allow the entry of cool air and the escape of warm air.

3.If the cabinet contains other heat generating components or you are using several PA1235's in a large multi-zone system, you will have to pay even closer attention to adequate ventilation.

4.Do not hesitate to use fans (quiet, boxer type), if necessary, to ensure a constant flow of air through the PA1235's and the other heat generating components.

5.When mounting in a 19" (483mm) rack, adding a single RU (Rack Unit) above and below the PA1235 will improve convection in heavy use applications.

[One Rack Unit size = 1-3/4" (44.5mm) in height].

6.The PA1235 will operate when mounted either horizontally or vertically. Horizontal placement is preferred, however, since it will run approximately 5% to 10% cooler when so oriented.

7.In multi-zone installations, you will have large bundles of wire and cable to accommodate audio, video and speaker connec- tions. Be sure to allow enough room for the leads and dress them in such a manner so as not to block airflow.

VIDEO

L

AUDIO

R

1

Preamp Outputs

ZPR68, etc.

RCA Type

Patch Cords

8.The PA1235 is designed for mounting into standard 19" Rack Panels or on flat horizontal surfaces. When mounting into a 19" rack, use the rack panel cup washers and screws supplied.

NOTE: You should consider some sort of rear support for rack mounted units when used in mobile applications or when located in seismically-active areas.

CONNECTING THE PA1235

When making connections to the PA1235 be sure the power cord is unplugged. Proceed as follows:

Stereo Mode Connections

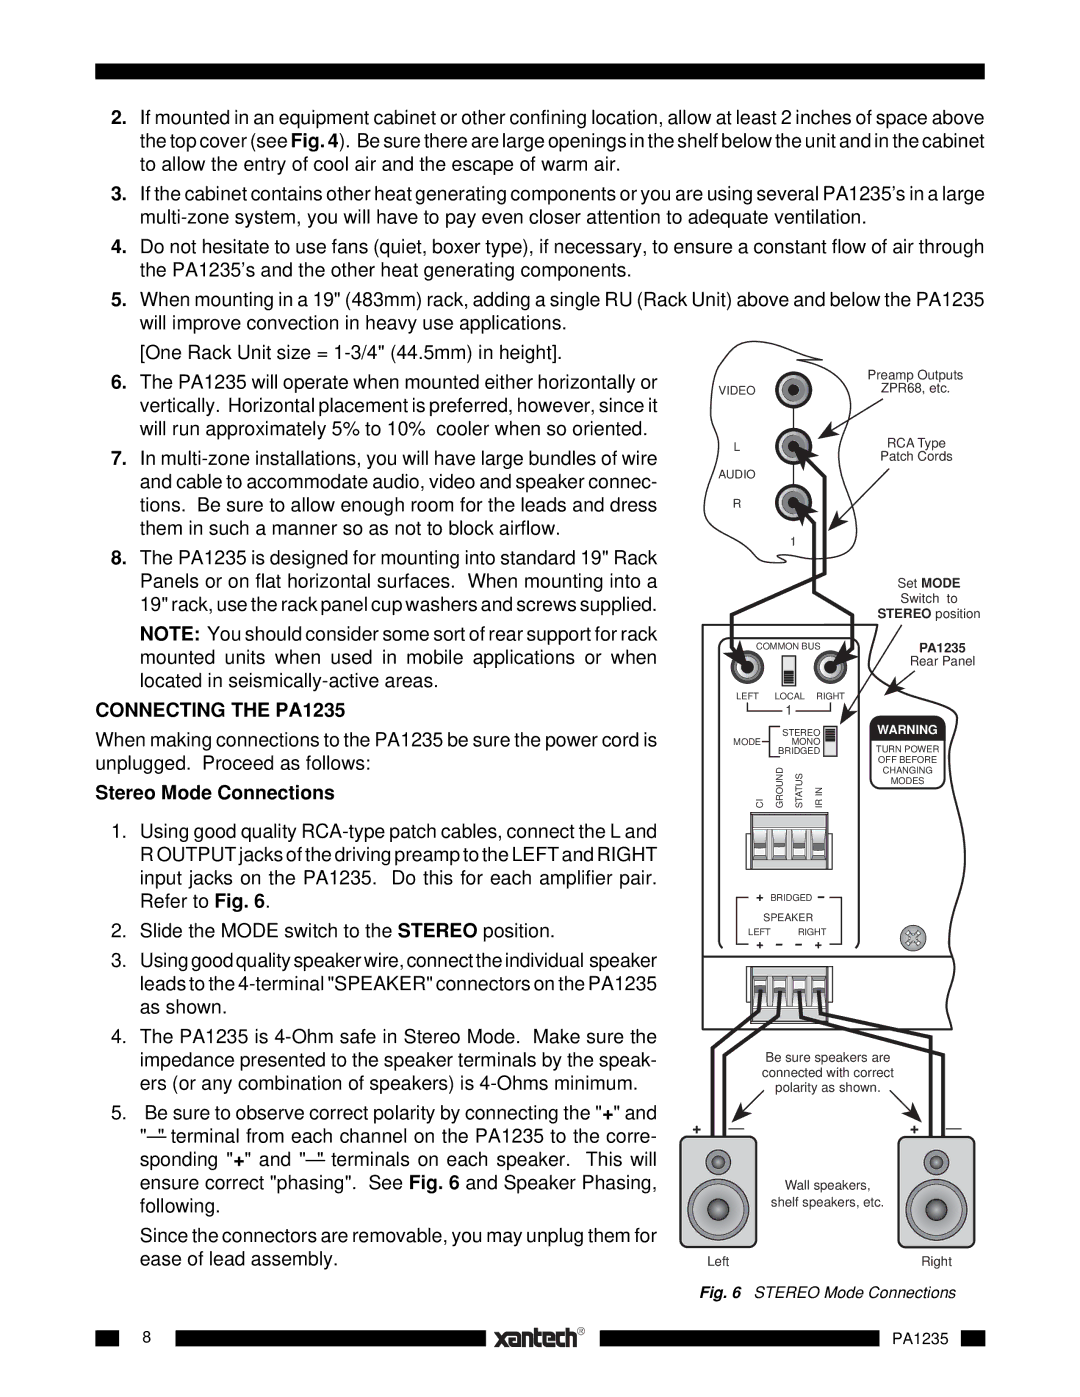
1.Using good quality RCA-type patch cables, connect the L and R OUTPUT jacks of the driving preamp to the LEFT and RIGHT input jacks on the PA1235. Do this for each amplifier pair. Refer to Fig. 6.

2.Slide the MODE switch to the STEREO position.

3.Using good quality speaker wire, connect the individual speaker leads to the 4-terminal "SPEAKER" connectors on the PA1235 as shown.

4.The PA1235 is 4-Ohm safe in Stereo Mode. Make sure the impedance presented to the speaker terminals by the speak- ers (or any combination of speakers) is 4-Ohms minimum.

5.Be sure to observe correct polarity by connecting the "+" and "" terminal from each channel on the PA1235 to the corre- sponding "+" and "" terminals on each speaker. This will ensure correct "phasing". See Fig. 6 and Speaker Phasing, following.

Since the connectors are removable, you may unplug them for ease of lead assembly.


®

8


Set MODE


Switch to


STEREO position

COMMON BUS

PA1235


Rear Panel

LEFT

LOCAL

RIGHT


1


STEREO

WARNING

MODE


MONO

TURN POWER


BRIDGED


OFF BEFORE

CI

GROUND

STATUS

INIR

CHANGING

MODES

+

BRIDGED --


SPEAKER

LEFT RIGHT

+ -- -- +

Be sure speakers are connected with correct polarity as shown.

+

+

Wall speakers,

shelf speakers, etc.

Left

Right

Fig. 6 STEREO Mode Connections

PA1235

Page 8
Image 8
Xantech installation instructions Connecting the PA1235, Stereo Mode Connections

PA1235 specifications

The Xantech PA1235 is a cutting-edge multi-zone power amplifier designed for both residential and commercial audio applications. Renowned for its impressive performance and reliability, the PA1235 offers robust amplification for distributed audio systems, fulfilling various audio needs in different environments.

One of the main features of the PA1235 is its power handling capabilities. It delivers 35 watts per channel across six channels, ensuring that every zone in a multi-room setup receives adequate power for optimal sound quality. This makes it suitable for powering a variety of speaker types, from in-ceiling speakers to outdoor sound systems. Its architecture allows flexibility in system configuration, making it easy to distribute audio throughout a home or business.

The PA1235 employs advanced Class D amplification technology, which maximizes efficiency while reducing power consumption and heat generation. This not only makes the amplifier more environmentally friendly but also enhances longevity and reliability. The lightweight design of Class D amplifiers allows for easier installation, especially in complex multi-zone environments.

Another characteristic of the PA1235 is its multi-zone functionality. Users can easily assign audio sources to different zones, allowing for personalized control of audio in various spaces. This feature is particularly valuable in commercial settings, where different areas may require distinct audio content or volume levels. It offers seamless integration with existing automation systems, thanks to its compatibility with various control protocols, facilitating a user-friendly experience.

The amplifier also features adjustable gain controls for each channel, allowing users to fine-tune the audio output for different speaker types or acoustic environments. Additionally, the built-in protection circuitry ensures that both the amplifier and attached speakers are safeguarded from overload or short-circuit situations, thereby enhancing overall system durability.

With its combination of power, efficiency, and versatility, the Xantech PA1235 is an ideal choice for integrators and audiophiles alike. Whether used in home theaters, restaurant sound systems, or corporate audio solutions, it provides high-quality audio performance that meets the demands of modern audio requirements, making it a prominent player in the audio amplification market.