2 of 2

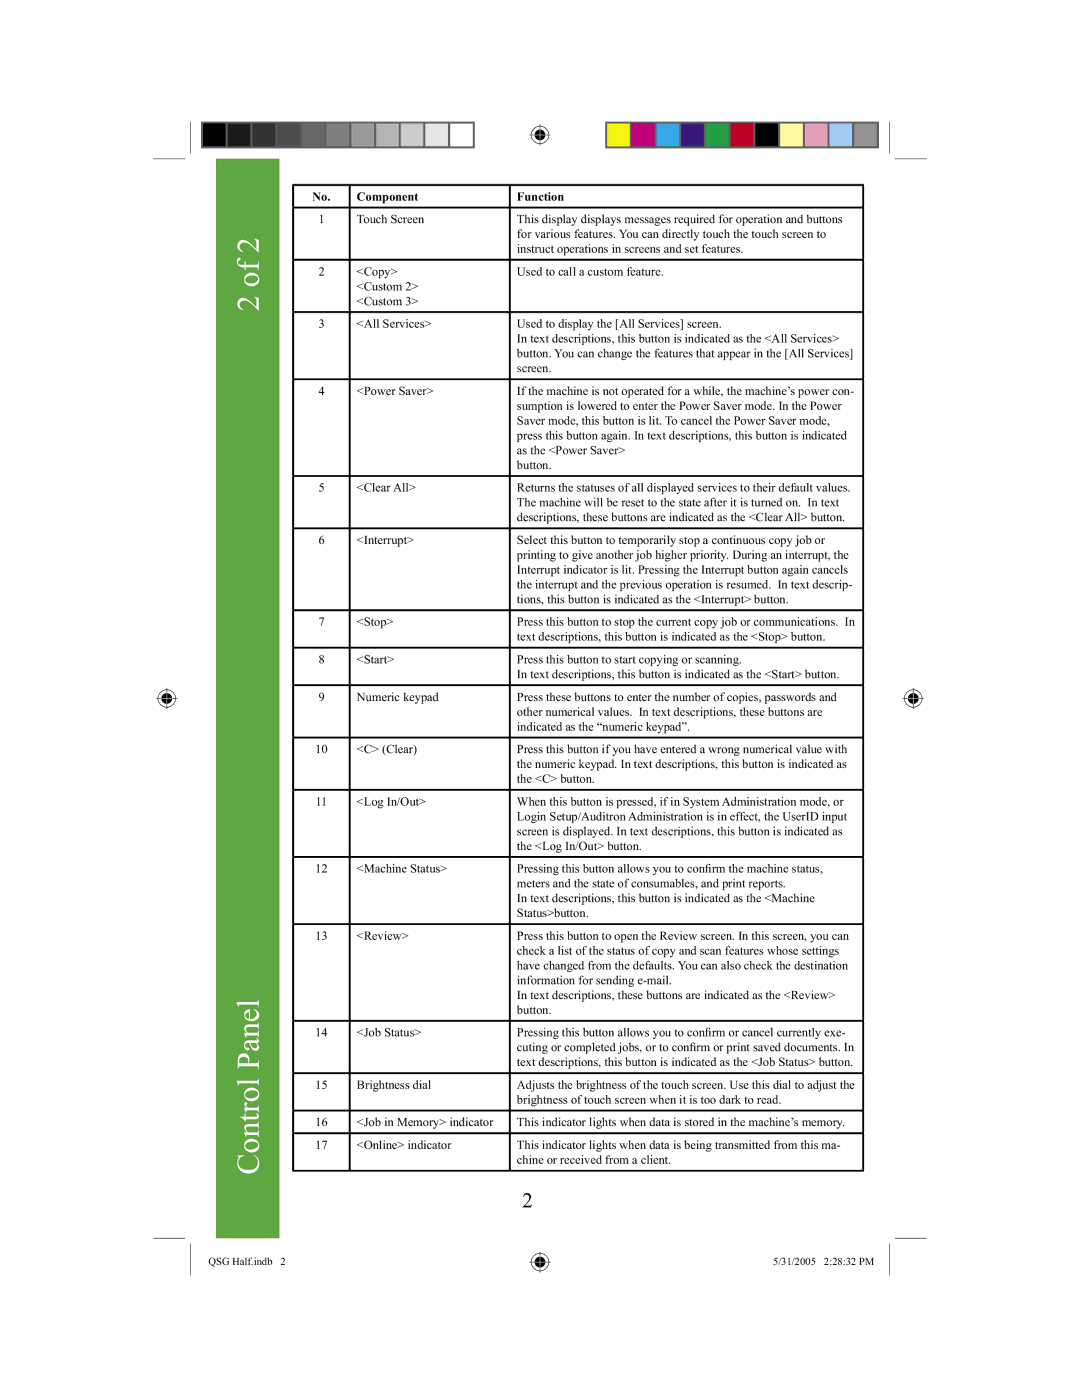
Control Panel


No.

Component

Function


1


Touch Screen

This display displays messages required for operation and buttons


for various features. You can directly touch the touch screen to


instruct operations in screens and set features.


2


<Copy>

Used to call a custom feature.


<Custom 2>


<Custom 3>


3


<All Services>

Used to display the [All Services] screen.


In text descriptions, this button is indicated as the <All Services>


button. You can change the features that appear in the [All Services]


screen.


4


<Power Saver>

If the machine is not operated for a while, the machine’s power con-


sumption is lowered to enter the Power Saver mode. In the Power


Saver mode, this button is lit. To cancel the Power Saver mode,


press this button again. In text descriptions, this button is indicated


as the <Power Saver>


button.


5


<Clear All>

Returns the statuses of all displayed services to their default values.


The machine will be reset to the state after it is turned on. In text


descriptions, these buttons are indicated as the <Clear All> button.


6


<Interrupt>

Select this button to temporarily stop a continuous copy job or


printing to give another job higher priority. During an interrupt, the


Interrupt indicator is lit. Pressing the Interrupt button again cancels


the interrupt and the previous operation is resumed. In text descrip-


tions, this button is indicated as the <Interrupt> button.


7


<Stop>

Press this button to stop the current copy job or communications. In


text descriptions, this button is indicated as the <Stop> button.


8


<Start>

Press this button to start copying or scanning.


In text descriptions, this button is indicated as the <Start> button.


9


Numeric keypad

Press these buttons to enter the number of copies, passwords and


other numerical values. In text descriptions, these buttons are


indicated as the “numeric keypad”.


10

<C> (Clear)

Press this button if you have entered a wrong numerical value with


the numeric keypad. In text descriptions, this button is indicated as


the <C> button.


11

<Log In/Out>

When this button is pressed, if in System Administration mode, or


Login Setup/Auditron Administration is in effect, the UserID input


screen is displayed. In text descriptions, this button is indicated as


the <Log In/Out> button.


12

<Machine Status>

Pressing this button allows you to confirm the machine status,


meters and the state of consumables, and print reports.


In text descriptions, this button is indicated as the <Machine


Status>button.


13

<Review>

Press this button to open the Review screen. In this screen, you can


check a list of the status of copy and scan features whose settings


have changed from the defaults. You can also check the destination


information for sending e-mail.


In text descriptions, these buttons are indicated as the <Review>


button.


14

<Job Status>

Pressing this button allows you to confirm or cancel currently exe-


cuting or completed jobs, or to confirm or print saved documents. In


text descriptions, this button is indicated as the <Job Status> button.


15

Brightness dial

Adjusts the brightness of the touch screen. Use this dial to adjust the


brightness of touch screen when it is too dark to read.


16

<Job in Memory> indicator

This indicator lights when data is stored in the machine’s memory.


17

<Online> indicator

This indicator lights when data is being transmitted from this ma-


chine or received from a client.


2


QSG Half.indb 2

5/31/2005 2:28:32 PM

Page 4
Image 4
Xerox 240, 250 quick start Control Panel

250, 240 specifications

The Xerox 250 and 240 were groundbreaking models in the realm of photocopying during the 1960s, marking significant advancements in office technology. Introduced in an era where duplication of documents was cumbersome and time-consuming, these machines revolutionized the way businesses managed paperwork.

The Xerox 250, launched in 1959, was particularly notable for introducing the process of electrophotography, also known as xerography. This technology allowed for the first-time automated copying, making it faster and more efficient than previous methods. The machine utilized a photoconductive drum, which played a crucial role in transforming light images from the original document into a copy. The drum would become electrically charged, allowing toner particles to adhere to specific areas, thus creating an accurate replica of the original.

In contrast, the Xerox 240, which followed, boasted enhanced features and improvements in speed and quality. The 240 model was designed to cater to the increasing demands of offices seeking efficient document duplication. One of its standout characteristics was its ability to produce multiple copies in a shorter time frame, an essential feature for busy workplaces. Moreover, the Xerox 240 featured a more user-friendly interface, promoting ease of use for all levels of staff.

Both models emphasized reliability and adaptability in various office environments. They were capable of handling different sizes of paper and types of documents, from standard letter-sized sheets to larger formats. Additionally, the machines incorporated advanced technologies for better image quality, ensuring that even fine details were preserved in the duplication process.

Furthermore, the durability of these Xerox machines contributed to their popularity. Built with robust materials, they could withstand the rigors of daily use, making them a long-term investment for businesses. Maintenance was also relatively straightforward, allowing offices to keep their machines operating efficiently without excessive downtime.

Overall, the Xerox 250 and 240 represented a significant leap forward in photocopy technology, paving the way for future innovations. Their introduction not only streamlined office processes but also set new industry standards for quality and efficiency in document management. With their advanced features and reliable performance, these models left a lasting impact on how businesses viewed and utilized photocopying, making them icons of their time.