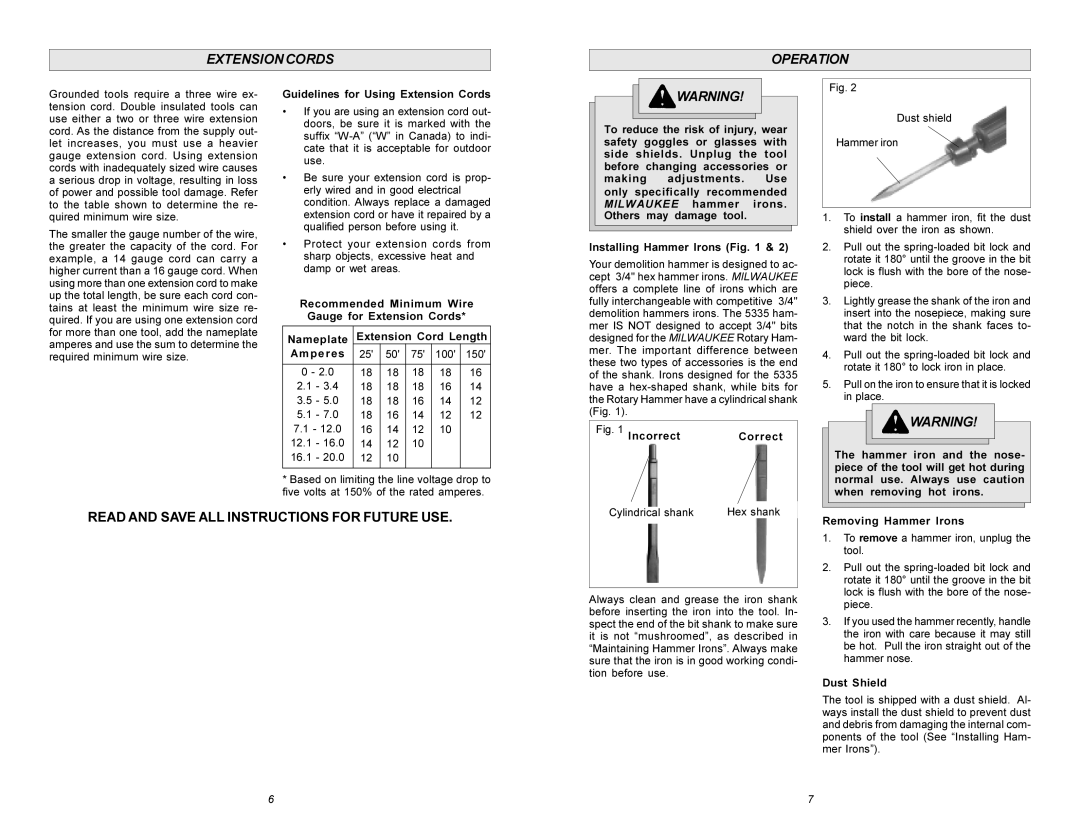
Xerox 5335 Extension Cords Operation, Guidelines for Using Extension Cords, Removing Hammer Irons

Models: 5335

1 17
Download 17 pages 28.72 Kb
Page 4
Image 4

EXTENSION CORDS

OPERATION

Grounded tools require a three wire ex- tension cord. Double insulated tools can use either a two or three wire extension cord. As the distance from the supply out- let increases, you must use a heavier gauge extension cord. Using extension cords with inadequately sized wire causes a serious drop in voltage, resulting in loss of power and possible tool damage. Refer to the table shown to determine the re- quired minimum wire size.

The smaller the gauge number of the wire,

Guidelines for Using Extension Cords

• If you are using an extension cord out-

doors, be sure it is marked with the

suffix “W-A” (“W” in Canada) to indi-

cate that it is acceptable for outdoor

use.

• Be sure your extension cord is prop-

erly wired and in good electrical

condition. Always replace a damaged

extension cord or have it repaired by a

qualified person before using it.

the greater the capacity of the cord. For example, a 14 gauge cord can carry a higher current than a 16 gauge cord. When using more than one extension cord to make up the total length, be sure each cord con- tains at least the minimum wire size re- quired. If you are using one extension cord for more than one tool, add the nameplate amperes and use the sum to determine the required minimum wire size.

• Protect your extension cords from

sharp objects, excessive heat and

damp or wet areas.

Recommended Minimum Wire Gauge for Extension Cords*

Nameplate

Extension Cord Length

Amperes

25'

50'

75'

100'

150'


0 - 2.0

18

18

18

18

16

2.1

- 3.4

18

18

18

16

14

3.5

- 5.0

18

18

16

14

12

5.1

- 7.0

18

16

14

12

12

7.1 - 12.0

16

14

12

10


12.1

- 16.0

14

12

10


16.1

- 20.0

12

10


*Based on limiting the line voltage drop to five volts at 150% of the rated amperes.

WARNING!

To reduce the risk of injury, wear safety goggles or glasses with side shields. Unplug the tool before changing accessories or making adjustments. Use only specifically recommended MILWAUKEE hammer irons. Others may damage tool.

Fig. 2

Dust shield

Hammer iron

1.To install a hammer iron, fit the dust shield over the iron as shown.

Installing Hammer Irons (Fig. 1 & 2)

Your demolition hammer is designed to ac- cept 3/4" hex hammer irons. MILWAUKEE offers a complete line of irons which are fully interchangeable with competitive 3/4" demolition hammers irons. The 5335 ham- mer IS NOT designed to accept 3/4" bits designed for the MILWAUKEE Rotary Ham- mer. The important difference between these two types of accessories is the end of the shank. Irons designed for the 5335 have a hex-shaped shank, while bits for the Rotary Hammer have a cylindrical shank (Fig. 1).

Fig. 1 Incorrect

Correct

2.Pull out the spring-loaded bit lock and rotate it 180° until the groove in the bit lock is flush with the bore of the nose- piece.

3.Lightly grease the shank of the iron and insert into the nosepiece, making sure that the notch in the shank faces to- ward the bit lock.

4.Pull out the spring-loaded bit lock and rotate it 180° to lock iron in place.

5.Pull on the iron to ensure that it is locked in place.

WARNING!

The hammer iron and the nose- piece of the tool will get hot during normal use. Always use caution when removing hot irons.

READ AND SAVE ALL INSTRUCTIONS FOR FUTURE USE.


Hex shank

Cylindrical shank


Always clean and grease the iron shank before inserting the iron into the tool. In- spect the end of the bit shank to make sure it is not “mushroomed”, as described in “Maintaining Hammer Irons”. Always make sure that the iron is in good working condi- tion before use.

Removing Hammer Irons

1.To remove a hammer iron, unplug the tool.

2.Pull out the spring-loaded bit lock and rotate it 180° until the groove in the bit lock is flush with the bore of the nose- piece.

3.If you used the hammer recently, handle the iron with care because it may still be hot. Pull the iron straight out of the hammer nose.

Dust Shield

The tool is shipped with a dust shield. Al- ways install the dust shield to prevent dust and debris from damaging the internal com- ponents of the tool (See “Installing Ham- mer Irons”).

6

7

Page 4
Image 4
Xerox 5335 Extension Cords Operation, Guidelines for Using Extension Cords, Installing Hammer Irons, Removing Hammer Irons

5335 specifications

The Xerox 5325, 5330, and 5335 multifunction printers are designed with the modern workplace in mind, offering a blend of versatility, efficiency, and high-quality output. These models are part of the Xerox WorkCentre series, engineered to cater to the diverse needs of small to medium-sized businesses. Each model comes equipped with features that enhance productivity while maintaining ease of use.

The Xerox 5325 is a monochrome multifunction printer that delivers exceptional performance, printing speeds of up to 25 pages per minute (ppm). It features high-quality prints with a resolution of up to 1200 x 1200 dpi, ensuring crisp text and clear graphics. The user interface is streamlined, with a 7-inch color touchscreen, making navigation intuitive. The device offers various connectivity options including USB, Ethernet, and Wi-Fi, enabling users to print from various devices seamlessly.

Upgrading to the Xerox 5330 brings enhanced capabilities, with print speeds reaching 30 ppm. This model retains the same high resolution but incorporates advanced finishing options, such as stapling and hole punching, directly within the printer. The 5330 also supports mobile printing via Apple AirPrint and Google Cloud Print, catering to the increasing demand for flexibility in document management. Its robust security features help safeguard sensitive information, ensuring that only authorized users can access confidential documents.

The Xerox 5335 takes productivity a step further with printing speeds of up to 35 ppm. This model is equipped with even more advanced features, such as a larger paper capacity and duplex printing, which allows for automatic double-sided printing, saving both time and paper. The 5335 also offers enhanced workflow solutions, including integration with cloud storage services, enabling easy access and sharing of documents. Similar to its counterparts, it boasts strong security protocols, making it suitable for environments where data protection is paramount.

All three models utilize Xerox’s PrecisionCore technology, which ensures exceptional quality and reliability in printing. They come with an array of customizable options, enabling businesses to tailor the devices to their specific needs. The energy-efficient design of these printers reduces the overall carbon footprint, aligning with the growing emphasis on sustainability in the office.

In summary, the Xerox 5325, 5330, and 5335 multifunction printers stand out due to their high-speed performance, advanced finishing features, and robust security measures. They cater to the evolving demands of today’s workplaces and are ideal solutions for any business looking to enhance their document workflow.