8 Choose System Connection

Sélectionnez le type de connexion du système

Ethernet

USB

Selezionare la connessione al sistema

Elija una conexión del sistema

Systemverbindung wählen


Escolha conexão com o sistema


Kies de systeemverbinding


Välj systemanslutning


Use Ethernet hub and RJ-45 cables.

A/B USB


7.2

7.3


Utilisez un concentrateur Ethernet et des câbles RJ-45


Utilizzare un hub Ethernet e cavi RJ-45


7.5

Ethernet-Hub und RJ-45-Kabel verwenden


Utilice un concentrador Ethernet y cables RJ-45


Use o hub Ethernet e os cabos RJ-45


7.4


Gebruik een Ethernet-hub en RJ-45-kabels

For networking information


Använd Ethernet-hubb och RJ-45-sladdar

Pour des informations de mise en réseau


Per informazioni sulla rete


Netzwerkinformationen


Para obtener información de red


Para obter informações sobre a rede

9

Turn On System

9.1

9.2


Voor netwerkinformatie


För nätverksinformation


Mettez le système sous tension


Accendere il sistema


System einschalten


Activa el sistema


Ligue o sistema


9.3


Schakel het systeem in


Slå på systemet


10

Add Ink


Ajoutez de l’encre


Aggiungere inchiostro


Tintenstifte einsetzen


Adición de tinta

10.1


Adicione tinta

10.3


Voeg inkt toe


Fyll på bläck


10.2


1

2

Use only C2424 ink.


Utilisez uniquement de l’encre C2424.


3


Utilizzare solamente inchiostro C2424.


4

Ausschließlich Tinte des Typs C2424 verwenden.


Utilice únicamente tinta C2424.


Use somente a tinta para a C2424.


Gebruik alleen C2424-inkt.


Använd endast C2424-bläck.


C2424.

10.5

10.4

11Load Paper Tray

Chargez le bac papier


Caricare il cassetto della carta


Papier einlegen


Cargue la bandeja de papel


Coloque papel na bandeja

11.1

Plaats papier in lade

Fyll på pappersfack

11.2

11.3

11.4

Adjust guides to paper size. Press to click in place.

Réglez les guides en fonction du format du papier. Appuyez pour enclencher.

Regolare le guide in base al formato carta. Premere per inserire nell'alloggiamento.

Führungen entsprechend dem Papierformat einstellen.

Auf die Führungen drücken, damit sie hörbar einrasten.

Ajuste las guías al tamaño del papel. Presione para hacer clic en el sitio.

Ajuste as guias ao tamanho do papel. Pressione para colocar no lugar (após um clique).

Stel de geleiders af op het papierformaat. Klik ze in de juiste positie.

Justera styrskenorna efter pappersstorleken. Snäpp fast dem.

11.5

12 Select Language


13

Set Date and Time


Sélectionnez la langue


Default language is English.


Réglez la date et l'heure


Selezionare la lingua


Impostare la data e ora


Copy


Print


Copy


Sprache auswählen


Datum und Uhrzeit einstellen


Seleccione el idioma


System Setup


Establece la fecha y hora


System Setup


Information


Information


Selecione o idioma

Scan


System Setup


Defina data e hora

Scan


Configuration Page


Configuration Page


Connection Setup


Connection Setup


Selecteer een taal


General Setup


Stel de datum en tijd in


General Setup


Job Defaults Setup


Job Defaults Setup


Välj språk


Ange datum och tid


Print

System Setup

14Install Printer

and Scan Drivers

Installez les pilotes d'impression et de numérisation


Installare il driver di stampa e di scansione


Drucker- und Scan-Treiber installieren


WorkCentre® C2424

Instale los controladores de impresora y escáner


copier-printer

Software

Instale os drivers da impressora e do scanner


CD-ROM


Installeer de printer- en scannerstuurprogramma's


System Setup


Information

3X

Configuration Page


Connection Setup

Enter

General Setup


Job Defaults Setup


System Setup

General Setup

Configuration générale

Impostazione generale

Allgemeine Einstellungen

Configuración general

Configuração geral

Algemene instellingen Allmänna inställningar

3X

Enter

Installera skrivar- och skannerdrivrutiner

General Setup

Control Panel Setup

System Controls

Front Panel Setup

Control Panel Language...

Control Panel Brightness...

Front Panel Language

English

Espanõl

Français

Deutsch

Italiano

Português

Nederlands

Svenska

Enter

Enter

Enter

Follow prompts


Suivez les instructions à l'écran


Seguire i messaggi di richiesta visualizzati


Aufforderungen befolgen

Back

Siga los indicadores

4X

Siga as solicitações


Aanwijzingen opvolgen


Följ anvisningar

General Setup

System Controls

Commandes du système

Controlli di sistema

Systemsteuerungen

Controles del sistema

Controles do sistema

Systeembesturing Systemkontroller

System Controls

Date and Time

Date et heure

Data e ora

Datum und Uhrzeit

Fecha y hora

Data e hora

Datum en tijd Datum och tid

1X

Enter

3X

Enter

15

15.1


15.2

Quick


Ref


Do not cover vents.

Guideence


r


DoUser


Ne couvrez pas les ouvertures d’aération

cumentat


Non coprire le prese d'aria

CDion-


Bedecken Sie die Lüftungsöffnungen nicht

ROM


Com


plete


No obstruya los orificios de ventilación

Instr


ucti User


Videos

onal

Guide


Deixe livre as passagens de ventilação

Lüftungsöffnungen nicht bedecken

Täck inte ventiler

001-1614-00 RevA

Copyright © 2005 Xerox Corporation. All rights reserved.

www.xerox.com/office/c2424support

Page 2
Image 2
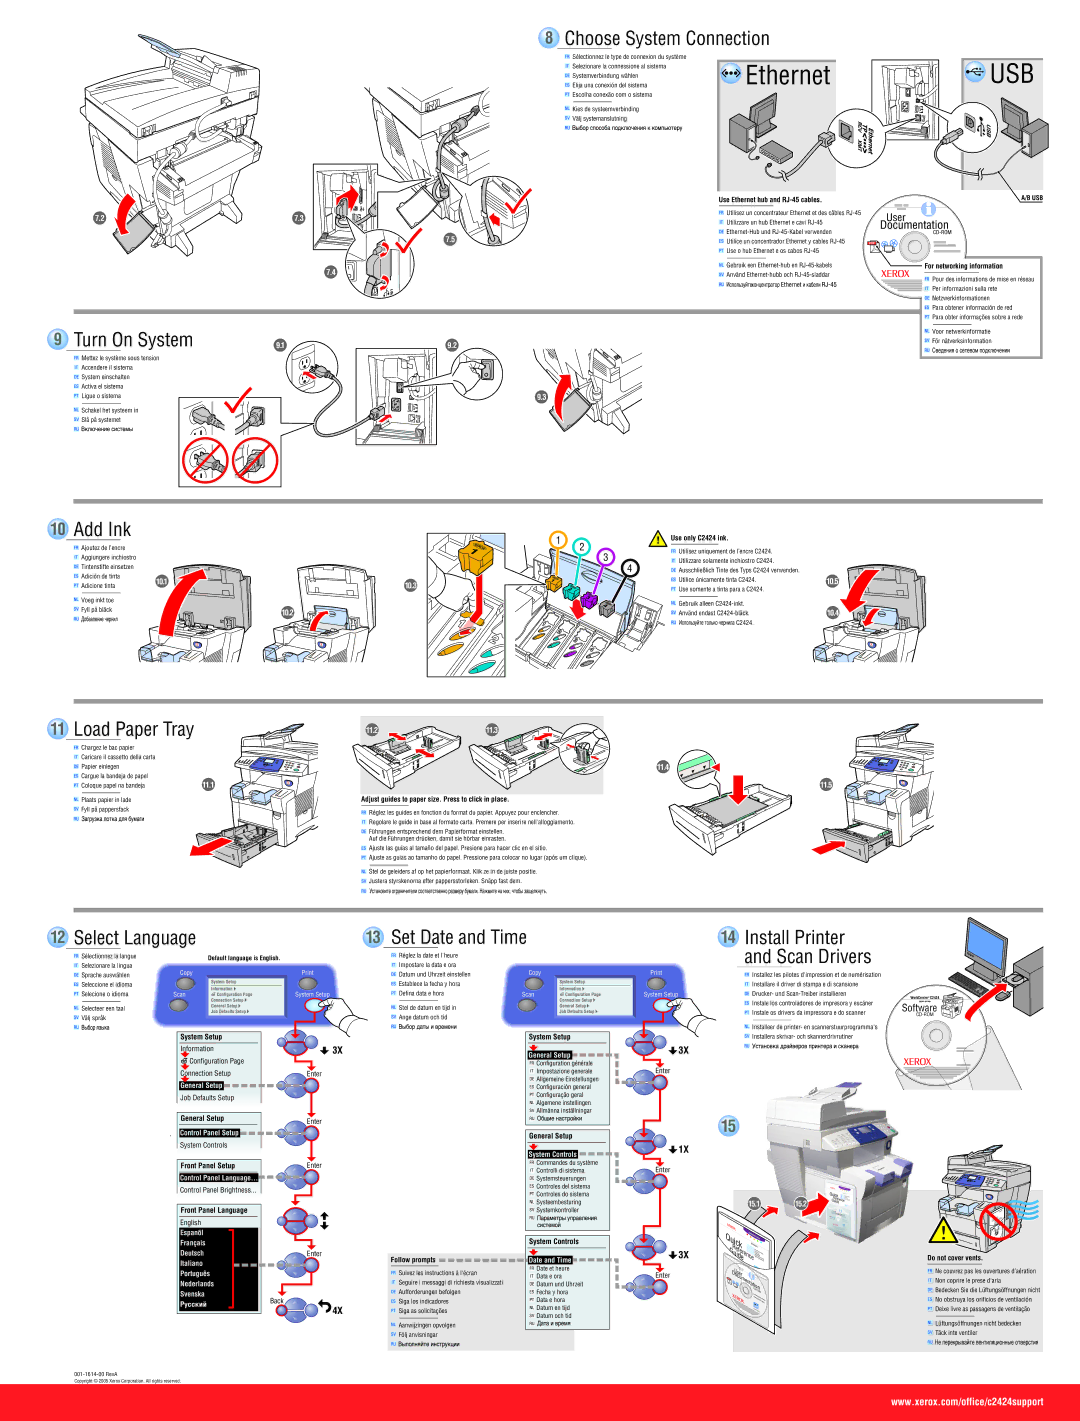
Xerox C2424 setup guide Choose System Connection, Turn On System, Add Ink, Load Paper Tray, Set Date and Time

C2424 specifications

The Xerox 2820/2840 All-in-One (AiO) and C2424 multifunction devices are designed to meet the diverse needs of modern offices and workgroups with a blend of functionality, reliability, and efficiency. Both models are particularly well-suited for small to medium-sized businesses requiring high-quality printing, copying, scanning, and faxing capabilities in a compact footprint.

The Xerox 2820 and 2840 AiO are monochrome models, while the C2424 offers color printing, catering to different business requirements. The 2820 provides print speeds of up to 28 pages per minute (ppm), making it suitable for high-volume tasks. On the other hand, the 2840 supports an impressive maximum print speed of 40 ppm, enabling faster workflow and increased productivity.

At the core of these devices is the advanced printing technology. They utilize a high-resolution printing mechanism that delivers sharp text and detailed graphics, ensuring professional-quality documents every time. The inclusion of automatic duplex printing in both models minimizes paper use and enhances efficiency, making it an eco-friendly choice for businesses.

The scanning capabilities of the Xerox AiOs are robust. Both models feature a flatbed scanner with an automatic document feeder (ADF) for efficient multi-page scanning. With high optical resolution, they ensure that scanned documents retain clarity and detail, whether for archiving or distribution. The C2424's color scanning adds another layer of versatility for businesses that handle various document types.

Faxing is another critical component. The 2820 and 2840 AiOs are equipped with reliable fax functionality that supports quick transmission and reception of documents, enhancing communication efficiency within and outside the organization. Security features, including password-protected printing and secure device access, further enhance the safety of sensitive business information.

Connectivity options are abundant across these devices. Standard USB and Ethernet interfaces allow for easy connection to existing networks, while optional wireless capabilities enable seamless integration with mobile devices. This makes it easier for teams to work collaboratively, regardless of their physical location.

In summary, the Xerox 2820/2840 AiO and C2424 multifunction devices stand out due to their impressive speed, quality print capabilities, and essential features such as scanning and faxing. Designed with user-friendliness in mind, they are equipped with an intuitive control panel and customizable settings, ensuring that businesses can operate with maximum efficiency. These devices embody the modern office's demands, delivering robust performance and versatility for a variety of tasks.