ELECTRIC ACOUSTIC GUITAR Owner’s Manual
SERVICE
Thank you for purchasing the YAMAHA Electric Acoustic Guitar. Incorporating a piezo pickup matched with a condenser micro- phone, this instrument achieves a realistically natural sound never before attained. A newly developed
The guitar's control section is simple, easy to use, and designed to fit any playing style.
In order to make the most of the advanced features and perfor- mance provided by your guitar, please read this manual carefully before using the instrument.
PRECAUTIONS
![]() The output jack is an
The output jack is an
![]() The
The
![]() Always set the VOL. control to “0” when plugging in or unplugging the connection cable.
Always set the VOL. control to “0” when plugging in or unplugging the connection cable.
![]() The battery check indicator (BAT.) will light briefly when a plug is inserted or removed from the output jack. This is normal and does not indicate a malfunction.
The battery check indicator (BAT.) will light briefly when a plug is inserted or removed from the output jack. This is normal and does not indicate a malfunction.
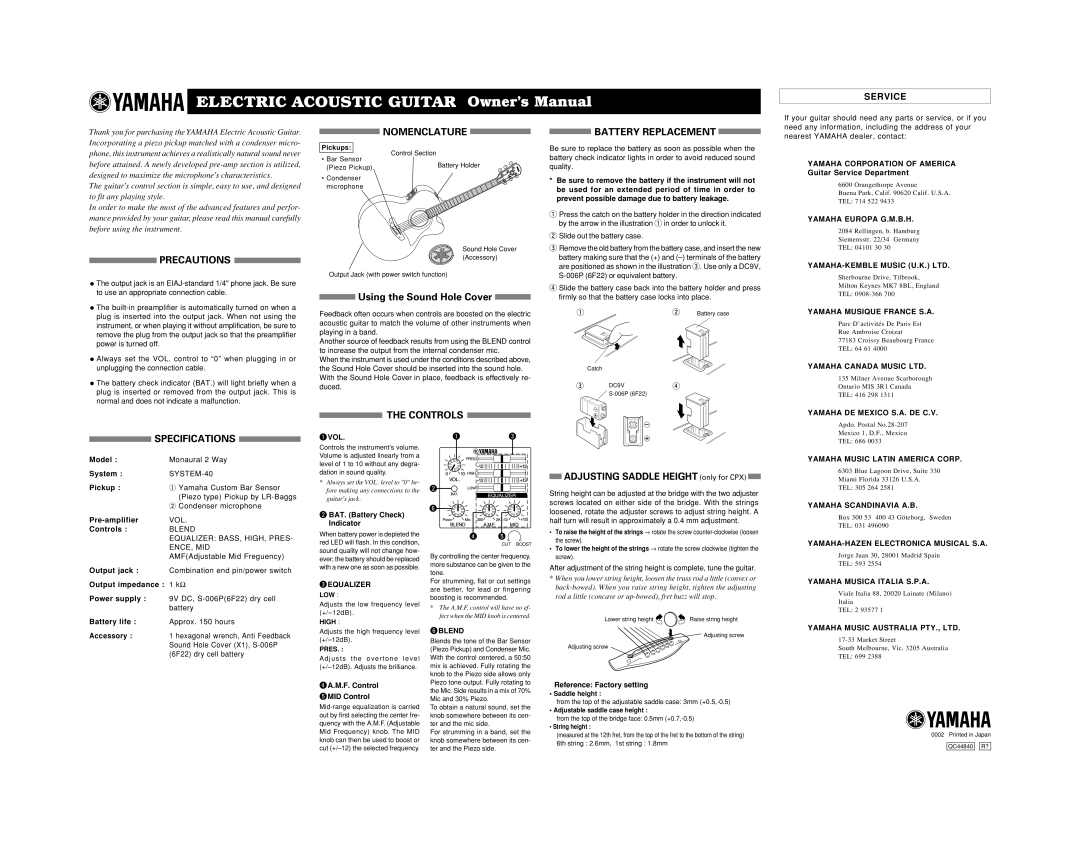
NOMENCLATURE
Pickups: | Control Section | |
• Bar Sensor | ||
Battery Holder | ||
(Piezo Pickup) | ||
|
• Condenser microphone
Sound Hole Cover (Accessory)
Output Jack (with power switch function)
Using the Sound Hole Cover
Feedback often occurs when controls are boosted on the electric acoustic guitar to match the volume of other instruments when playing in a band.
Another source of feedback results from using the BLEND control to increase the output from the internal condenser mic.
When the instrument is used under the conditions described above, the Sound Hole Cover should be inserted into the sound hole. With the Sound Hole Cover in place, feedback is effectively re- duced.
THE CONTROLS
BATTERY REPLACEMENT
Be sure to replace the battery as soon as possible when the battery check indicator lights in order to avoid reduced sound quality.
*Be sure to remove the battery if the instrument will not be used for an extended period of time in order to prevent possible damage due to battery leakage.
qPress the catch on the battery holder in the direction indicated by the arrow in the illustration q in order to unlock it.
wSlide out the battery case.
eRemove the old battery from the battery case, and insert the new battery making sure that the (+) and
rSlide the battery case back into the battery holder and press firmly so that the battery case locks into place.
q |
| w | Battery case |
| OPEN |
| OPEN |
|
|
| |
| Catch |
|
|
e | DC9V | r |
|
|
|
| |
|
|
| OPEN |
If your guitar should need any parts or service, or if you need any information, including the address of your nearest YAMAHA dealer, contact:
YAMAHA CORPORATION OF AMERICA
Guitar Service Department
6600 Orangethorpe Avenue
Buena Park, Calif. 90620 Calif. U.S.A.
TEL: 714 522 9433
YAMAHA EUROPA G.M.B.H.
2084 Rellingen, b. Hamburg Siemensstr. 22/34 Germany TEL: 04101 30 30
Sherbourne Drive, Tilbrook,
Milton Keynes MK7 8BL, England
TEL:
YAMAHA MUSIQUE FRANCE S.A.
Parc D’activités De Paris Est
Rue Ambroise Croizat
77183 Croissy Beaubourg France
TEL: 64 61 4000
YAMAHA CANADA MUSIC LTD.
135 Milner Avenue Scarborough
Ontario MIS 3R1 Canada
TEL: 416 298 1311
YAMAHA DE MEXICO S.A. DE C.V.
Apdo. Postal
| SPECIFICATIONS |
|
|
| |
Model : |
|
|
Monaural 2 Way | ||
System : | ||
Pickup : | q Yamaha Custom Bar Sensor | |
| (Piezo type) Pickup by | |
| w Condenser microphone | |
VOL. | ||
Controls : | BLEND | |
| EQUALIZER: BASS, HIGH, PRES- | |
| ENCE, MID | |
| AMF(Adjustable Mid Freguency) | |
Output jack : Combination end pin/power switch
Output impedance : 1 kΩ
Power supply : 9V DC,
battery
Battery life : | Approx. 150 hours |
Accessory : 1 hexagonal wrench, Anti Feedback Sound Hole Cover (X1),
qVOL.
Controls the instrument's volume. Volume is adjusted linearly from a level of 1 to 10 without any degra- dation in sound quality.
*Always set the VOL. level to "0" be- fore making any connections to the guitar's jack.
w BAT. (Battery Check) Indicator
When battery power is depleted the red LED will flash. In this condition, sound quality will not change how- ever; the battery should be replaced with a new one as soon as possible.
eEQUALIZER
LOW :
Adjusts the low frequency level
HIGH :
Adjusts the high frequency level
PRES. :
A d j u s t s t h e o v e r t o n e l e v e l
rA.M.F. Control
tMID Control
q e
w![]()
y![]()
![]()
![]()
r t![]()
CUT BOOST
By controlling the center frequency, more substance can be given to the tone.
For strumming, flat or cut settings are better, for lead or fingering boosting is recommended.
*The A.M.F. control will have no ef- fect when the MID knob is centered.
yBLEND
Blends the tone of the Bar Sensor (Piezo Pickup) and Condenser Mic. With the control centered, a 50:50 mix is achieved. Fully rotating the knob to the Piezo side allows only Piezo tone output. Fully rotating to the Mic. Side results in a mix of 70% Mic and 30% Piezo.
To obtain a natural sound, set the knob somewhere between its cen- ter and the mic side.
For strumming in a band, set the knob somewhere between its cen- ter and the Piezo side.
ADJUSTING SADDLE HEIGHT (only for CPX)
String height can be adjusted at the bridge with the two adjuster screws located on either side of the bridge. With the strings loosened, rotate the adjuster screws to adjust string height. A half turn will result in approximately a 0.4 mm adjustment.
•To raise the height of the strings → rotate the screw
•To lower the height of the strings → rotate the screw clockwise (tighten the screw).
After adjustment of the string height is complete, tune the guitar.
*When you lower string height, loosen the truss rod a little (convex or
Lower string height ![]()
![]()
![]() Raise string height
Raise string height
Adjusting screw
Adjusting screw
Reference: Factory setting
• Saddle height :
from the top of the adjustable saddle case: 3mm (+0.5,-0.5)
• Adjustable saddle case height :
from the top of the bridge face: 0.5mm (+0.7,-0.5)
• String height :
(measured at the 12th fret, from the top of the fret to the bottom of the string)
6th string : 2.6mm, 1st string : 1.8mm
Mexico 1, D.F., Mexico
TEL: 686 0033
YAMAHA MUSIC LATIN AMERICA CORP.
6303 Blue Lagoon Drive, Suite 330
Miami Florida 33126 U.S.A.
TEL: 305 264 2581
YAMAHA SCANDINAVIA A.B.
Box 300 53 400 43 Göteborg, Sweden
TEL: 031 496090
Jorge Juan 30, 28001 Madrid Spain
TEL: 593 2554
YAMAHA MUSICA ITALIA S.P.A.
Viale Italia 88, 20020 Lainate (Milano)
Italia
TEL: 2 93577 1
YAMAHA MUSIC AUSTRALIA PTY., LTD.
South Melbourne, Vic. 3205 Australia
TEL: 699 2388
0002 Printed in Japan
QC44840 ![]()
![]() R?
R?