Flip seat up and clean the area around the hydraulic oil dipstick to prevent debris from entering the crankcase. See Figure 15.

Remove the hydraulic fill plug/dipstick and read the

level:

If hydraulic oil level is inside operating range, then do nothing.

If hydraulic oil level is below operating range, the add hydraulic oil before operating. Also check for leaks.

If hydraulic oil level is above operating range, then drain excess oil before operating.

Reinstall the dipstick completely into the fill tube.

Adding Hydraulic Oil

WARNING: Never overfill the hydraulic units. Damage can result if the oil level is not within the operating range. When adding hydraulic oil, do so in small quantities and recheck the oil level before adding more.

Place the Z-Series on a level surface and engage the parking brake.

Stop the engine and remove the key from the ignition switch.

Clean the area around the hydraulic oil dipstick to prevent debris from entering the crankcase.

Remove the hydraulic fill plug and insert a clean funnel into the hydraulic fill point. See Figure 15.

Pour proper amount of hydraulic oil level, insert the dipstick, and check the hydraulic oil level.

Draining Hydraulic Oil

Place the Z-Series on a level surface and engage the parking brake.

Stop the engine and remove the key from the ignition switch.

Remove the mower deck. See Removing the Mower Deck section.

Flip seat up and clean the area around the hydraulic oil dipstick to prevent debris from entering the crankcase.

Remove hydraulic fill plug/dipstick.

Place a suitable container (at least 2 gallon) under the hydraulic oil filter.

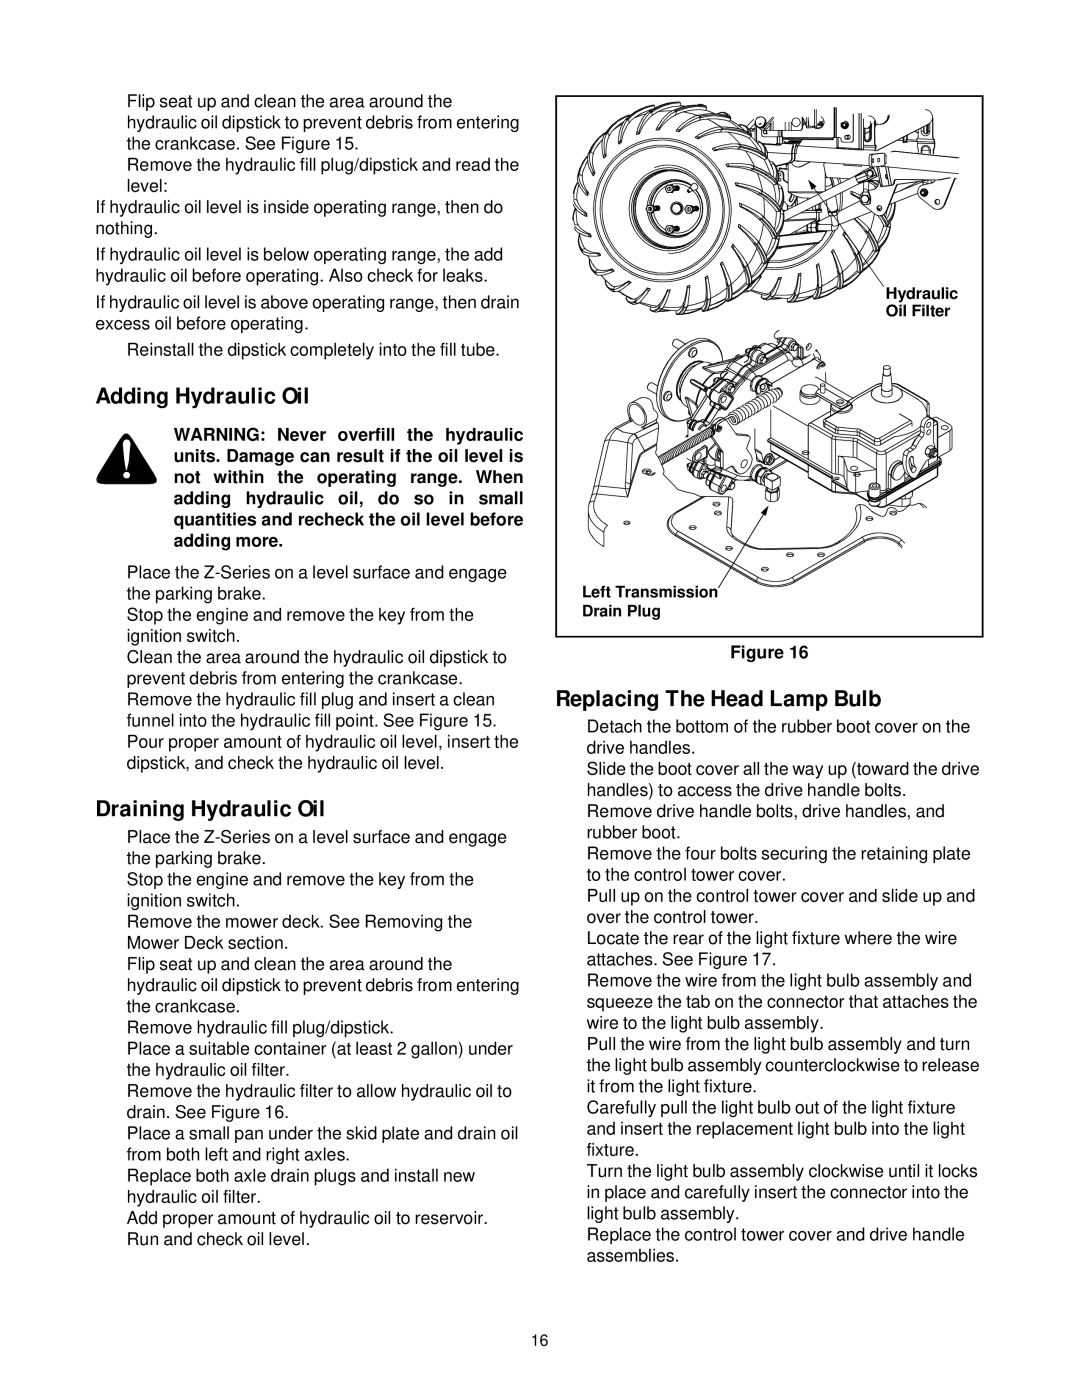
Remove the hydraulic filter to allow hydraulic oil to drain. See Figure 16.

Place a small pan under the skid plate and drain oil from both left and right axles.

Replace both axle drain plugs and install new hydraulic oil filter.

Add proper amount of hydraulic oil to reservoir.

Run and check oil level.

Hydraulic

Oil Filter

Left Transmission

Drain Plug

Figure 16

Replacing The Head Lamp Bulb

Detach the bottom of the rubber boot cover on the drive handles.

Slide the boot cover all the way up (toward the drive handles) to access the drive handle bolts.

Remove drive handle bolts, drive handles, and rubber boot.

Remove the four bolts securing the retaining plate to the control tower cover.

Pull up on the control tower cover and slide up and over the control tower.

Locate the rear of the light fixture where the wire attaches. See Figure 17.

Remove the wire from the light bulb assembly and squeeze the tab on the connector that attaches the wire to the light bulb assembly.

Pull the wire from the light bulb assembly and turn the light bulb assembly counterclockwise to release it from the light fixture.

Carefully pull the light bulb out of the light fixture and insert the replacement light bulb into the light fixture.

Turn the light bulb assembly clockwise until it locks in place and carefully insert the connector into the light bulb assembly.

Replace the control tower cover and drive handle assemblies.

16

Page 16
Image 16
Yard-Man 53AA1A3G401 manual Adding Hydraulic Oil, Draining Hydraulic Oil, Replacing The Head Lamp Bulb

53AA1A3G401 specifications

The Yard-Man 53AA1A3G401 is a standout model in the realm of outdoor lawn care equipment, specifically designed for homeowners seeking efficiency and ease in lawn maintenance. This lawn mower integrates advanced technology and robust features that cater to both novice and experienced users alike.

One of the most impressive aspects of the Yard-Man 53AA1A3G401 is its powerful engine. The mower is equipped with a reliable gas engine that delivers exceptional performance, ensuring it can tackle a variety of grass types and terrains without compromising on power. The engine is designed for easy starting, minimizing the hassle often associated with traditional pull-start models.

At the heart of the Yard-Man 53AA1A3G401 is its cutting system. This mower features a 21-inch cutting deck that provides a wide swath with each pass, significantly reducing mowing time. The deck is constructed from durable materials, ensuring longevity and resistance to wear. Furthermore, the mower boasts adjustable cutting heights, allowing users to customize the grass length according to their preferences.

Another notable characteristic is the self-propulsion feature, which makes maneuvering this mower a breeze. Users can easily navigate around obstacles and tackle slopes without excessive effort, thanks to the adjustable speed settings that cater to varying terrains. This feature is particularly beneficial for larger lawns or uneven surfaces, where control and ease of operation are essential.

In terms of ergonomics, the Yard-Man 53AA1A3G401 is designed with user comfort in mind. The handles are adjustable and equipped with soft grips, reducing fatigue during extended use. Additionally, the mower is relatively lightweight, making it easier to transport and store when not in use.

The Yard-Man 53AA1A3G401 also comes with a robust grass collection system. It includes a spacious rear bag, allowing for efficient grass clippings collection without frequent stops for emptying. This feature keeps lawns tidy and minimizes the need for additional cleanup efforts afterward.

In summary, the Yard-Man 53AA1A3G401 is a well-rounded lawn mower that combines power, efficiency, and user-friendly features. With its strong engine, adaptable cutting deck, self-propulsion capabilities, and ergonomic design, it stands out as an excellent choice for homeowners looking to maintain a healthy, well-manicured lawn with minimal fuss.